You can use the Barracuda Load Balancer ADC to distribute traffic across multiple Barracuda Web Security Gateways in your network. The Barracuda Load Balancer ADC can load balance outgoing Internet traffic across multiple Barracuda Web Security Gateways, so they handle even traffic loads. Alternatively, you can configure the Barracuda Load Balancer ADC to send more traffic to higher performance Barracuda Web Security Gateways, while sending less to lower performance appliances.
Step 1. Deploy the Barracuda Load Balancer ADC and the Barracuda Web Security Gateways in Your Network
The Barracuda Load Balancer ADC and the Barracuda Web Security Gateways are deployed in one-armed mode. Configure all of the Barracuda Web Security Gateways and the Barracuda Load Balancer ADC on the same LAN subnetwork. For more information, see One-Armed Using a TCP Proxy, UDP Proxy, or Layer 7 Service.
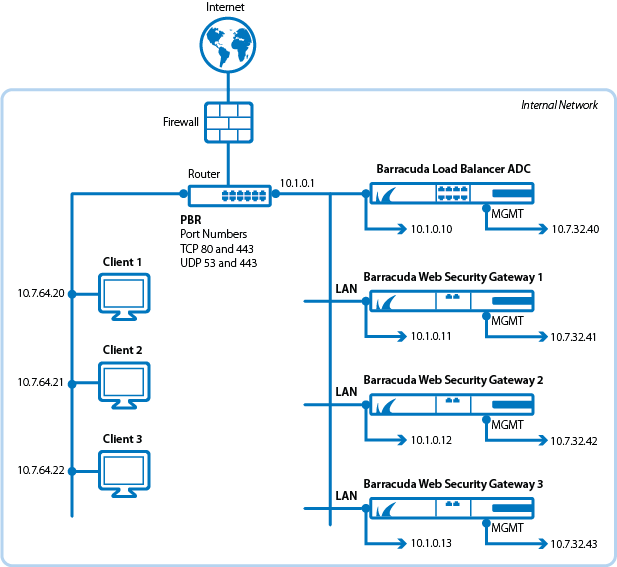
- Interconnect the Barracuda Load Balancer ADC, the Barracuda Web Security Gateways and the Internet-facing firewall or router. The following illustration shows this topology. Be aware of the following:
- Traffic to and from the Internet is sent to the intranet router handling Internet traffic for your organization.
- The Barracuda Load Balancer ADC distributes Internet access requests to two or more Barracuda Web Security Gateways. In the following illustration, the Barracuda Load Balancer ADC and the Barracuda Web Security Gateways send Internet traffic over the 10.1.0.x network.
- Each Barracuda Web Security Gateway applies its own policies to these requests. The Barracuda Web Security Gateway policies should be replicated across each of the Barracuda Web Security Gateways participating in this deployment. By configuring the clustering feature, the Barracuda Web Security Gateways can automatically synchronize their policies. For more information, see High Availability - Linked Management and the Barracuda Web Security Gateway.
- The management ports on the Barracuda Networks appliances should use a separate network from the one load balancing Internet traffic. In the following illustration, the management ports are connected to the 10.7.32.x network.
Figure 1: Barracuda Load Balancer ADC supporting three Barracuda Web Security Gateways in a one-armed deployment.
- Configure policy-based routing (PBR) on the router to redirect outgoing requests and incoming Internet traffic to the Barracuda Load Balancer ADC. Specifically, a policy to redirect traffic from ports TCP 80, TCP 443, AND UDP 53 to the Barracuda Load Balancer ADC. Ports 80 and 443 handle HTTP and HTTPS traffic respectively. UDP port 53 handles DNS requests and responses. To be able to filter HTTP and HTTPS traffic properly, the Barracuda Web Security Gateways need to be able to receive traffic directed to these ports.
- Configure a NAT rule on the router to forward outbound traffic from the Barracuda Web Security Gateways to the Internet.
Step 2. Configure the Barracuda Load Balancer ADC
Complete the following steps to configure the Barracuda Load Balancer ADC to load balance traffic between the Barracuda Web Security Gateways:
- Go to the BASIC > Services page.
Click Add Service.
The following table shows examples of the values you could configure for a service based on the topology shown in Figure 1 :Name Type Interface Load Balancing WSG-Example Barracuda Web Security Gateway ge-1-1 Persistence Type: Source IP
Persistence Netmask: 255.255.255.0
Persistence Time: 1200
Please note the following:
- Configure a custom virtual interface on the Barracuda Load Balancer ADC using the same interface you configured for the Barracuda Web Security Gateway service to route traffic from the gateway.
- This interface is dedicated to the Barracuda Web Security Gateway service. You cannot configure any other service on it.
- Click Create.
- Add each of the Barracuda Web Security Gateways you need to load balance by clicking Add Server.
- Specify a Name for the server and its IP Address.
- You can also specify a Weight for each Barracuda Web Security Gateway. The greater the weight you assign to a Barracuda Web Security Gateway, the more traffic it receives from the Barracuda Load Balancer ADC. If the Barracuda Web Security Gateways are not the same model, you can modify the weights for each to match its capability. Higher specification models should have higher weights. By default, weights are set to 1, which means all of the Barracuda Web Security Gateways have the same capacity and should receive the same volume of traffic.
Step 3. Configure the Barracuda Web Security Gateways
Complete the following steps to configure each Barracuda Web Security Gateway. You need to complete these steps from the console on each Barracuda Web Security Gateway:
- Select Auxiliary Port. Here you can specify the IP address for the Management port on the Barracuda Web Security Gateway. The Management port should be on a separate network from the Barracuda Web Security Gateway ports handling Internet traffic. Set the IP Address, Subnet Mask, and Default Gateway. When finished, select Save.
- Select TCP/IP Configuration. For the Default Gateway, set the IP address for the router connected to the Internet (in the illustration, this address is 10.1.0.1). When finished, select Save.
Step 4. Monitor the Service on the Barracuda Load Balancer ADC
- Log in to the web interface of the Barracuda Load Balancer ADC as admin.
- Go to the BASIC > Services page and select the Barracuda Web Security Gateway service.
- The Service must show a green check mark icon for each of the Barracuda Web Security Gateways added as a server.
Step 5. Verify the Configuration
When the client accesses any website such as cnn.com, traffic from the client is directed to the Barracuda Web Security Gateway service on the Barracuda Load Balancer ADC. The Barracuda Load Balancer ADC then sends the traffic to one of the Barracuda Web Security Gateways configured as part of the service.
