To apply central usage policies and scan your web traffic for malware or unwanted content, forward web traffic to the Barracuda Web Security service, formerly known as FLEX, and configure your clients to use the Barracuda CloudGen Firewall as a proxy . The Barracuda Web Security Server is licensed on a per-user basis. If the number of users consistently exceeds the licensed number, traffic continues to be filtered, but you will be asked to upgrade your subscription to the actual user number. If the service expires, traffic is no longer filtered; it is only passed through.
Before You Begin
To configure the Barracuda Web Security service, you need the following components:
A Barracuda Web Security subscription connected to your Barracuda Cloud Control account.
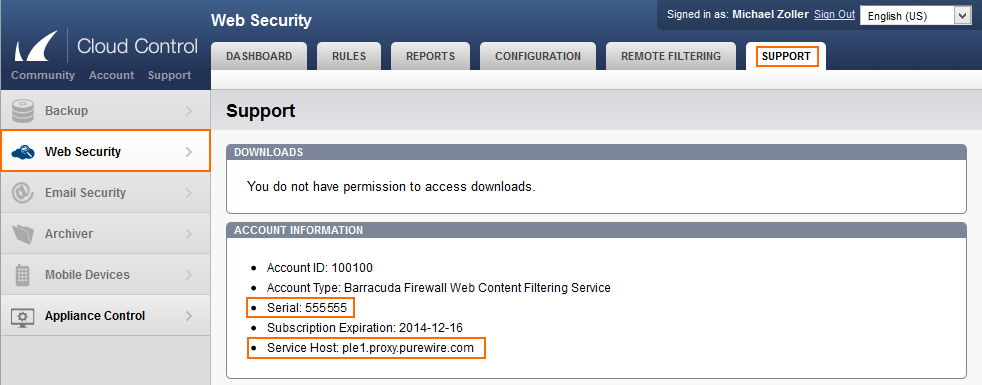
The serial number and proxy server host for your Barracuda Web Security service subscription:
To locate your serial number, log into your Barracuda Cloud Control account, and click on the SUPPORT tab in the Web Security section.

Step 1. Configure the Barracuda Web Security Service
Enable the Barracuda Web Security service in the HTTP Proxy settings.
Go to CONFIGURATION > Configuration Tree > Box > Assigned Services > HTTP Proxy > HTTP Proxy Settings .
Click Lock.
Set Enable Barracuda Web Security to Yes.
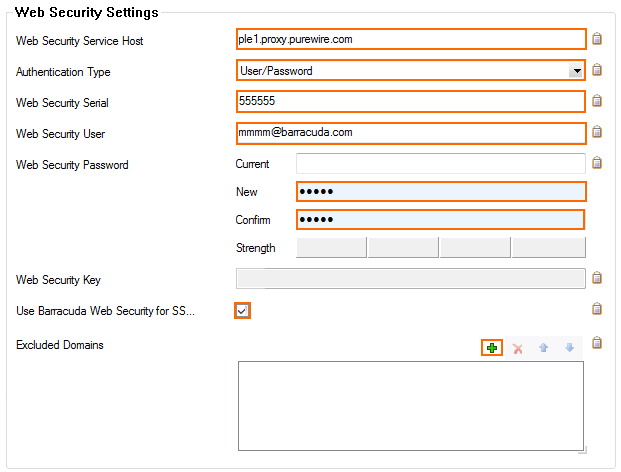
Click Set / Edit to edit the Web Security Settings. The Web Security Settings window opens.

Enter the Web Security Settings for your Barracuda Web Security service account:
Web Security Service Host – Enter the URL for your Barracuda Web Security service account. E.g.,
ple1.proxy.purewire.comAuthentication Type – Select User/Password to use your Barracuda Cloud Control credentials, or select AuthenticationKey to use an authentication key created in your Barracuda Networks Account on the Web Security > Configuration > Key Management page.
Web Security Serial – The Barracuda Web Security service serial number.
Web Security User – Your Barracuda Cloud Control username.
Web Security Password – (User/password authentication only) Your Barracuda Cloud Control password.
Web Security Key – (Key authentication only) Select your authentication key.
Use Web Security for SSL/TLS – To redirect SSL/TLS HTTPS traffic to the Barracuda Web Security service, select Yes.
Excluded Domains – Enter domains you do not want to forward for processing by the Barracuda Web Security service.

Click OK.
Click Send Changes and Activate.
Step 2. Configure your Clients to use Barracuda Web Security via the CloudGen Firewall
Configure your clients to use the Barracuda CloudGen Firewall as a forwarding proxy.
