You can propagate and learn networks via BGP in which the peer is connected via a site-to-site IKEv1 IPsec tunnel. The BGP service uses the IPsec tunnel to dynamically learn the routes of the remote network via the intermediary network /30 assigned to the VPN next hop interface and the remote gateway.

Before You Begin
- You must have a free /30 network.
- You must have or assign autonomous system numbers (ASNs) for the remote and local networks. The ASNs can be private if you are not propagating these networks to other public networks.
Step 1. Create VPN Next Hop Interfaces
Create a VPN next hop interface and assign an IP address out of the intermediary /30 network.
- Go to CONFIGURATION > Configuration Tree > Box > Assigned Services > VPN-Service > VPN Settings.
- Click Lock.
- In the left menu, select Routed VPN.
- Create a VPN next hop interface for each IPsec tunnel by clicking Add in the Next Hop Interface Configuration section.
- In the VPN Interface Properties window, enter:
- VPN Interface Index – Enter a number between 0 and 99. Each interface index number must be unique.
- IP Addresses – Enter the first IP address in the /30 network.
- Click OK.
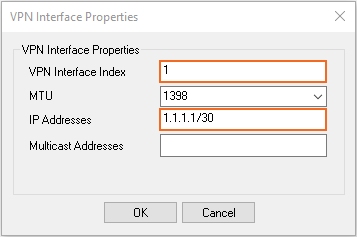
- In the VPN Interface Properties window, enter:
- Click Send Changes and Activate.
Step 2. Configure a Site-to-Site IKEv1 IPsec Tunnel
Configure a site-to-site IPsec tunnel using the VPN next hop interface.
- Go to CONFIGURATION > Configuration Tree > Box > Assigned Services > VPN-Service > Site to Site.
- Click on the IPSEC IKEv1 Tunnels tab.
- Click Lock.
- For each IPsec tunnel, right-click and click New IPsec IKEv1 tunnel.
- Enter the IPsec tunnel configurations:
- Enter a Name.
Enter the Phase 1 and Phase 2 settings:
Phase 1 Phase 2 Encryption AES AES Hash Meth. SHA SHA DH-Group Group2 Group 2 Lifetime(sec) 28800 3600 Perfect Forward Secrecy Enable - In the Local Networks tab:
- Local IKE Gateway – Enter your external IP address. If you are using a dynamic WAN interface, enter
0.0.0.0 - ID-type – Select IPV4_ADDR_SUBNET (explicit).
- Explicit Net – Enter
0.0.0.0/0.
- Local IKE Gateway – Enter your external IP address. If you are using a dynamic WAN interface, enter
- In the Remote Networks tab:
- Remote IKE Gateway – Enter the public IP address of the remote third-party VPN gateway.
- ID-type – Select IPV4_ADDR_SUBNET (explicit).
- Explicit Net – Enter
0.0.0.0/0.
- In the Peer Identification tab:
Shared Secret – Enter the Pre-Shared Key.
- In the Advanced tab:
- Interface Index – Enter the VPN Next Hop Interface index number you entered in Step 1.
- VPN Next Hop Routing – Enter the second IP address of the /30 network that is assigned to the remove VPN gateway.
- Click OK.
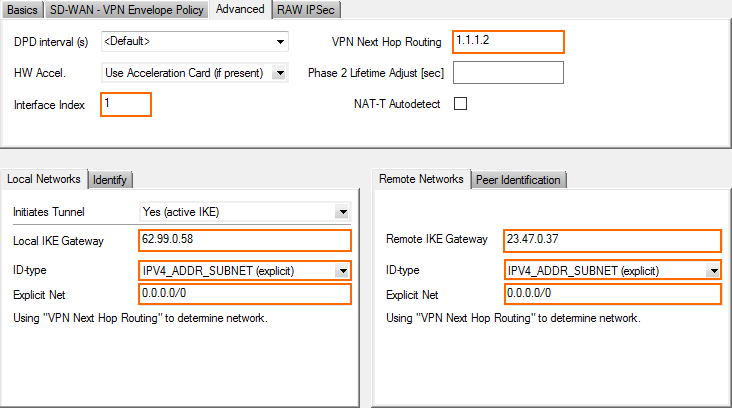
- Enter the IPsec tunnel configurations:
- Click Send Changes and Activate.
You now have one VPN next hop interface listed in the Interfaces/IPs section on the CONTROL > Network page and the VPN tunnels on the CONTROL > VPN > STATUS.


Step 3. Enable BGP and Add BGP Routes
Enable the direct-attached or gateway routes you want to advertise via BGP.
- Go to CONFIGURATION > Configuration Tree > Box > Assigned Services > OSPF-RIP-BGP-Service > OSPF/RIP/BGP Settings.
- Select yes from the Run BGP Router list.
- Select advertise-learn from the Operations Mode list.
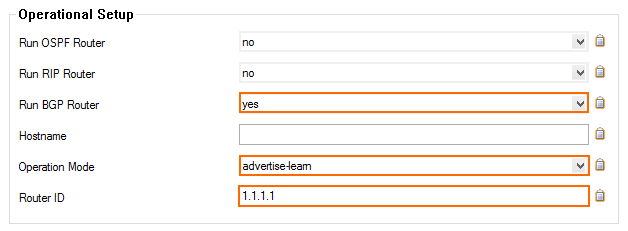
- In the left menu, click BGP Router Setup.
- Enter the AS Number (e.g.,
65000). - Enter the Terminal Password.
- From the Connected Routes drop-down list, select yes.
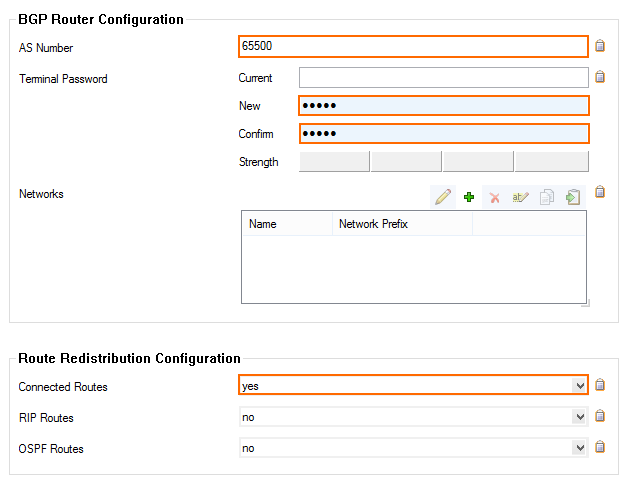
- In the left menu, expand Configuration Mode and click Switch to Advanced Mode.
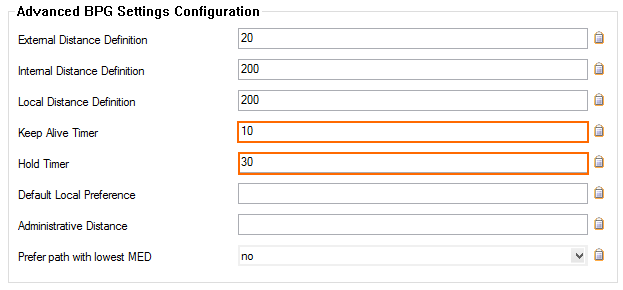
- Click the Set button for the Advanced Settings. The Advanced Settings window opens.
- Set the Hold timer to
30seconds. - Set the Keep Alive Timer to
10seconds.
- Click OK.
- Click Send Changes and Activate.
Step 4. Add a BGP Neighbor for the Remote Gateway
To dynamically learn the routing of the neighboring network, set up a BGP neighbor for the VPN next hop interface.
- In the left menu of the OSPF/RIP/BGP Settings page, click Neighbor Setup IPv4.
- Click Lock.
- For each IPsec tunnel, click the plus sign (+) next to the Neighbors table to add a new neighbor.
- Enter a Name for the neighbor
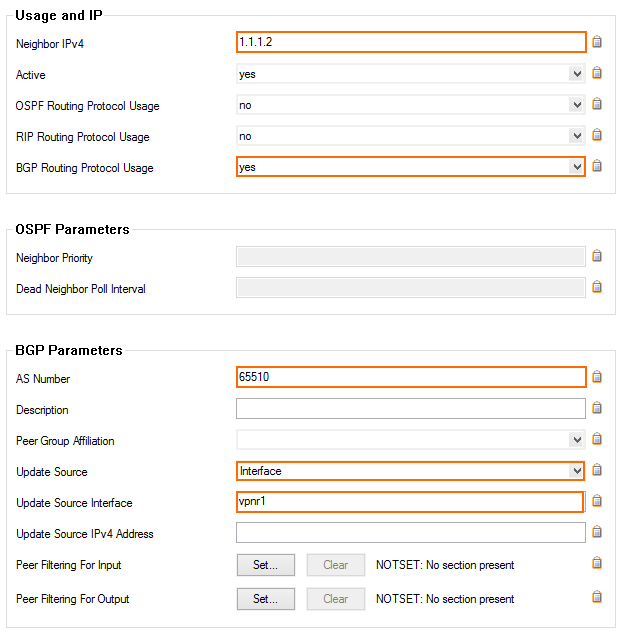
. - In the Neighbors window, configure the following settings in the Usage and IP section:
- Neighbor IPv4 – Enter the second IP address in the /30 network that is assigned to the remote gateway. E.g.,
1.1.1.2 - OSPF Routing Protocol Usage – Select no.
- RIP Routing Protocol Usage – Select no.
- BGP Routing Protocol Usage – Select yes.
- Neighbor IPv4 – Enter the second IP address in the /30 network that is assigned to the remote gateway. E.g.,
- In the BGP Parameters section, configure the following settings:
- AS Number – Enter the ASN for the remote network: E.g.,
65510 - Update Source – Select Interface.
- Update Source Interface – Enter the vpnr interface. E..g,
vpnr1
- AS Number – Enter the ASN for the remote network: E.g.,
- Click OK.
- Click Send Changes and Activate.
Step 5. Configure Routes to be Advertised via BGP
To propagate a route, set advertise to yes, or enter the network as a BGP network manually.
On Box Level
For direct-attached gateway routes and the management network, enable advertising the route in the network configuration.
- Go to CONFIGURATION > Configuration Tree > Box > Network.
- Click Lock.
- (optional) To propagate the management network, set Advertise Route to yes.
- In the left menu, click Routing.
- Double-click on the Routes you want to propagate, and set Advertise Route to yes.
- Click OK.
- Click Send Changes and Activate.
Manually BGP Networks
To manually add networks that are advertised to the neighbor, you can also enter them directly as a BGP network.
- Go to CONFIGURATION > Configuration Tree > Box > Assigned Services > OSPF-RIP-BGP-Service > OSPF/RIP/BGP Settings.
- Click Lock.
- In the left menu, click BGP Router Setup.
- Click + to add an entry to the Networks list.
- Enter a Name.
- Click OK.
- Enter the network you want to propagate as the Network Prefix.
- Click OK.
- Click Send Changes and Activate.
Step 6. Create an Access Rule for VPN Traffic
To allow traffic to and from the VPN networks, a pass access rule is needed.
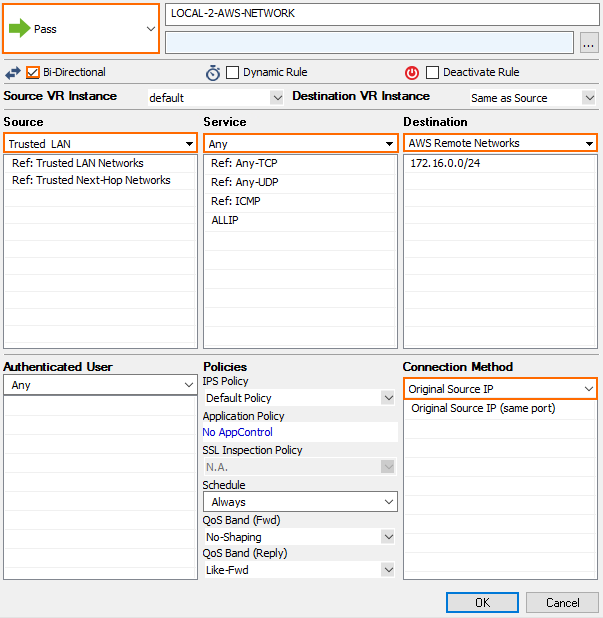
- Create a Pass access rule:
- Bi-Directional – Enable.
- Source – Select the local network(s) you are propagating via BGP.
- Service – Select the service you want to have access to the remote network or ALL for complete access.
- Destination – Enter the remote networks.
- Connection Method – Select No Src NAT.
- Click OK.
- Move the access rule up in the rule list, so that it is the first rule to match this type of traffic.
- Click Send Changes and Activate.
Step 7. Configure your Third-Party VPN Gateway
Configure the remote VPN gateway using the same encryption settings and shared key for the IPsec tunnel. Also, configure the BGP service to listen on the second IP address of the /30 network and the CloudGen Firewall as a BGP neighbor. This setup has been tested with the following third-party devices:
| Third-Party Device | Test Device Firmware Version* | Link |
|---|---|---|
| Fortinet FortiGate 60D | v5.2.1,build618 (GA) | For more information, see Fortinet documentation. |
* This firmware has shown to be working in our tests. If you are using a different device or firmware version, your mileage may vary.
Monitoring
You now have an IPsec VPN tunnel connecting your CloudGen Firewalls to a third-party VPN gateway. It may take some time for BGP to learn the new routes.
IPsec Tunnel
Go to VPN > Status and verify that the IPsec tunnel is Active.

BGP
Go to CONTROL > NETWORK > BGP and verify that you are connected to the remote BGP neighbor and that networks are learned.

