Network objects are ideal for organizing flat network topologies and small networks. As a network grows larger, subnetting provides additional structure to the network. Subnets are organized into groups, usually in correlation with the company structure, and use criteria such as location or internal department as the differentiator. However, remembering and managing IP addresses, and translating them to network objects for the firewall, can become very difficult the larger your network becomes. By using Named Networks instead of network objects, the network structure information is transferred to the firewall configuration, and human-readable names are used. Named Networks can be used solely for firewall ruleset evaluation, or for both ruleset evaluation and visualization.
Creating Named Networks is a two-step process:
- Create a Named Network Structure.
- Add Values to the Named Network structure.

Named Network Structures
The Named Network structure uses two basic building blocks:
- Named Network Tree Nodes
- Group Categories

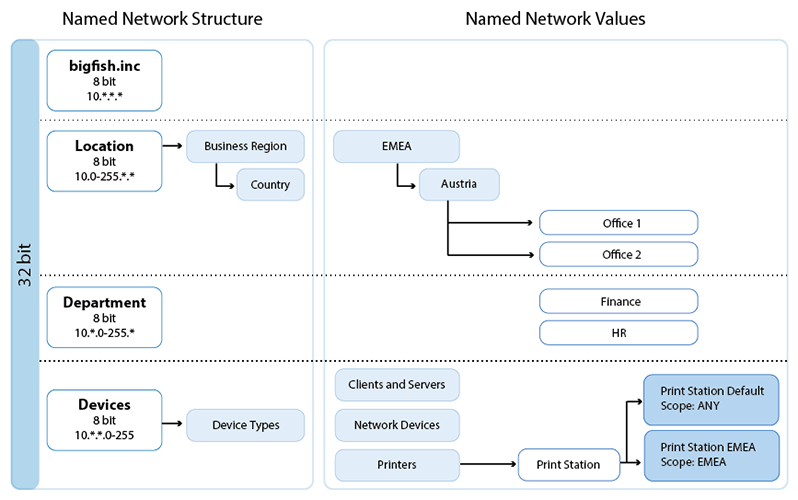
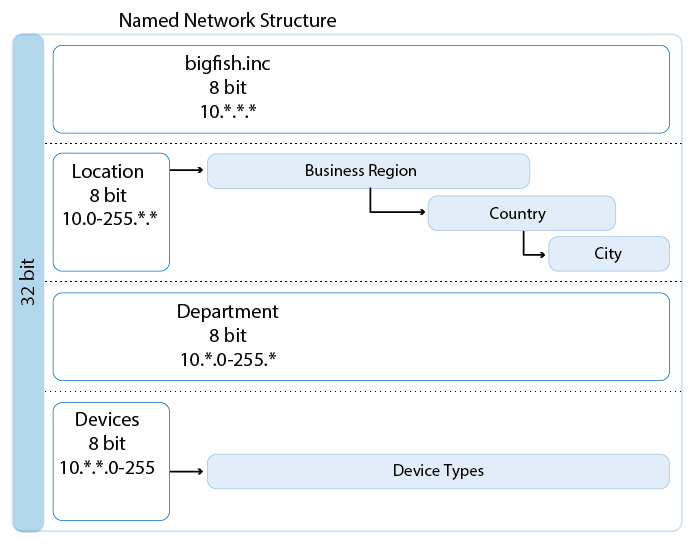
Named Network structures describe your network in a top-down approach, splitting the 32 bits of the IPv4 address or the 128 bits of the IPv6 address into multiple, sequential bit-ranges called network tree nodes. The scope of a tree node is determined by the number of bits assigned to it. The bit-ranges translate the subnet mask information of your network to your firewall. To simplify visualization and to add logical differentiation without having to change the bit-ranges of the tree nodes, group categories can be added to a tree node during setup. Each group category can, in turn, contain further subgroups, allowing for granular and flexible hierarchies to accurately reflect your company's network. Do not confuse group categories with the actual values added later to the Named Network structure. For example, if the tree node designates the location, possible group category names would be "business region", "country", and "city", not the values such as "EMEA", or "Austria". Using group categories is optional. After the Named Networks structure has been created, it can no longer be edited. The sum of the number tree nodes and group categories in a Named Network object may not exceed 32.

Named Network Values
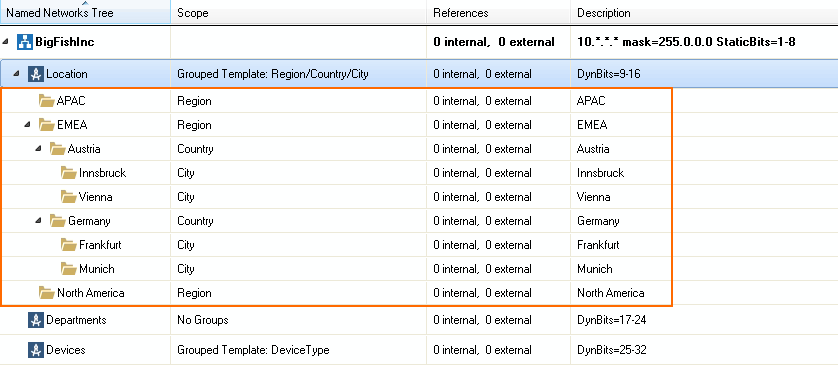
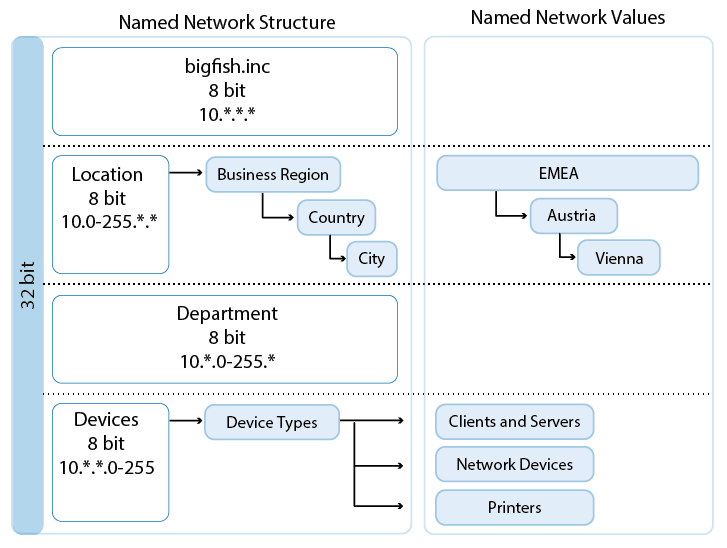
Thus far, only the Named Network tree for the network structure has been created. Now, the groups and actual networks are added. Values for the complete group structure need to be added first. Using the location example from above, a group with a sub-group and a sub-sub-group is added.


The Named Network values are added to the most granular layer of the group hierarchy. In our location example, this is the "City" group. Values can be added directly to the group or tree node if there is only one address or sequential address for this Named Network value. (For example: BigFishStore1 uses 10.0-2.*.*) If there are multiple, non-sequential addresses that need to be assigned to this location, the top Named Network value must be created as a value container. Then, you can add multiple sub-values to the value container to make up the complete Named Network value. (For example: BigFishStore2 uses 10.13-15.*.* and 10.45-46.*.*)

If the value is inserted into a lower tree node, you can also configure the scope of the Named Network value based on the tree and group nodes in the Named Network tree structure above the current value. By default, the scope is set to ANY. This means that the value is valid for all Named Network values located above the current location in the tree structure. This allows you to create exceptions for networks that deviate from the standard. For example: If the printer always uses the *. * .*.10 IP address in all locations except the EMA region, this can be accomplished by creating a Printer named 'Network Value Container' in the Office Location tree node that is responsible for the last 8 bits of the address. Then, add two values to the value container: one with a scope of EMEA, the other with a scope of Any. When two values are available, the more-specific scope is always preferred. The granularity of the scope can also be configured.

IPv6 Named Networks
Named Networks can be created for either IPv4 or IPv6 networks. Each Named Network is valid only for one IP version. If a dual-stack IPv4 and IPv6 network is used then two Named Networks must be created, one for each IP version.
Using Named Networks
Since Named Networks allow you to structure a large network for use in your firewall environment, it makes the most sense when Named Networks are used in the Global, Range, or Cluster Firewall object in the Firewall Control Center. This allows you to share one set of Named Networks for all your manged firewalls. It is currently not possible to override Named Network objects. Verify that the Global Firewall objects are set to use feature level 7.2. or higher to enable Named Networks.
Named Network objects are not used directly in the firewall configuration; they are used to create network objects that, in turn, can then be used. Using Named Network objects in combination with network objects allow you to define networks and IP addresses based on the name or classification of the device, similar to wildcard network objects. The biggest advantage is that using Named Networks does not require the admin to remember the associated networks. Updates to the named network object are automatically reflected in the network object.
For easy visibility and to make the FIREWALL > Live and FIREWALL > History pages human readable, the Src and Dst Named Network columns display the Named Network path associated with the source and destination IP addresses.

Creating Named Network Objects
Named Network objects are created in two steps. First, the Named Network structure is created. Then, the structure is filled in with the Named Network values. Named Network values and Named Network containers are combined to accurately translate your network to the Named Network object.
For more information, see How to Configure Named Networks.
Creating Network Objects from Named Network Objects
To be able to use the information stored in the Named Network object, you must create network objects. By changing the scope of the network objects, the network object contains network and IP address information based on the name.
For more information, see How to Configure Network Objects from Named Networks.
