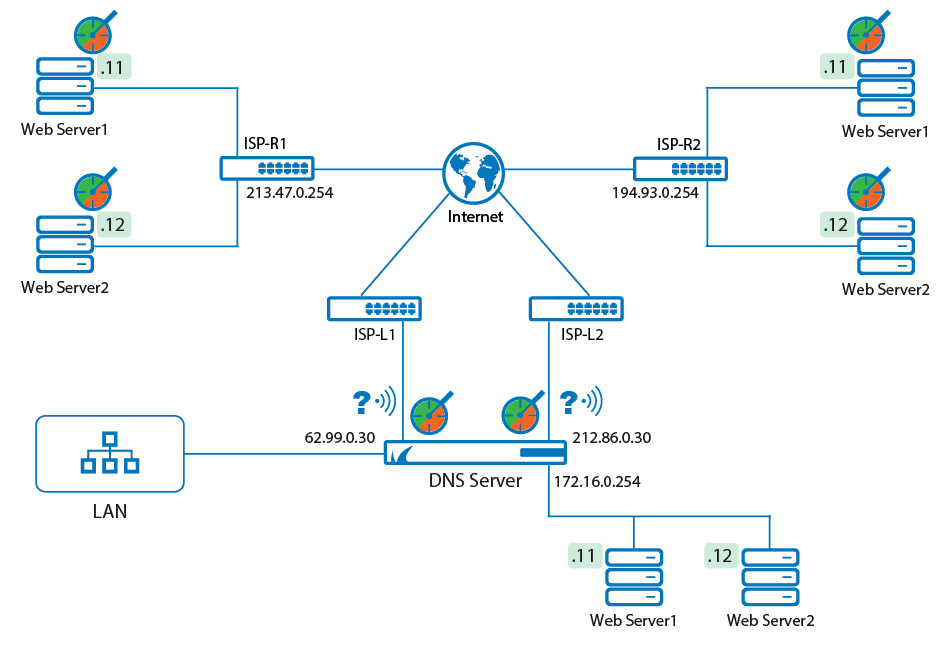
In certain situations, multiple servers must provide the same service with identical content, e.g., web content in different regions. If resolving queries originating from clients in a special region hit the DNS service on the CloudGen Firewall, different targets can be referred to by the firewall depending on where the query originated from. If these (redundant) targets are monitored using health probes, the reference of a failing web server can immediately be replaced by a reference to another still reachable and redundant one.
The following example assumes that the CloudGen Firewall is operating as a primary DNS server for the domain example.com . Two public interfaces are connected to the Internet where each public IP address represents another region. Each of these two remote regions contains two redundant web servers, all of them hosting the same content. On a third interface, the firewall hosts a DMZ with two redundant web servers that serve both for queries from the LAN and as fallback for the web servers in the public regions. For the public networks, the two web servers in the DMZ are reachable via the public IP address on the respective regional interfaces (62.99.0.30, 212.86.0.30).

The solution is to monitor the remote web servers in the two regions R1/R2 using health probes. These health probes must be configured to monitor ports 80/443 on the respective web servers. It is not necessary to use health probes for the internal web servers in the DMZ because in this example it is assumed that both web servers will be available all the time. By configuring 2 listeners, incoming queries on the public interfaces of the firewall can be used to distinguish where the query originated from. When configuring the resource records, each one must contain the following information:
- IP address(es) that will be returned in the response in case the health probe succeeds.
- The listener that catches the resolving request on a certain public interface / IP address.
- The health probe for every single web server whose IP address must be returned in case of its reachability. In this case, both remote web servers of a region must be part of the list of valid IP addresses. Also, the redundant web servers in the DMZ must be present in the list with the public IP address of the firewall that is connected to the respective region, e.g., 62.99.0.30 for region 1 and 212.86.0.30 for region 2.
The effect is that if a regional web server becomes unavailable due to increasing loads, it will not be able to respond fast enough to session queries on port 80/443. When the health probe detects this, the IP address of the respective web server is immediately removed from the list of available domain hosts while the other IP addresses still remain in the list of available web servers. If both web servers in a region fail, the client will receive the public IP on the firewall from where the requests will be forwarded to one of the web servers in the DMZ by a redirection rule.
Before You Begin
- Verify that all service IP addresses are already configured that are necessary for answering DNS queries on the respective incoming interfaces. For more information, see How to Assign Services.
- Resource records must always be added to an existing primary zone. Verify that the primary zone is already configured. For more information, see How to Configure a Zone.
Configure Listeners
Configure the listeners (via-ISP1, via-ISP2) as EXTERNAL for the two regions connected to the public interfaces with IP addresses 62.99.0.30 and 212.86.0.30. Allow recursive lookups.
For more information, see How to Configure a DNS Listener.
Configure Health Probes
Configure 6 health probes for all web servers in the two regions and the DMZ. The probing type is HTTP/S.
| Location | Name of Health Probe | Source IP Address | Probing Target (1) | Probing Target (2) |
|---|---|---|---|---|
| Region 1 | WS1-R1 | 62.99.0.30 | 213.47.0.11 | - |
| Region 1 | WS2-R1 | 62.99.0.30 | - | 213.47.0.12 |
| Region 2 | WS2-R1 | 212.86.0.30 | 194.93.0.11 | - |
| Region 2 | WS1-R2 | 212.86.0.30 | - | 194.93.0.12 |
| DMZ | WS-DMZ-public-1 | 62.99.0.30 | 62.99.0.30 | - |
| DMZ | WS-DMZ-public-2 | 212.86.0.30 | 212.86.0.30 | - |
For more information, see How to Configure a DNS Health Probe.
Create Resource A Records for External Resolving Requests
Create two A resource records, with each containing the respective regional web servers and the public IP of the firewall where the region is connected to.
- Go to CONFIGURATION > Configuration Tree > Box > Assigned Services > DNS > DNS-Service.
- In the left menu, click Hosted Zones.
- In the main window, right-click onto the zone entry for which the resource record must be created, e.g., example.com (Primary) zone.
- From the list, select Add New DNS Record to Zone.
- For Type, select the record type identifier, e.g., A.
- For Description, enter any text that best describes your host, e.g., Web server region 1.
- For Name/Owner, enter the name or owner of the record, e.g., www.
- For TTL (time to live [sec], change the value if necessary.
In the main window, click + to the right of the table of the section IP Address. Add the three IP addresses that must be returned if a resolving query comes in on the public interface with IP address 62.99.0.30:
IP Address Listener Name Health Probe 213.47.0.11 region-1 WS1-R1 213.47.0.12 region-1 WS2-R1 62.99.0.30 region-1 WS-DMZ-public-1 - Click OK.
- In the main window, right-click onto the zone entry for which the resource record must be created, e.g., example.com (Primary) zone.
- From the list, select Add New DNS Record to Zone.
- For Type, select the record type identifier, e.g., A.
- For Description, enter any text that best describes your host, e.g., Web server region 2.
- For Name/Owner, enter the name or owner of the record, e.g., www.
- For TTL (time to live [sec], change the value if necessary.
In the main window, click + to the right of the table of the section IP Address. Add the three IP addresses that must be returned if a resolving query comes in on the public interface with IP address 212.86.0.30:
IP Address Listener Name Health Probe 194.93.0.11 region-2 WS1-R2 194.93.0.12 region-2 WS2-R2 212.86.0.30 region-2 WS-DMZ-public-2 - Click OK.
- Click Send Changes.
- Click Activate.
Create Resource A Records for Internal Resolving Requests
In case a client from the private LAN requires a DNS resolution, he must receive the IP addresses of the web servers in the DMZ.
- In the main window, right-click onto the zone entry for which the resource record must be created, e.g., example.com (Primary) zone.
- From the list, select Add New DNS Record to Zone.
- For Type, select the record type identifier, e.g., A.
- For Description, enter any text that best describes your host, e.g., LAN-to-DMZ.
- For Name/Owner, enter the name or owner of the record, e.g., www.
- For TTL (time to live [sec], change the value if necessary.
In the main window, click + to the right of the table of the section IP Address. Add the three IP addresses that must be returned if a resolving query comes in on the public interface with IP address 212.86.0.30:
IP Address Listener Name Health Probe 172.16.0.11 INTERNAL NONE 172.16.0.12 INTERNAL NONE - Click OK.
- Click Send Changes.
- Click Activate.
Create a DST Nat Rule to Redirect HTTP/S Queries to the Web Servers in the DMZ
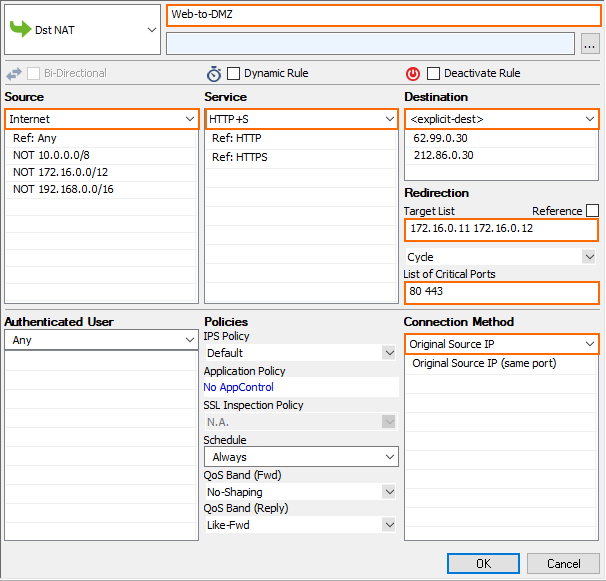
Create a Dst NAT rule Web-to-DMZ so that access on the two public IP addresses on port 80/443 will be redirected to one of the web servers in the DMZ. The probing packets will be forwarded by the Dst NAT rule into the DMZ. The option Cycle in the redirection rule ensures that requests will be forwarded alternatingly to one of the two DMZ web servers.
- Go to CONFIGURATION > Configuration Tree > Box > Assigned Services > Firewall > Forwarding Rules.
- In the left menu bar, click Access Rules.
- Click Lock.
- Click + in the upper-right corner of the window.
- The Edit Rule: New Rule window is displayed.
- For the rule type, select Dst NAT.
- Fill out the edit fields for the Dst NAT rule:
- Name – Web-to-DMZ
- Source – Internet
- Service – HTTP/S
- Destination – 62.99.0.30, 212.86.0.30
- Target list – 172.16.0.11, 172.16.0.12
- For the Fallback method, select Cyclic from the list.
- List of Critical Ports – 80, 443
- Connection Method – Original Source IP

- Move the access rule to the top of the list.
