The Active Directory Federation Service (AD FS) is a service provided by Microsoft that enables users to authenticate across multiple organizations. The credentials are not forwarded to the service provider. Rather, when users contact a service provider, they are forwarded to the AD FS that will provide a token. This token will then be used to verify with the identity provider that the user authenticated successfully. Using the token ensures that the service provider never has access to the actual user credentials. AD FS uses the Security Assertion Markup Language (SAML) for exchanging authentication and authorization information. AD FS is currently provided for HTTPs only. To use AD FS for Client-to-Site VPN, an Advanced Remote Access subscription is required.
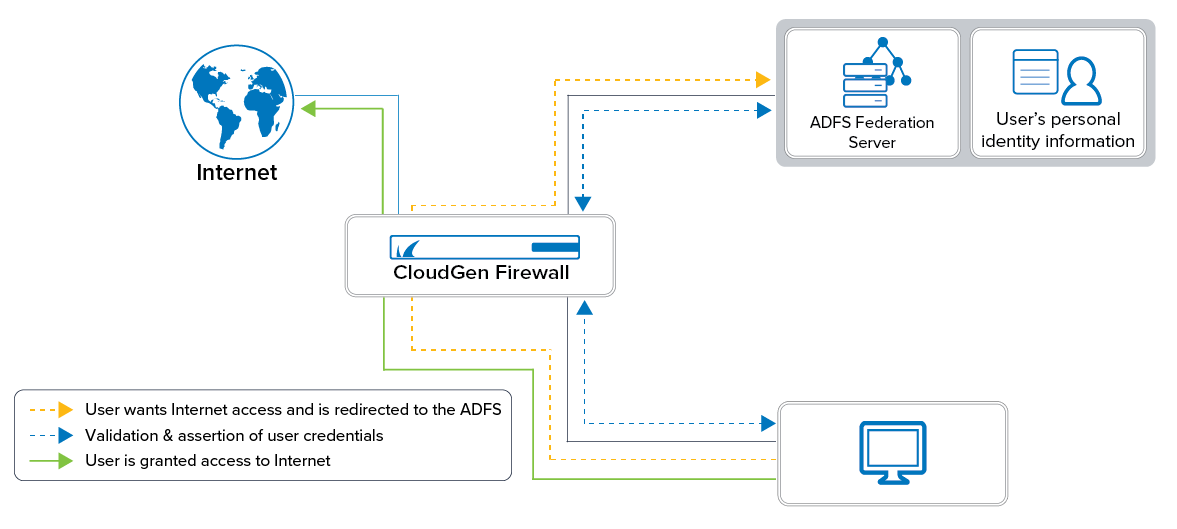
AD FS enables transparent single sign-on (i.e., sign in to applications if the user is already signed in on the firewall, and vice versa). This requires a firewall rule to forward the traffic to fwauthd. AD FS authentication supports both offline authentication and inline authentication.
Step 1. Enable AD FS Authentication on the Firewall
Go to CONFIGURATION > Configuration Tree > Assigned Services > Firewall > Firewall Forwarding Settings.
In the left menu, click Authentication.
In the Authentication Server Configuration section, import or create the Default HTTPS Private Key and Default HTTPS Certificate.
In the Metadirectory Authentication section, set the following values:
Authentication Scheme – Select SAML/ADFS from the list.
Listen IP – Enter the listening address of the CloudGen Firewall's authentication daemon.
Request Timeout – Set the value for the timeout for requests.
User ACL Policy
Set the value to deny-explicit if you want only domain users listed in User ACL to be blocked.
Set the value to allow-explicit if you want only domain users listed in User ACL to be allowed.
User ACL – Click + to add or x to remove users to or from the ACL list.
URL Filter Override Users – Click Set/Edit to configure user-specific credentials.
Step 2. Configure General AD FS Settings for SAML, Identity Provider, and Certificates
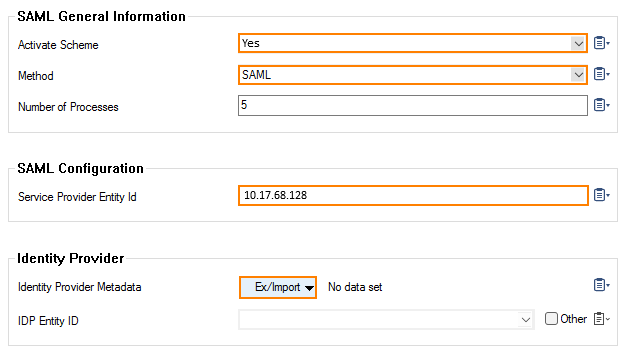
Go to CONFIGURATION > Configuration Tree > Infrastructure Service > SAML/ADFS Authentication.
Set Activate Scheme to yes.
For Method, select SAML.
In the section SAML Configuration, enter the IP address for the Service Provider Entity ID.
In the section Identity Provider, click Ex/Import to import the identity provider's metadata. The metadata in the imported XML file contains important information about the identity provider and the person's identity and is commonly generated by AD FS.
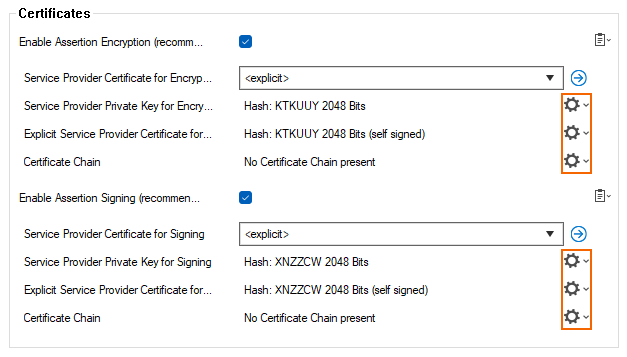
In the section Certificates, use the cogwheel icons on the right to configure certificates and keys:
Service Provider Private Key for Encryption
Create New Key – Click to create a new key.
Ex/Import – Click to ex/import a key for encryption.
Service Provider Certificate for Encryption
Edit/Show – Click to show the provider certificate.
Ex/Import – Click to ex/import a certificate for encryption.
Service Provider Private Key for Signing
Create New Key – Click to create a new private key for signing.
Ex/Import – Click to ex/import a certificate for encryption.
Service Provider Certificate for Signing
Edit/Show – Click to show the provider certificate for signing.
Ex/Import – Click to ex/import the service provider certificate for signing.
Click Send Changes and Activate.
Click Activate.
Close the tab Authentication Service.

After clicking Activate and closing the Authentication Service tab, the user's attributes stored in the Identity Provider Metadata will be extracted to the list for IDP Entity ID.
Step 3. Configure a Specific Attribute for the Authentication of the Remote User
Click the field of the list for IDP Entity ID.
Select an attribute that optimally fits the configuration of the remote user.
Click Send Changes and Activate.

Close the tab Authentication Service.

Step 4. Export the Service Provider Metadata
Click Generate Data in the section Service Provider Metadata to export the metadata.
Specify a location where to store the file.

Click Send Changes and Activate.
Close the tab Authentication Service.
Step 5. Create Access Rules for Authenticating with AD FS
Create an access rule for redirecting users for authentication.
Go to CONFIGURATION > Configuration Tree > Box > Assigned Services > Firewall > Forwarding Rules.
Click Lock.
Either click the plus icon (+) in the top right of the ruleset or right-click the ruleset and select New > Rule.
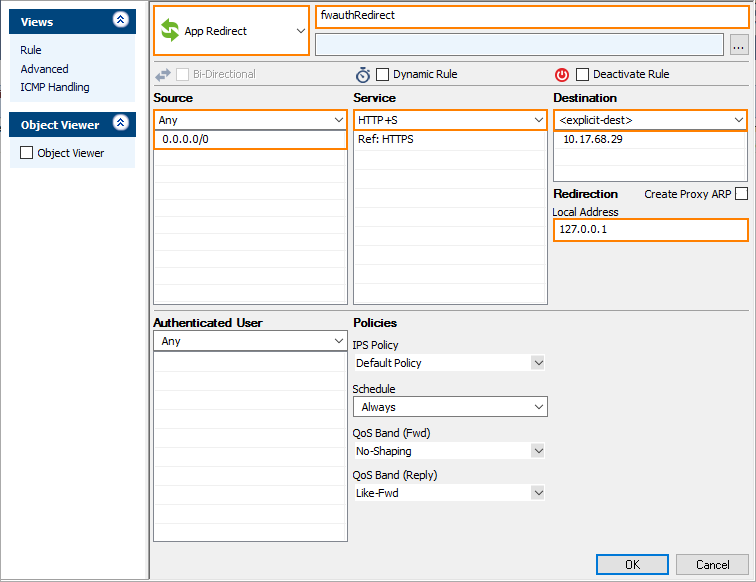
Select App Redirect as the action.

Enter a Name for the rule. For example,
fwauthredirect.Specify the following settings that must be matched by the traffic to be handled by the access rule:
Source – The source addresses of the traffic, e.g.,
0.0.0.0/0.Service – Select HTTPS from the list.
Destination – Enter the IP address of the CloudGen Firewall, e.g.,
10.17.68.29.
Enter the Redirection IP address and optional port as the Local Address. For example,
127.0.0.1.Click OK.
Drag and drop the access rule so that it is the first rule that matches the traffic that you want it to forward. Ensure that the rule is located above the BLOCKALL rule; rules located below the BLOCKALL rule are never executed.
Click Send Changes and Activate.
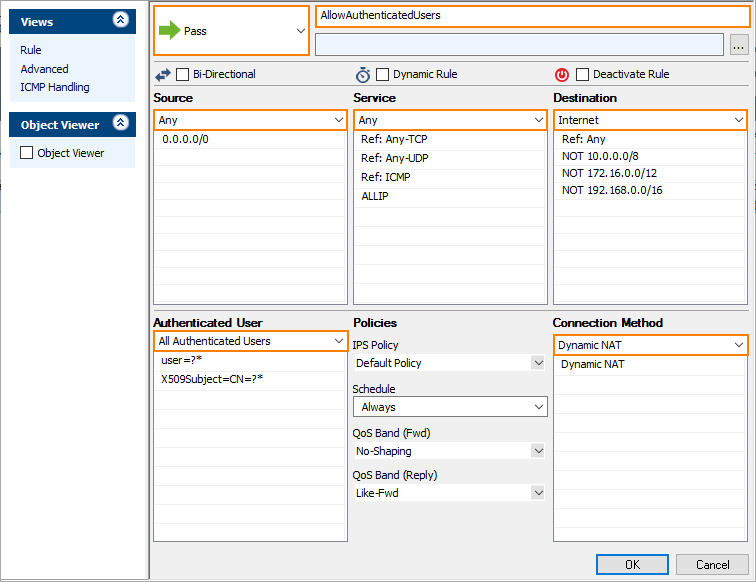
Step 6. Create an Access Rule for Passing Authenticated Users
Authenticated users can be passed on when authenticated already.
Go to CONFIGURATION > Configuration Tree > Box > Assigned Services > Firewall > Forwarding Rules.
Click Lock.
Either click the plus icon (+) in the top right of the ruleset or right-click the ruleset and select New > Rule.

Select Pass as the action.
Enter a Name for the rule. For example,
AllowAuthenticatedUsers.Specify the following settings that must be matched by the traffic to be handled by the access rule:
Source – The source addresses of the traffic, e.g.,
0.0.0.0/0.Service – Select ANY from the list.
Destination – Select Internet.
Authenticated User – Select All Authenticated Users from the list.
Connection Method – Select Dynamic NAT from the list.
Click OK.
Drag and drop the access rule so that it is the first rule that matches the traffic that you want it to forward. Ensure that the rule is located above the BLOCKALL rule; rules located below the BLOCKALL rule are never executed.
Click Send Changes and Activate.
You can now authenticate against AD FS.
