Authentication redirection is used when a Control Center or a stand-alone firewall forwards user credentials to a dedicated authentication server, e.g., MSAD, RADIUS, LDAP, etc. This intermediary system serves as an authentication proxy.
The CloudGen Firewall, which handles the credentials, must be configured to send the credentials to the authentication proxy, which will then forward the data to the actual authentication server.
The authentication proxy can be of two types:
- If it is a Control Center (see image for CC-Managed Setup below), it already contains the necessary access rule for forwarding the credential.
- If it is a stand-alone CloudGen Firewall (see image for Stand-alone Setup below), an appropriate access rule must be configured on this forwarding system.
The firewall that receives and sends the credentials can be either a managed or a stand-alone firewall.
Use Case
In this example, a user enters credentials into a web-based form in a web browser that then sends the data to a CloudGen Firewall. This firewall is configured to redirect the authentication request to another CloudGen Firewall that effectively handles the authentication request.
| Example 1: CC-Managed Setup | Example 2: Stand-Alone Setup |
|---|---|
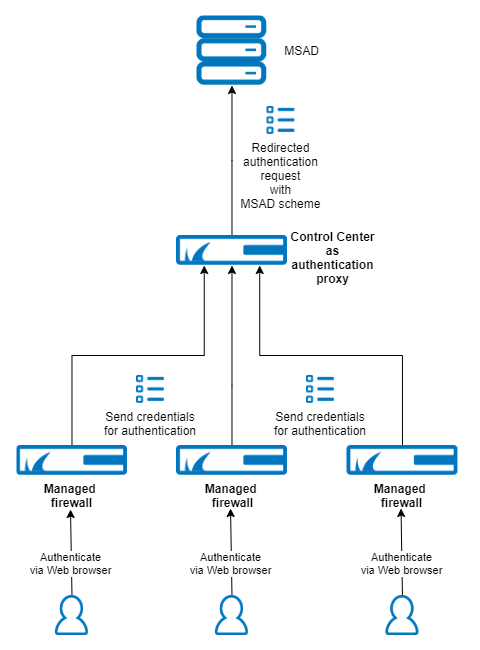 | 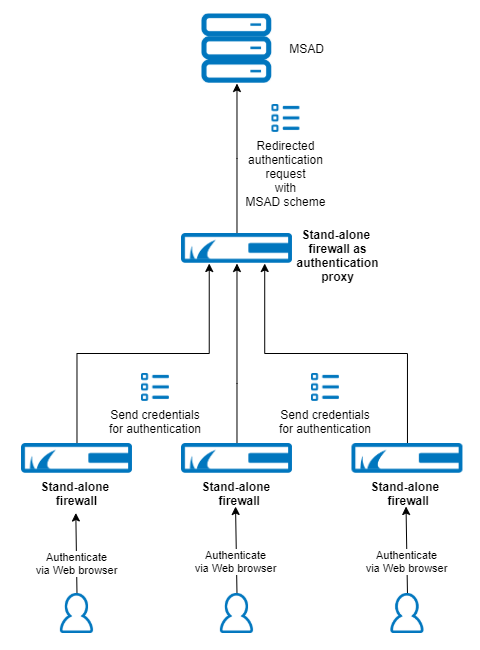 |
According to various authentication systems available, the following target schemes can be redirected:
- NGFLocal
- MSAD
- LDAP
- TacPlus
- Radius
- RSASecurID
Authentication redirects are transmitted using the UDP protocol on port number 802.
Before You Begin
For a setup with a Control Center as an authentication proxy, ensure the following conditions are met:
- The Control Center must be configured so that it authenticates against a specific authentication server, e.g. MSAD.
For more information on this example, see How to Configure MSAD Authentication.
For more information on other authentication methods, see Authentication. - The firewall, which handles the credentials, must be configured as a managed firewall and must be connected to its managing Control Center. For more information, see How to Add a New CloudGen Firewall to the Control Center.
For a setup with a stand-alone firewall as an authentication proxy, ensure the following conditions are met:
- A stand-alone CloudGen Firewall must be configured so that it authenticates against a specific authentication server, e.g. MSAD.
For more information on this example, see How to Configure MSAD Authentication.
For more information on other authentication methods, see Authentication.
Example 1: Configure Authentication Redirection for a Managed CloudGen Firewall
When configuring authentication redirection for a managed CloudGen Firewall, the forwarding rule for protocol type UDP, port 802, is already preconfigured on the Control Center. Therefore, the Control Center already knows how to forward authentication requests.
The following steps apply to the use case as shown in the image above for the CC Managed Setup.
- Log into the Control Center that manages the firewall in question.
- Go to CONFIGURATION > Configuration Tree > Multi-Range > your range > your cluster > Boxes > your managed box > Infrastructure Service > Authentication Service.
- In the left menu, click Redirect Authentication.
- Click Lock.
- For Redirect Scheme, select Yes.
- For Primary box type, select CC. (Note: it is not necessary to enter an explicit IP address because the managed firewall already knows the IP address of its managing Control Center)
- For Target Scheme, select the target scheme that you want to authenticate against, e.g., MSAD.
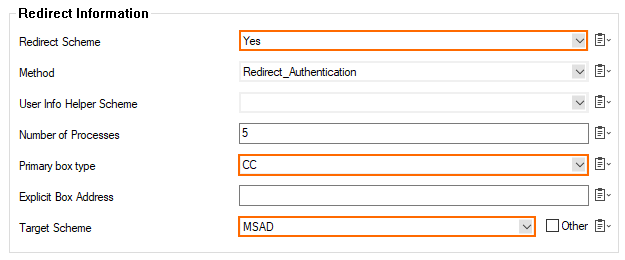
When authenticating to a managed CloudGen Firewall, your credentials will now be forwarded to the authentication system (e.g., MSAD authentication server) by the Control Center that operates as an authentication proxy.
Example 2: Configure Authentication Redirection for a Stand-Alone CloudGen Firewall
The following steps apply to the use case as shown in the image above for the Stand-Alone Setup.
- Log into the stand-alone firewall that receives the user credentials.
- Go to CONFIGURATION > Configuration Tree > Infrastructure Service > Authentication Service.
- In the left menu, click Redirect Authentication.
- Click Lock.
- For Redirect Scheme, select Yes.
- For Primary box type, select Explicit.
- For Explicit Box Address, enter the IP address of the forwarding stand-alone firewall.
- For Target Scheme, select the target scheme that you want to authenticate against, e.g., MSAD.
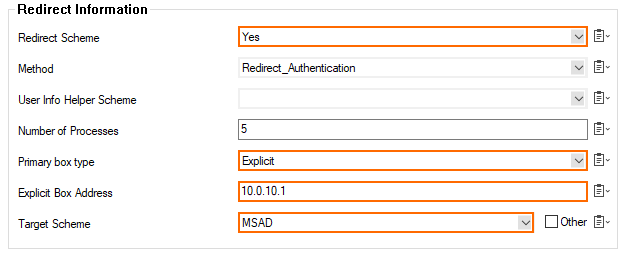
When configuring authentication redirection for a stand-alone CloudGen Firewall, an access rule must also be configured to forward an authentication request.
- Log into the firewall that forwards the authentication request.
- Go to CONFIGURATION > Configuration Tree > Box > Assigned Services > Firewall > Forwarding Rules.
- Click Lock.
- Click + to add a new access rule.
- The Edit Rule:New Rule window is displayed.
- For the access rule type, select App Redirect.
- For the name of the access rule, enter AuthRedirect.
- For source, enter Any.
- For service, select <explicit-srv>.
- Double-click the first empty line in the list.
- The Edit/Create Service Object window is displayed.
- Click New Object.
- The Service Entry Parameters window is displayed.
- For IP Protocol, select 017 UDP.
- For Port Range, enter 802.
- For Service Label, enter phibs.
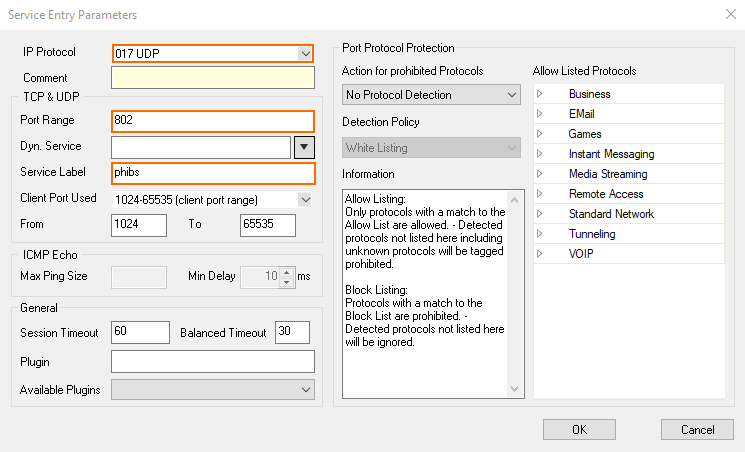
- Click OK.
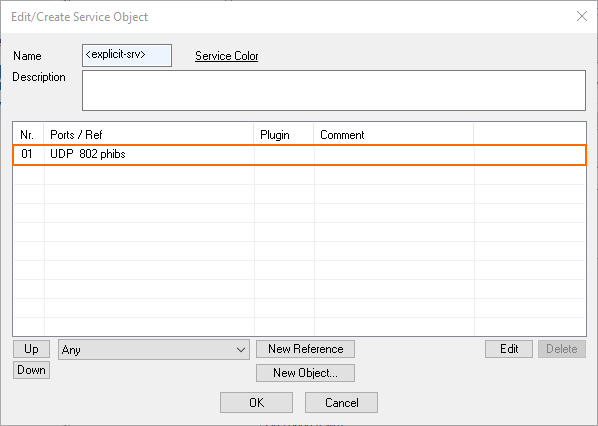
- Click OK.
- For Destination, select <explicit-srv>.
- Double-click the first empty line in the list.
- The Edit/Create Network Object window is displayed.
- Click + right to Include Entries.
- The Edit/Create Include Entry window is displayed.
- For IP, enter the IP address of the forwarding firewall, e.g.
10.0.10.32.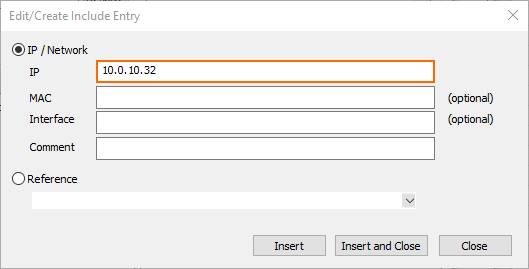
- Click Insert and Close.
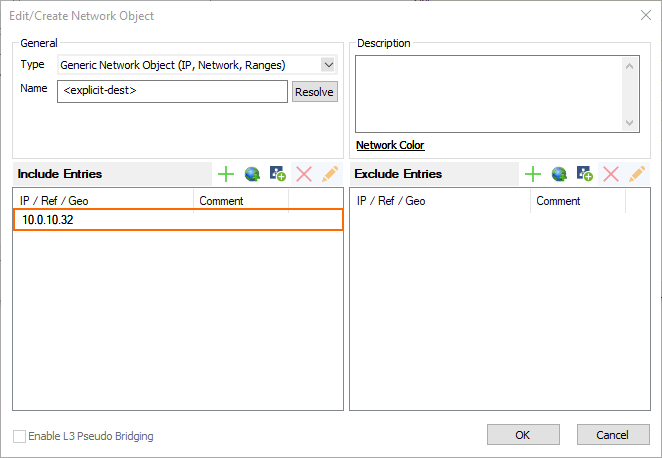
- Click OK.
- For Local Address, enter
127.0.0.1:802.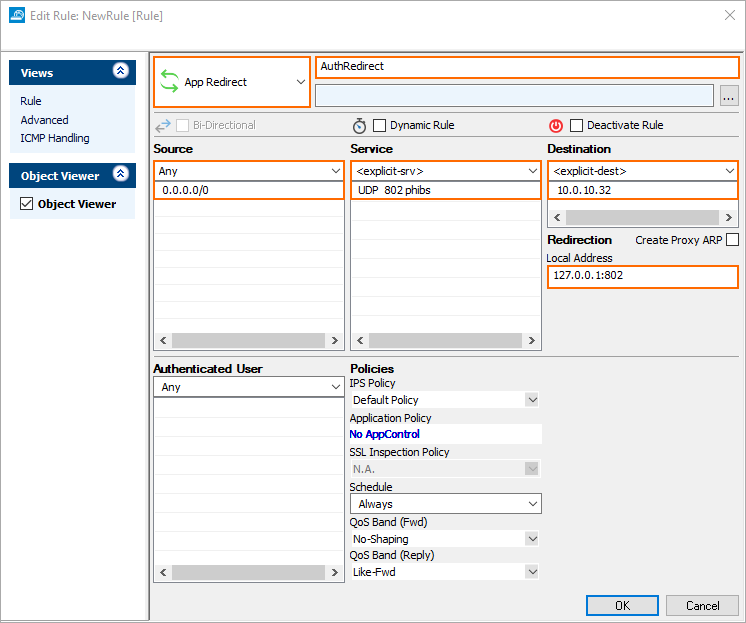
- Click OK.
When authenticating to the stand-alone CloudGen Firewall, your credentials will now be forwarded to the authentication system (e.g., MSAD authentication server) by the stand-alone CloudGen Firewall that operates as an authentication proxy.
