The Access Control service defines security policies for network users (e.g., VPN clients) and enables the CloudGen Firewall to perform identity and health checks on clients. For this feature, the Barracuda CloudGen Firewall includes an automatic software downloader, which periodically connects to the Barracuda Networks website. To reduce the need for permanent Internet connection for Barracuda CloudGen Firewalls, the Barracuda Networks update service behaves differently on stand-alone boxes than on CC-administered boxes. Internet access using an HTTP/HTTPS proxy server is possible.
Configure the Access Control Service
Before You Begin
Create an Access Control service on the CloudGen Firewall. For more information, see How to Assign Services.
Stand-alone boxes running an Access Control Service require Internet access.
CC-administered boxes running an Access Control Service get the required files uploaded from the Barracuda Firewall Control Center. The CC itself requires Internet access to secure.phion.com:443.
Step 1. Configure the System Health Validator
On a stand-alone CloudGen Firewall, go to CONFIGURATION > Configuration Tree > Box > Assigned Services > Access Control Service > Access Control Service Settings.
On a Control Center, go to CONFIGURATION > Configuration Tree > Multi-Range > your range > your cluster > your box > Assigned Services > Access Control Service > Access Control Service Settings.In the Configuration menu on the left, select System Health Validator.
(CC only) Define a global Trustzone if applicable. Leaving the Name field blank indicates that the local trustzone configuration (for example, only this Access Control Service should use the configured trustzone). For more information, see Configuring Access Control Service Trustzones.
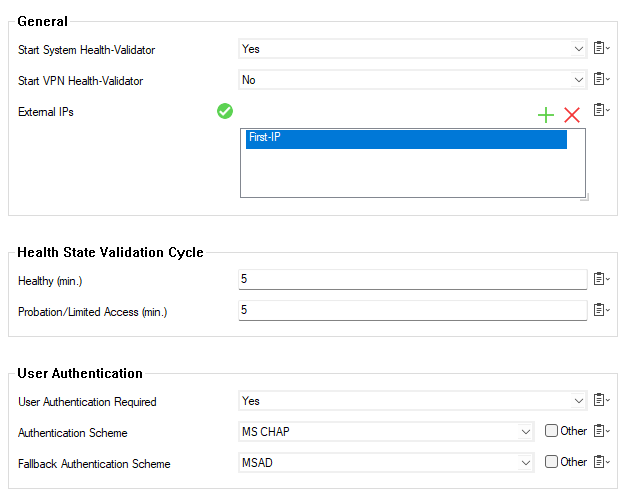
Set Start System Health-Validator to yes (default) to let the firewall start the Access Control Service module for authentication before VPN health validation occurs.
Set Start VPN Health-Validator to yes (default: no) if required to let the Access Control Service module perform VPN health state evaluation.
In the External IPs field, click + and define which service IP addresses should be declared as external. This information may be used in policy rules for health evaluation to distinguish between external and internal requests.
(Optional) Adjust the parameters for the Health State Validation Cycle (default: 5): The Healthy (min.) value restricts validity time of authentication. If the client does not re-evaluate its health state within that period, all assigned network access rights will be dropped. Probation/Limited Access (min.) defines the probation interval of a health validation. If a client does not satisfy the health requirements in an initial health validation step, the client will be set into probation. It will get the special network access right probation, in addition to the rights it had when it was healthy. If the client does not become healthy within the probation time, it will be set to the health state “unhealthy” automatically after the probation time elapses.
Configure User Authentication:
User Authentication Required is enabled by default. If set to No, the client will not re-evaluate its health state when a user logs on. For example, no current user health evaluation will take place.
From the Authentication drop-down menu, select the phibs Scheme used for basic authentication (default: MS CHAP).
When using MS CHAP, select the Fallback Authentication Scheme (default: MSAD). This scheme is used for authentication if the MS-CHAP authentication fails. The client will display a pop-up window requesting username and password.

In the Local Machine Authentication section, select whether a certificate is required for successful local machine authentication.
If enabled, set the Search String Type to either Issuer or Subject. This parameter defines how the search string for box certificates is interpreted.
In the Search String for Box Certificates field, enter an X.509 issuer string or an X.509 subject string (e.g.
C=AT, O=Barracuda, OU=*,CN=*). Pattern matching is allowed.
In the General Authentication section, select the Authentication Root/CA Certificate that should be used to verify the validity of certificates provided by clients within a local computer health validation process. On a CC, click the arrow icon on the right of the field to select a certificate from the CloudGen Firewall Certificate Store.

To configure root certificate revocation settings, click Set/Edit. Certificate revocation can be done by using either CRL (LDAP) or OCSP.
Configure Referrals:
From the Remediation Server Location drop-down list, select where the remediation server can be reached:
Select This, if the remediation server is running on the same system as the Access Control Server. In this case, Start Remediation Server must be set to yes.
Select Other in case the remediation server is running on a different system, and specify the remediation server IP addresses in the fields below:
Internal Remediation Server IPs – IP address(es) of the remediation servers accessible by clients within the secure network.
External Remediation Server IPs – IP address(es) of the remediation servers accessible by clients within the restricted network.
VPN Remediation Service IPs – The IP address(es) for the Access Control Service remediation service module for VPN clients.
(CC only) Select the checkbox to enable Sync authentication to Trustzone.
Click Send Changes and Activate.
The Health Validation Mode parameter, to be configured in Barracuda Firewall Admin within the Access Control Server Trustzones (VPN only) settings, may also be modified on the client using the following registry key:
Path |
|
Key | ScanRequired |
Value | Moderate |
Step 2. Configure the Remediation Service
In the Configuration menu on the left, select Remediation Service.

Set Start Remediation Service to yes (default) to start the Access Control Server remediation service module.
Set TLS required to yes (default) to allow unencrypted downloads from the remediation server.
Click Send Changes and Activate.
Step 3. Configure Trustzone-Border Settings
In the Configuration menu on the left, select Trustzone-Border.
Enable Start Border Health-Validator to start the Access Control Service module responsible for trustzone border health state evaluation.
In the Trustzone Border IP section, click + to add the IP address the health validator uses for listening for trustzone border health validations.
In the Foreign Health Passp. Verification section, click + to add all foreign health passport verification keys here for health passports that should be trusted for this border trustzone. The health state of clients with a signed and trusted health passport is revalidated for this trustzone; however, their authentication credentials are accepted from the signed cookie.
Add Allowed Peer Networks. Only peers from listed networks are allowed to perform trustzone border health validations.
Click Send Changes and Activate.
Step 4. Configure Advanced Settings
In the Configuration menu on the left, select Advanced.
Adjust the following settings if required:
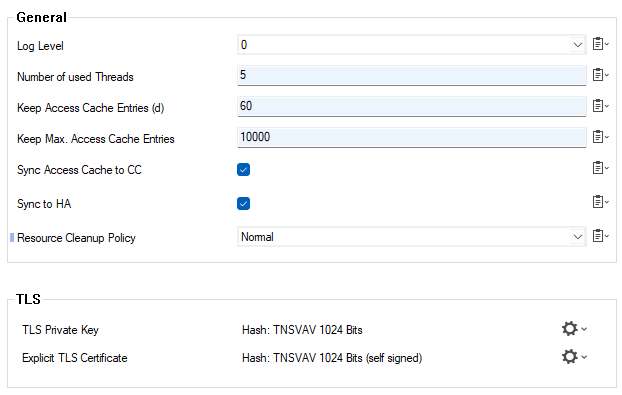
Log Level – This option defines the verbosity of log file output. Usually, it should be set to 0 (that is, no debug output). Higher values provide more detailed log information.
Number of used Threads – Number of used worker threads for health validation and remediation. The default value is 5.
This should meet the requirements in most cases. Increasing this value leads to a more reactive server, but also increases the load on the system.Keep Access Cache Entries (d) – Number of days for which access cache entries generated by activities traversing the Access Control Server should be deleted.
Keep Max. Access Cache Entries – Maximum number of access cache entries to keep.
Sync Access Cache to CC – If selected, the access cache entries of this Access Control Service are synced to the Barracuda Firewall Control Center. A consolidated health status of multiple Access Control Services will therefore be available. Additionally, the appropriate Barracuda Network Access Client service must e introduced on the CC.
Sync to HA – Enable / disable HA synchronization.
Resource Cleanup Policy – Enforce a strict resource cleanup policy in case of an overload on the service. This parameter is available only in advanced configuration mode. (Expand the Configuration Mode menu on the left and click Switch to Advanced.)
TLS/SSL Private Key – Corresponding RSA private key to be used with TLS.
Explicit TLS/SSL Certificate – The X.509 certificate to be used with TLS.

Click Send Changes and Activate.
