Before You Begin
Deploy the Barracuda Load Balancer ADC Vx on your hypervisor .
Step 1. Configure Your Firewall
If your Barracuda Load Balancer ADC Vx is located behind a firewall, open the ports below on the Barracuda network address ranges found in Required Outbound Connections for Barracuda Appliances.
| Port | Direction | Protocol | Description |
|---|---|---|---|
| 22/8788/443 | Out | TCP | Remote diagnostics and Technical Support services |
| 53 | Out | TCP/UDP | Domain Name Server (DNS) |
| 80/8000/443 | Out | TCP | Firmware updates (unless configured to use a proxy) |
| 123 | Out | UDP | Network Time Protocol (NTP) |
443 | Out | TCP | Initial VM provisioning * |
| 25 | Out | TCP | Sending system alerts and notifications to the administrator via your mail server. This port can be changed on the BASIC > Administration page. |
| Any ports used by Services | as needed | as needed | As required to access the VIP address of a load-balanced service. Configure 1:1 NATs as needed. Certain protocols, including FTP and streaming media protocols, require additional ports to be open. |
* You can disable the initial provisioning port after the initial provisioning process is complete.
Also, see Deployment Requirements for Open Network Address Ranges on Firewall.
Step 2. Start the Virtual Appliance, Configure TCP/IP, and Enter the License Token
You need a Barracuda Vx license token and a serial number, which you might have received via email or from the website when you downloaded the Barracuda Load Balancer ADC Vx package. If not, you can request an evaluation on the Barracuda website https://www.barracuda.com/purchase/evaluation or purchase one from https://www.barracuda.com/purchase/index. The license token looks similar to the following: 01234-56789-ACEFG.
- In your hypervisor client, start the virtual appliance and allow it to boot up.
- Log in to the console as admin with the password admin.
- Navigate to TCP/IP Configuration. Set the System IP Address, Subnet Mask, Default Gateway, Primary DNS Server, and Secondary DNS Server for your virtual appliance.
Navigate to Licensing. Enter your Barracuda license token and default domain to complete provisioning. The appliance will reboot as a part of the provisioning process.
Step 3. Accept the End User License Agreement and Login
- Go to http://<your ip>:8000 to access the web interface.
- Read through the End User License Agreement. Scroll down to the end of the agreement.
- Enter the required information: Name, Email Address, and Company (if applicable). Click Accept. You are redirected to the Login page.
Log into the Barracuda Load Balancer ADC Vx web interface as the administrator:
Username: admin
Password: based on the preboot version you are using- versions 4.6.1 or higher: The numeric portion of the appliance serial number, found in your invoice and in your VM setup email. In this example, use 123456: #BAR-WF-123456
- versions before 4.6.1: admin
To find the preboot version number, check the name of downloaded Vx image (zip file). The number after vm is the version number. In this example, the version is 4.6.1: BarracudaWebApplicationFirewall-p2-vm4.6.1-fw8.1.0.003-20200113-esx-vbox.zip.
For help finding the serial number of your virtual appliance, see Serial Number for Hardware and Virtual Appliances.
Step 4. Change the Administrator Password
Go to the BASIC > Administration page to change the administrator password.
Step 5. Attach Multiple Interfaces to the Deployed VM
Assign network interface cards (NICs) to the Barracuda Load Balancer ADC Vx. In the web administration interface, they are numbered in the order that you assign them. The first interface that you attach to the VM will act as the management interface and is named MGMT. The next interface that you attach to the VM (the first interface used for handling network traffic) is named ge-1-1. The next interface that you attach is named ge-1-2, and so on. Once you have restarted your VM, the interfaces are displayed on the BASIC > Dashboard page as shown below:

The Barracuda Load Balancer ADC VM requires a minimum of two interfaces, one for management and one for network traffic. You can attach more interfaces depending upon your deployment mode. For more information on the different deployment modes that are supported by the Barracuda Load Balancer ADC, see Step 6. Choose a Deployment Mode .
Steps to attach additional interfaces varies from hypervisor to hypervisor, so follow the manual of your hypervisor to add more interfaces.
Step 6. Choose a Deployment Mode
Choose the network layout that best suits your environment. For a complete list of deployment options, see Deployment . Common options include:
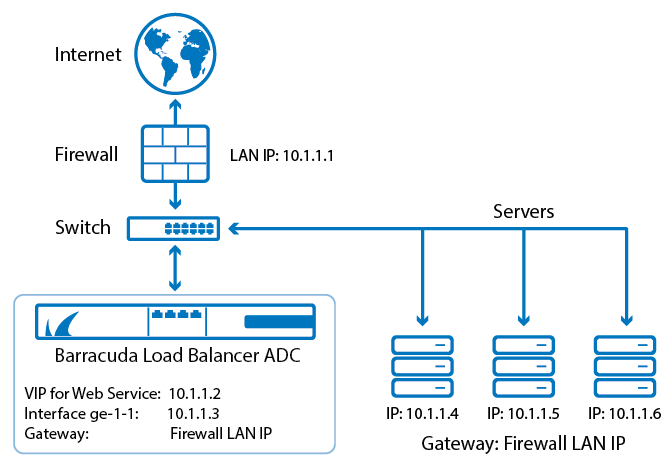
- One-armed deployment, with a TCP Proxy service, where one network connection of the Barracuda Load Balancer ADC is used for all load-balanced traffic.
Figure 1. One-armed deployment

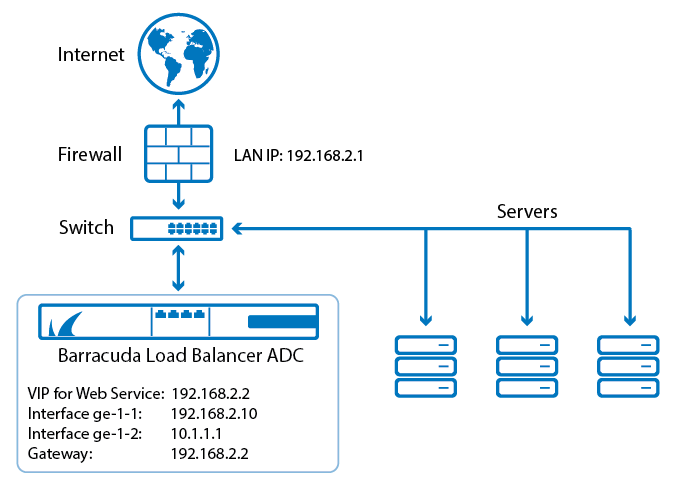
- Two-armed deployment, where the Barracuda Load Balancer ADC is deployed in-line, performing NAT from the WAN network to the LAN.
Figure 2: Two-armed Deployment

Next Step
Continue withStep 5 - How to Configure Your Network and Services .
