To integrate Microsoft 365 Defender, you must do the following:
Create an event hub namespace and event hub entity in Microsoft Azure
An event hub is temporary storage that Microsoft 365 Defender writes to and XDR reads from.
The cost of your event hub subscription depends on the pricing tier you choose and the throughput unit. You may need to increase the throughput unit based on the number of events generated by Defender 365. For more information, see the Capacity section at the end of this document.
To set up the required resource provider in the event hubs subscription
Log into the Microsoft Azure Portal.
Click Subscriptions, then click the name of the event hub subscription the event hubs will be deployed to.
Click Resource providers.
If Microsoft.Insights Provider isn’t registered, register it.
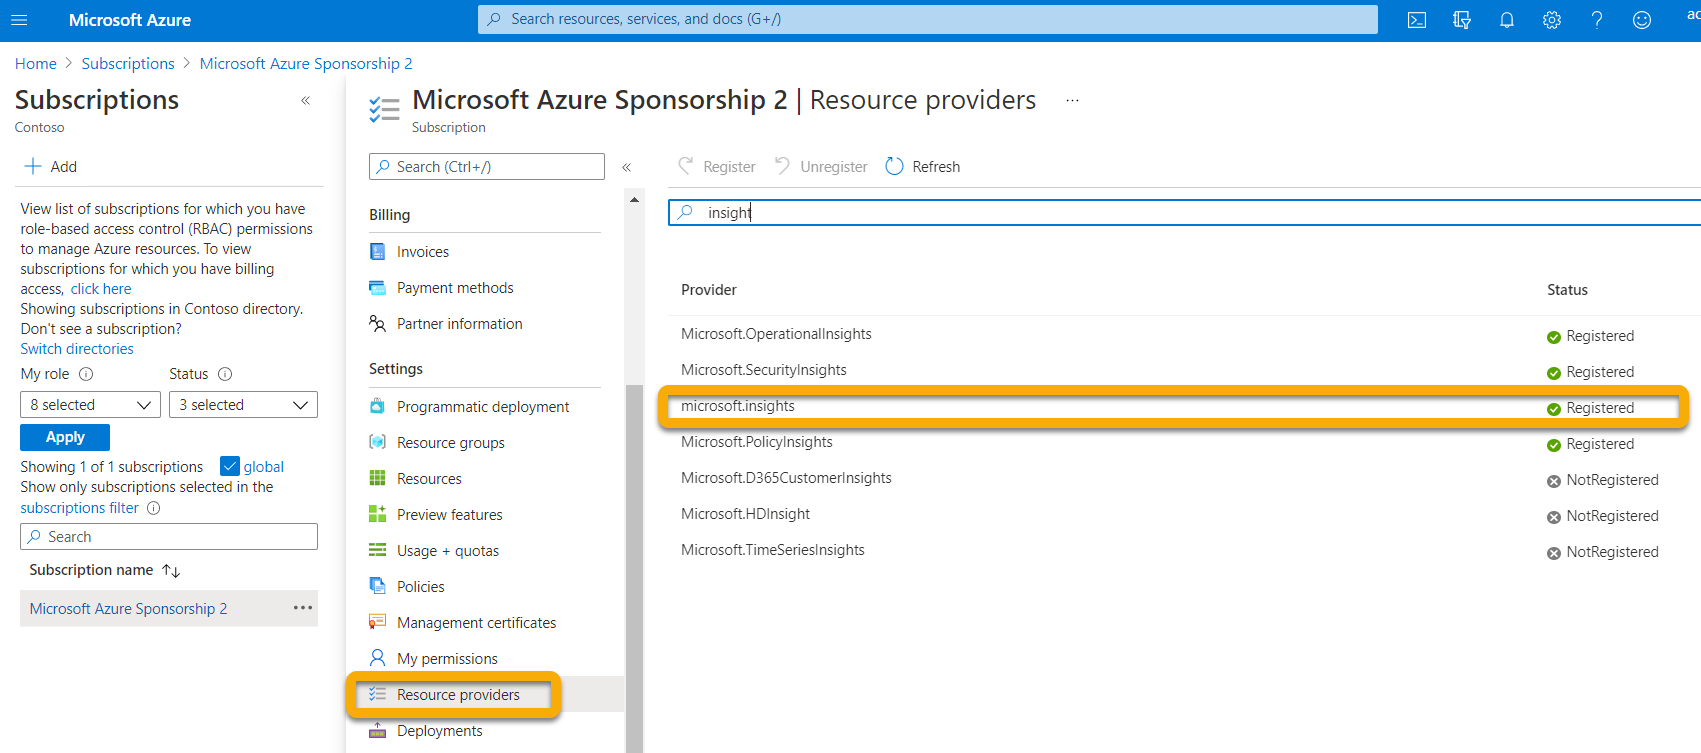
To create an event hub namespace and event hub entity in Microsoft Azure
Log into the Microsoft Azure Portal and select the tenant (directory) of the customer to be monitored.
Navigate to Event Hubs.
Click +Create.
Provide the following information:
Your subscription
Your resource group
The namespace
NOTE We suggest using the following naming convention: <acme-inc>-xdr-events where <acme-inc> is the name of the customer.Location: Select your location.
Pricing Tier: Basic
Throughput Units: See the Capacity section at the end of this document.
Networking: Public Access
Click Review/Create.
Navigate to the namespace that was created.
From the Overview screen, click +Event Hub and complete the form:
Name: m365
NOTE This is the name of your event_hub.Partition count: 1
Cleanup Policy: Delete
Retention time: 24 hours
Click Review/Create.
From the event hub click Settings > Shared access policies.
NOTE Make sure you are adding the SAS policy on the event hub, not the namespace. The namespace has its own SAS policy called RootManageSharedAccessKey.Click +Add
Enter the following information:
Name
NOTE We suggest using the value barracuda-xdr.Listen: Enabled
Click the new SAS policy and copy the Connection string–primary key. This will be used on the Barracuda XDR Dashboard.
NOTE This is your event_hub_connection_string.
For example:Endpoint=sb://<acme-inc>-xdr-events.servicebus.windows.net/;SharedAccessKeyName=barracuda-xdr;SharedAccessKey=123;EntityPath=m365
where<acme-inc>is the name of the customer.From the namespace, click Settings > Properties.
Copy the namespace id. This will be used in the Microsoft Defender Streaming API settings later on.
NOTE This is your namespace_resource_id.
For example:/subscriptions/10bd4af8-2e42-4550-a424-e565c8a047f4/resourceGroups/<acme-inc>/providers/Microsoft.EventHub/namespaces/<acme-inc>-xdr-events
where<acme-inc>is the name of the customer.
Event Hub Monitoring (optional)
You can configure event hub alerts and monitoring from the Event hub namespace.
If you did not enable autoscaling for your event hub, we recommend adding an alert for Quota Exceeded Error. If the quota is exceeded, it results in log loss.
We recommend adding alerts for ingress and egress limits so you are notified before the quota is exceeded:
Each throughput unit has the following capacities:
Ingress: 1 MB/sec or 1000 events per second
Egress: 2 MB/sec or 4,096 events per second
For a single throughput unit, the alerts may be configured as follows (you may adjust the values depending on your use case):
Ingress:
Signal Name: Incoming Bytes
Threshold: Static
Aggregation type: Maximum
Operator: Greater than
Unit: MB
Threshold: 0.85
Signal Name: Incoming Messages
Threshold: Static
Aggregation type: Total
Operator: Greater than
Unit: Count
Threshold: 850
Egress:
Signal Name: Outgoing Bytes
Threshold: Static
Aggregation type: Maximum
Operator: Greater than
Unit: MB
Threshold: 0.85
Signal Name: Outgoing Messages
Threshold: Static
Aggregation type: Total
Operator: Greater than
Unit: Count
Threshold: 850
Creating a storage account
The storage account allows event hub consumers to keep track of which events have been ingested. It's a checkpoint file which multiple consumers can write to and does not increase cost significantly.
To create a Microsoft Azure storage account
Log into the Microsoft Azure Portal https://portal.azure.com and select the tenant (directory) of the customer to be monitored
Navigate to Storage Accounts.
Click + Create.
For example:
Storage account name
NOTE We recommend using the following naming convention:<acme-inc>m365where<acme-inc>is the name of the customer.
Region: Select your region.
Performance: StandardRedundancy: GRS
Read Access checked: YesClick Review/Create.
Navigate to the storage account.
Click Security + Networking > Access Keys.
Click Show next to Key1 and copy the value. This will be used on the Barracuda XDR Dashboard.
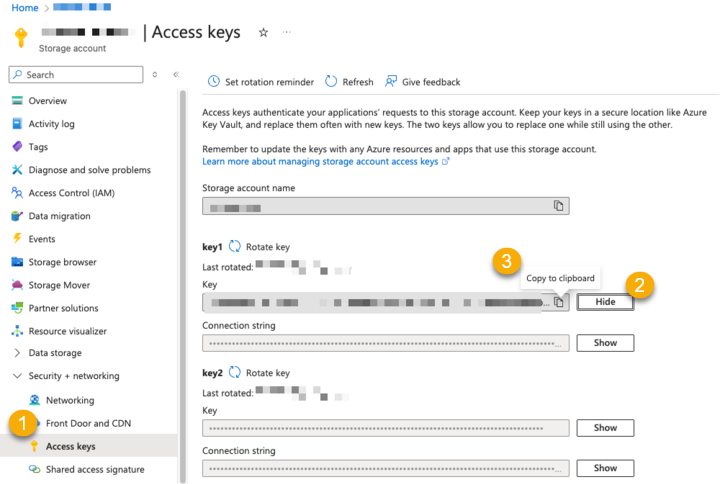
Copy the value.
NOTE This is your storage_account_access_key.
Storage account monitoring (optional)
The storage account is expected to contain a single small file. We recommend adding an alert to make sure the storage account does not exceed a certain threshold.
Storage Account alerts
Signal Name: Used capacity
Threshold: Static
Aggregation type: Average
Unit: MiB
Threshold: 100
Setting up log streaming
Log in to the Microsoft Defender portal as a Global Admin or Security Administrator.
Go to System >Settings > Microsoft 365 Defender XDR.
Click Streaming API.
Click + Add.
Choose a name for your new settings.
Select Forward events to Azure Event Hubs.
Enter your Event-Hub name (event_hub) and Event-Hub Resource ID (namespace_resource_id).
For example:
Name: m365-event-hub
Event-Hub Resource ID:/subscriptions/10bd4af8-2e42-4550-a424-e565c8a047f4/resourceGroups/<acme-inc>/providers/Microsoft.EventHub/namespaces/<acme-inc>-xdr-events
where<acme-inc>is the name of the customer.
Event-Hub name: m365
Event Types: Select all event types except for “Identity Info”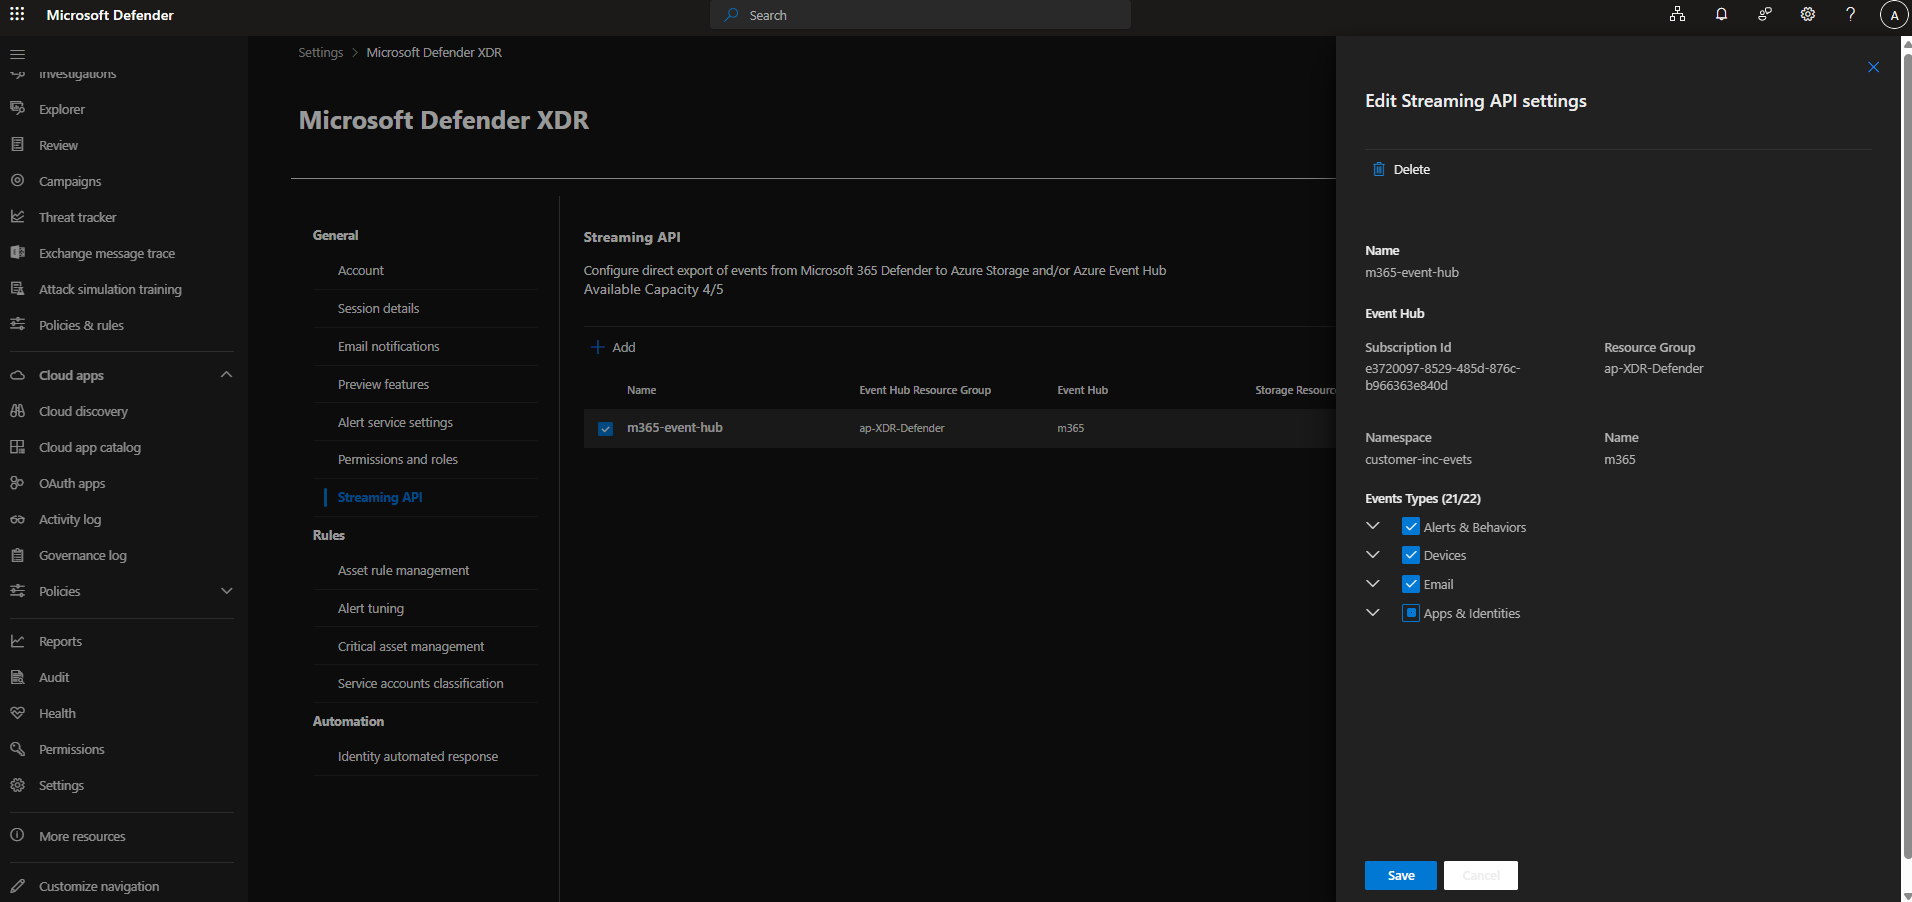
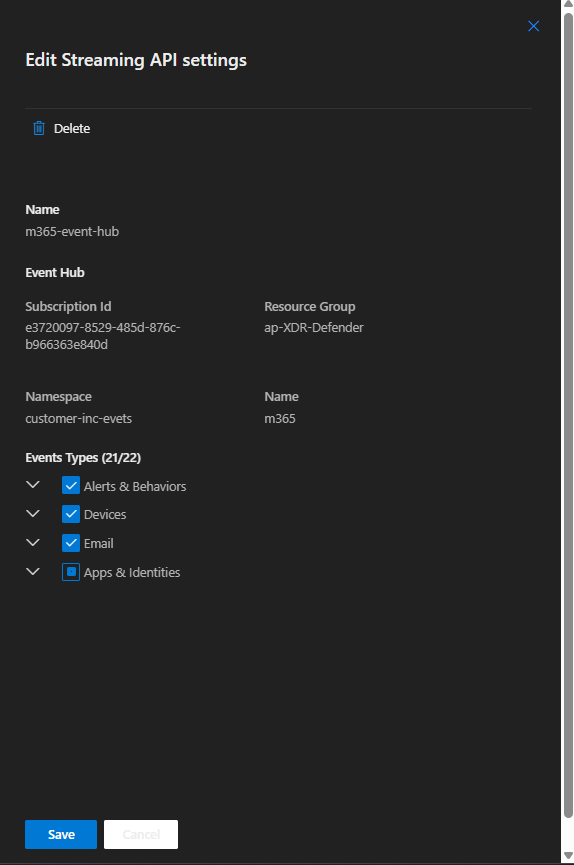
Click Submit.
Creating an app key for incidents/alerts api
Sign in to the Microsoft Entra admin center.
If you have access to multiple tenants, use the Settings icon in the top menu to switch to the tenant in which you want to register the application from the Directories + subscriptions menu.
Click Identity > Applications > App registrations.
Select New registration.
Type a display Name for your application. Specify who can use the application in the Supported account types section.
For example:
Display Name: m365api
Supported account types: Users within the current tenantFrom the app registration overview screen obtain the tenant_id and client_id. This will be used on the Barracuda XDR dashboard.
For example:
Tenant id: 1286cb4f-9975-4e91-a711-6bfd1e2a049dClient id: 1290db81-e444-4619-a87b-1d88365959a5
Click Certificates & secrets.
Add a new secret. We recommend an expiration of 24 months.
For example:
Name: xdr-m365-apiCopy the secret value, also known as the client_secret.
WARNING Ensure you copy the secret value, not the secret id.
Granting permissions to the application
The Microsoft Entra tenant administrator MUST explicitly grant the permissions to the application. This must be done per tenant and must be performed every time the application permissions are changed in the application registration portal.
Sign in to the Microsoft Entra admin center.
If you have access to multiple tenants, use the Settings icon in the top menu to switch to the tenant in which you want to register the application from the Directories + subscriptions menu.
Click the app you created in the previous procedure.
Go to the app's API permissions page.
Select Add a permission and then choose Microsoft Graph.
Click What type of permissions does your application require > Select Application permissions.
Use the search box to find and select the required permissions: SecurityIncident.Read.All.
Click Add permissions.
Grant Admin Consent.
Enable Microsoft 365 Defender
In Barracuda XDR Dashboard, navigate to Administration > Integrations.
On the Microsoft 365 Defender card, click Setup.
Select the Enabled check box.
Fill out the following information:
Event Hub
Connection String
Storage Account
Access Key
Tenant ID
Client ID
Client Secret
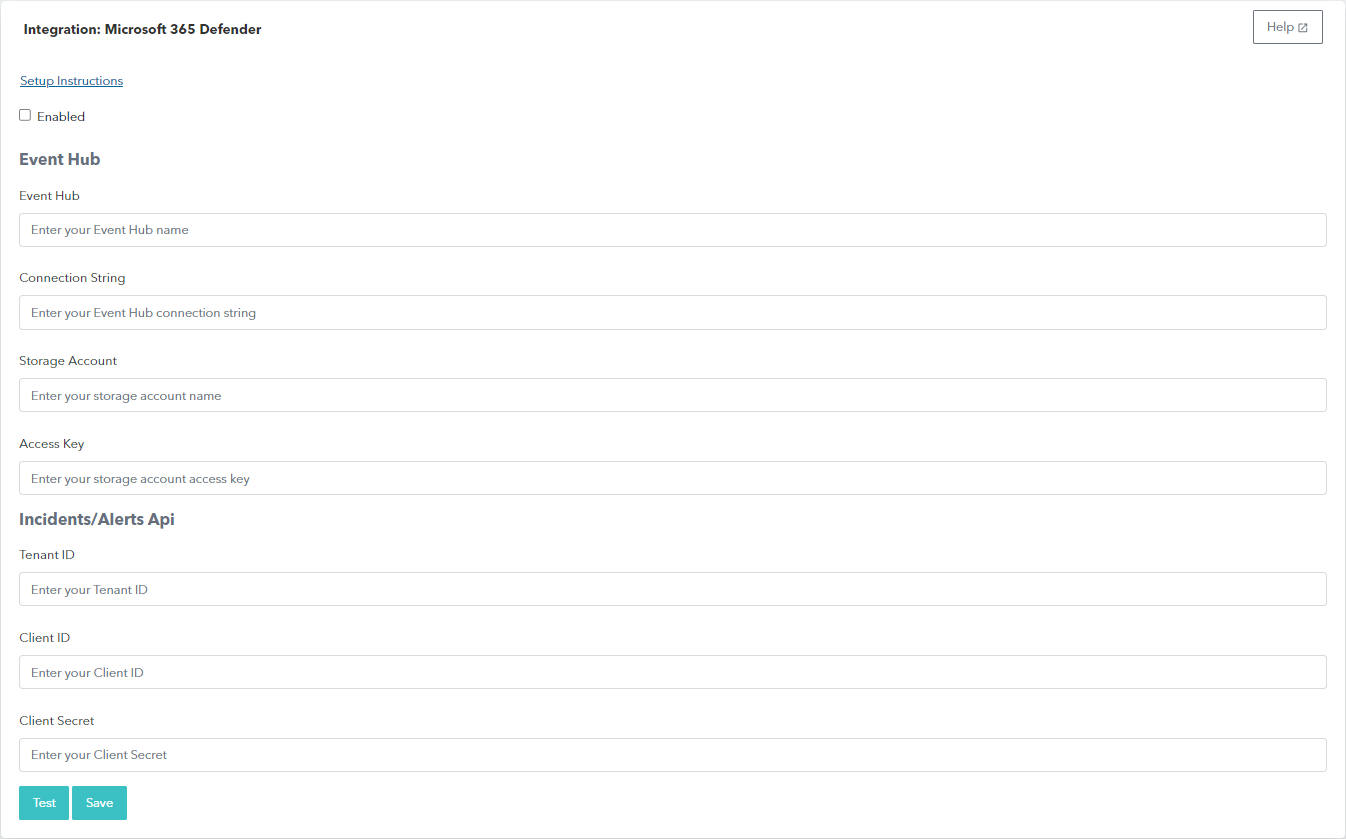
Optional: Click Test to test the connection. When the connection is successful
, proceed to the next step.
Click Save.
Capacity
The event hub throughput unit determines its capacity. For more information, see https://learn.microsoft.com/en-us/azure/event-hubs/compare-tiers .
The basic tier has the following quotas:
Number of consumer groups per event hub | 1 |
Maximum retention period of event data | 1 day |
Throughput per unit | Ingress: 1 MB/sec or 1000 events per second |
To help determine the required event hub throughput unit, you can run the following query.
Log into security.microsoft.com
Navigate to Hunting > Advanced hunting.
Ensure Last 7 days is selected.
Create a new query, then copy and paste the following, then run the query:
let bytes_ = 1000;union withsource=MDTables *| where MDTables in ('AlertEvidence', 'AlertInfo', 'DeviceEvents', 'DeviceFileCertificateInfo', 'DeviceFileEvents', 'DeviceImageLoadEvents', 'DeviceInfo', 'DeviceLogonEvents', 'DeviceNetworkEvents', 'DeviceNetworkInfo', 'DeviceProcessEvents', 'DeviceRegistryEvents', 'EmailAttachmentInfo', 'EmailEvents', 'EmailPostDeliveryEvents', 'EmailUrlInfo', 'IdentityLogonEvents', 'IdentityQueryEvents', 'IdentityDirectoryEvents', 'CloudAppEvents', 'UrlClickEvent')| where Timestamp > startofday(ago(7d))| summarize count() by bin(Timestamp, 1m), MDTables| extend EPS = count_ / 60| summarize avg(EPS), estimatedMBPerSec = avg(EPS) * bytes_ / (1024*1024) by MDTables, bin(Timestamp, 3h)| summarize avg_EPS = max(avg_EPS), estimatedMBPerSec = max(estimatedMBPerSec) by MDTables| sort by toint(estimatedMBPerSec) desc| project MDTables, avg_EPS, estimatedMBPerSec| as IndividualTableMetrics| union ( IndividualTableMetrics | summarize avg_EPS = sum(avg_EPS), estimatedMBPerSec = sum(estimatedMBPerSec) | extend MDTables = "Total")
If the total avg_EPS > 1000, or estimateMBPerSec > 1, you may need to increase the throughput unit for your event hub. Configure the throughput unit so that it is able to handle the peak ingress. You may also choose to enable autoscaling of your event hub. If you choose this option, we recommend that you monitor the usage details and create alerts to ensure there are no unexpected costs.
Example Output
MDTables | avg_EPS | estimatedMBPerSec |
Total | 1400 | 0.4 |
For this event hub, a throughput unit of 2 is adequate to handle the peak ingress of 1400 EPS.
