Proxy Connect acts as an intermediary between a client and a server. It intercepts requests and forwards them, offering benefits such as enhanced privacy, security, and performance. You can enable Proxy Connect in the advanced settings of your existing Sites. When Proxy Connect is enabled, the firewall will listen by default on all service IPs and on ports 3128 and 8080. In addition, you can also specify arbitrary IP:port combinations to be used instead. To perform an HTTP proxy, you can enable Proxy Connect settings on a Site from all LANs to the Internet (WAN). Note that Proxy Connect feature does not allow proxy authentication, but does provide the same security features that a TLS-inspected session can get on SecureEdge.
The Barracuda SecureEdge Manager allows you to configure Proxy Connect, a new feature available for your Sites and Private Edge Services. When Proxy Connect is enabled, the SecureEdge appliance uses either the default listening sockets or user-configured listening sockets.
Requirements and Limitations
To enable Proxy Connect, you need to update your SecureEdge appliances to firmware version 9.0.3 or higher.
By default, Proxy Connect settings are disabled for new or existing Sites or Private Edge Services.
You can define Proxy Connect sockets only when the Proxy Connect setting is enabled.
Note that the Proxy Connect sockets are an optional setting. If these inputs are not provided, the LANs of the Site/Private Edge Service will be used with ports 3128 and 8080, instead.
If you configure Proxy Connect sockets, the default sockets will not be used.
There is no limit to the number of sockets.
Proxy Connect is not supported on any type of bridges.
The use of special-use ports such as 691 or 443 is possible on Proxy Connect. However, this may break other services.
Proxy Connect does not support Web Filter policies when Action is set to Alert/Warn.
Use Case
The Proxy Connect feature is intended for users who do not use the Web Security Gateway (WSG) / Site device in a transparent inline fashion, but instead have their clients explicitly configured to use the WSG/Site device as a proxy. You can deploy a WSG/Site device in Forward Proxy Deployment mode. In addition, you can replace your WSG device with a SecureEdge T appliance. To configure a SecureEdge Site device as a proxy, you must enable and configure the Proxy Connect feature. For more Information on WSG deployments, see How to Configure the SecureEdge Environment for Web Security Gateway (WSG) Migration.
Enable Proxy Connect Settings on the Private Edge Service
Go to https://se.barracudanetworks.com and log in with your existing Barracuda Cloud Control account.
In the left menu, click the Tenants/Workspaces icon and select the workspace containing your Private Edge Service.
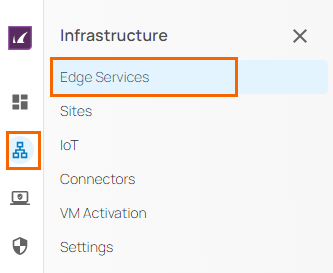
Go to Infrastructure > Edge Services.

The Edge Services page opens. Select the Private Edge Service you wish to enable Proxy Connect settings for.
Click on the arrow icon next to the Private Edge Service you are interested in.

The selected <Name of Your Private Edge Service > page opens.
In the Edge Services menu, go to Settings > Advanced Settings.

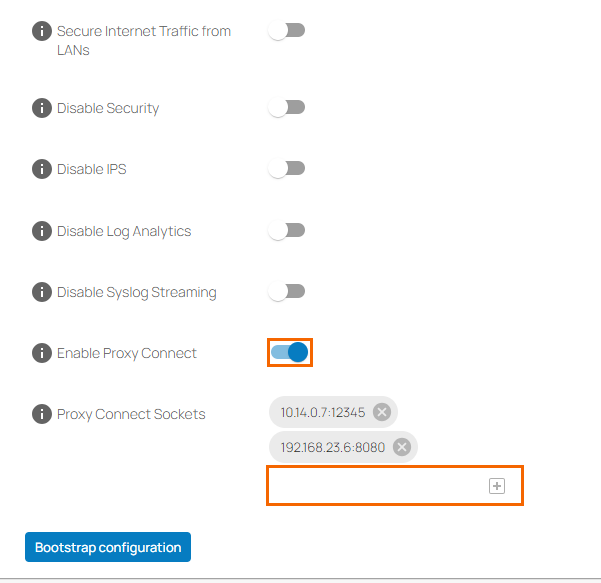
In the Advanced Settings section, specify the value for the following:
Enable Proxy Connect – Click to enable/disable. By default, Enable Proxy Connect is disabled.
When Enable Proxy Connect is enabled, specify the value for the following:
Proxy Connect Sockets – Enter the IP address in combination with a valid port. Click + to add more IP addresses.
When Enable Proxy Connect is disabled, you cannot enter the IP address for Proxy Connect sockets.

Click Save.
Enable Proxy Connect Settings on the Site
Go to https://se.barracudanetworks.com and log in with your existing Barracuda Cloud Control account.
In the left menu, click the Tenants/Workspaces icon and select the workspace containing your Site.
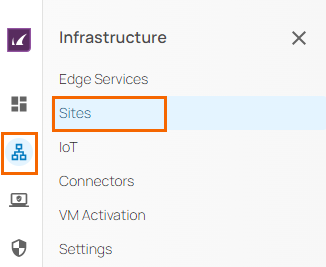
Go to Infrastructure > Sites.

The Sites page opens. Select the Site you wish to enable Proxy Connect settings for.
Click on the arrow icon next to the Site you are interested in.

The selected <Name of Your Site> page opens.
In the Sites menu, go to Settings > Advanced Settings.

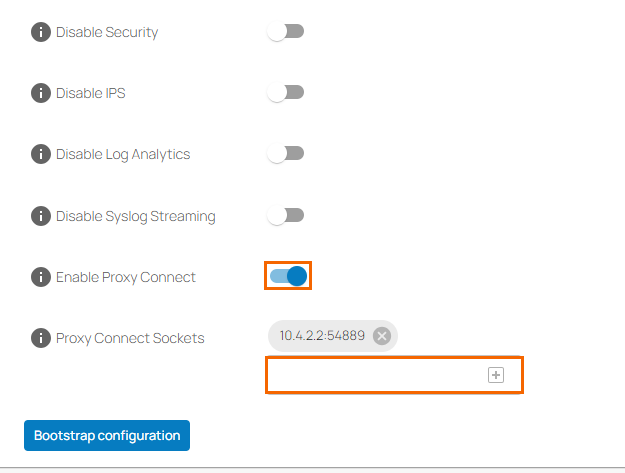
In the Advanced Settings section, specify the value for the following:
Enable Proxy Connect – Click to enable/disable. By default, Enable Proxy Connect is disabled.
When Enable Proxy Connect is enabled, specify the value for the following:
Proxy Connect Sockets – Enter the IP address in combination with a valid port . Click + to add more IP addresses.
When Enable Proxy Connect is disabled, you cannot enter the IP address for Proxy Connect sockets.

Click Save.
