The Finished Scans page lists each completed scan by name under the associated URL. Click the arrow to the left of the URL name to display or hide the list of scans.
On this page, you can view the date and time the scan was completed and the scan status, including details about vulnerabilities found during the scan.
Viewing Basic Scan Status
The Status bar is color coded, so you can see basic information at a glance. Colors include:
-
Red – Maximum level of vulnerabilities found is critical.
- Yellow – Maximum level of vulnerabilities found is medium.
- Grey – Maximum level of vulnerabilities found is low.
The length of the Status bar correlates to a weighted measure of the severity and number of vulnerabilities found. Longer bars correlate to the measure of vulnerabilities on your web application.
The Status section also displays problems including:
- Error During Scan – Indicates scan did not complete successfully.
- Scan Cancelled – Indicates scan was cancelled manually.
If a scan did not run to completion, you can view a partial report to see results from the areas that were scanned.
Searching For and Deleting Scans
To refine the list of scans, begin typing in the Search field, or use the navigation tools to move through the list.
You can select one or more check boxes next to scan names, then click Delete to remove the selected scans, or select the check box to the left of the Scan Name heading at the top of the table, and then click Delete to remove all scans listed in the Finished Scans table.
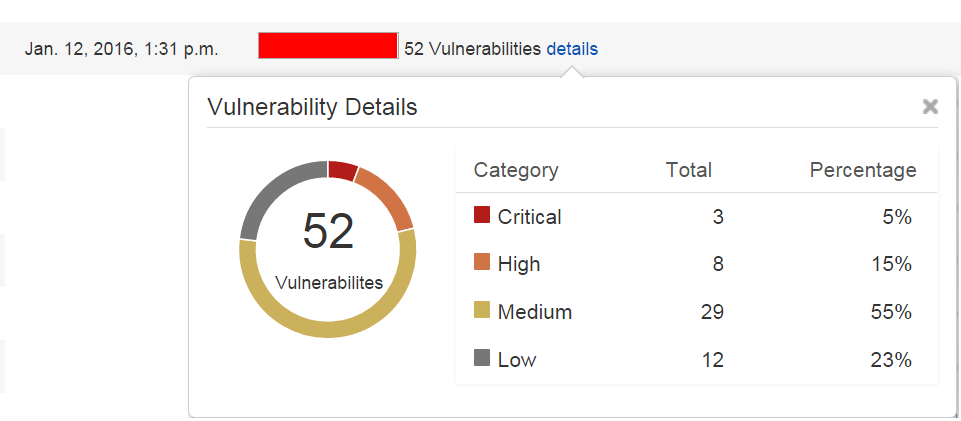
Viewing Scan Vulnerability Details
The Status field displays based on the scan outcome:
- No Vulnerabilities Found – Indicates scan completed successfully and found no vulnerabilities.
-
n Vulnerabilities – Indicates the scan completed successfully and found n number of vulnerabilities. Click details for more information:

Copying a Scan
To run a scan again, or to create a similar version of the same scan, in the Actions column, click Copy in the appropriate row of the Finished Scans table.
When you click Copy, the Scan Configuration window appears, pre-filled with the information from the original scan you copied. At this point, you have two options:
- To run the same scan again – If you choose, change the scan name. Do not make any changes to the configuration parameters. Click Start Scan.
- To run a similar scan – If you choose, change the scan name. Change some of the configuration parameters. Click Start Scan.
The Copy function is the same on the Finished Scans and Active Scans pages.
Viewing Reports
Click View in the Reports column to view the Barracuda Vulnerability Manager Report for the selected scan. The report appears. Refer to the following articles for information on understanding and working with reports:
- Understanding Barracuda Vulnerability Manager Reports
- Interacting with the Barracuda Vulnerability Manager Reports
Downloading Reports
lick Download and select to download the report to your local system as a PDF, XML, or CSV file.
You can import an XML file into the Barracuda Web Application Firewall. Refer to Integrating with Barracuda Web Application Firewall for details.
Flagging a Scan
Click the flag icon ( ) to the left of a scan name to mark it in red (
![]() ), so it is easier to find next time you want to view it.
), so it is easier to find next time you want to view it.
