

Configuring Multiple Identity Providers
Multiple Identity Providers can be configured to a SAML authentication service on the Barracuda Web Application Firewall. You can add maximum of ten (10) Identity Providers to the SAML authentication service. If a user attempts to access a service that is configured with multiple Identity Providers, the user is provided with an Identity Provider Selection page, where the user can select an Identity Provider for authentication. The Barracuda Web Application Firewall redirects the user to the selected Identity Provider for authentication.
Add multiple Identity Providers
- Go to the ACCESS CONTROL > Authentication Services page.
- In the Existing Authentication Services section, click Add next to the SAML authentication service to which you want to add an Identity Provider.
- In the Add Identity Provider window, specify values for Identity Provider Name, Identity Provider Entity ID, and Identity Provider Metadata URL (or upload the metadata file).
- Click Add.
- To add another Identity Provider, repeat Step 1 to 4.
After adding multiple Identity Providers, configure the Identity Provider (IdP) selection page and logout URL for the service by following the steps below:
- Go to the ACCESS CONTROL > Authentication Policies page.
- In the Authentication Policies section, click Edit Authentication next to the service to which you have associated the SAML authentication service that is configured with multiple Identity Providers.
- In the Edit Authentication Policies window:
- Ensure that the SAML authentication service associated with the service is the same to which multiple Identity Providers are configured.
- In the Access Control Pages section, if you want to display a custom logout page to the users:
- Click Show Advanced Settings.
- Select Custom from the Logout Successful Page list.
- In Auth Logout Successful URL, enter the URL to which the user needs to be redirected after a successful logout. If the URL is not specified, the Barracuda Web Application Firewall displays the default logout page upon a successful logout.
- Specify values for other parameters as required and click Save.
Configuring SAML Attributes
The Barracuda Web Application Firewall can authorize users accessing the secure web application based on the attributes configured in the access rules. The user is granted access to the secure web application only if the attribute(s) and their values are matched successfully.
To configure SAML attributes, perform the following steps:
- Go to the ACCESS CONTROL > Authentication Policies page.
- In the Authentication Policies section, click Edit Authentication next to the service to which SAML authentication service is associated.
- In the Edit Authentication Policies window, scroll down to the SAML Service Provider Configuration section and do the following:
- Under Privacy Policy, select the encryption certificate if you want the response from Identity Provider to be encrypted.
- Under Attributes Configuration, add the attributes that needs to be filtered by the Service Provider (SP) in the incoming SAML response. The configured attributes can be specified in the access rule to authorize users based on the values of attributes.
- Name - The name of the attribute that appears in the assertions sent by the IDP.
- ID - A name to identify this attribute on the Barracuda Web Application Firewall.
- Type - Select the type for the attribute value in the assertions. The Barracuda Web Application Firewall uses this setting to match assertion attribute values with the configured access rules. Example: Name -http://schemas.xmlsoap.org/ws/2005/05/identity/claims/name , ID - name, Type - String.
Format - Select the type of the SAML format to be filtered for Access Control.
- uri: An attribute used by attribute name. This uses the uri_old namespace.
- Basic: An attribute in which the attribute name uses a simple string value. This is the default format if no format is specified.
- Unspecified: The attribute name can be any format. The identity provider defines the format, and the service provider accepts the format and provide the required service to the user.
- Repeat the Step 3 (b) to add required attributes.
- Click Save.
Configure the attributes if you want the service provider (i.e., Barracuda Web Application Firewall) to apply the access rule(s) to authorize users accessing the service. After adding the required attributes, configure the access rule for the defined attributes. To configure the access rule, see Configuring Access Rule .
Sending SAML Attributes to the Backend Server
The Barracuda Web Application Firewall sends the attributes (i.e., Local_ID and the value mapped with it) to the backend server as part of the headers in the request.
Attribute Name Mapping
SAML attributes can be configured under Attributes Configuration by editing an authentication policy associated with the service on the ACCESS CONTROL > Authentication Policies section. For more information, see Configuring SAML Attributes.
For example, consider the following is the attribute statement sent by the IDP in the SAML response:
<saml:AttributeStatement>
<saml:Attribute Name="uid" NameFormat="urn:oasis:names:tc:SAML:2.0:attrname-format:uri">
<saml:AttributeValue xsi:type="xs:string">johnkerry</saml:AttributeValue></saml:Attribute>
<saml:Attribute Name="mail" NameFormat="urn:oasis:names:tc:SAML:2.0:attrname-format:uri">
<saml:AttributeValue xsi:type="xs:string">john@gmail.com </saml:AttributeValue>
</saml:Attribute>
</saml:AttributeStatement>
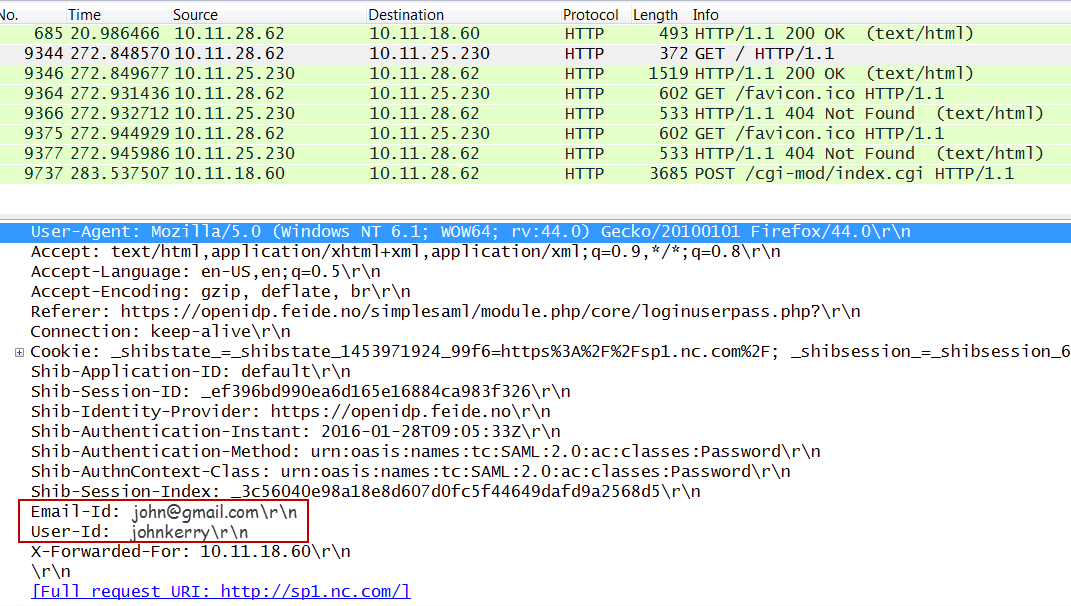
In the above SAML response, “uid” and “mail” are the two (2) attributes. If the backend server expects the “uid” and “mail” attributes as “User-Id” and “Email-id” headers, then create the attribute map as shown in the screen shot below.

After successful authorization, the matching attributes from the SAML response will be sent to the backend server as HTTP headers as shown in the packet capture below:
Configuring Access Rules (Optional)
You can create access rules based on the attributes configured in the ACCESS CONTROL > Authentication Policies page. This configuration is needed only when you want the service provider (SP) to authorize the users based on the configured access rules.
- Go to the ACCESS CONTROL > Authentication Policies page.
- In the Access Rules section, click Add Access Rule, and specify values for the following fields:
- Service Name - Select the service to which you want to configure the access rule.
- Rule Name - Enter a name for the access rule.
- Attributes - Select the attribute and specify the value to be matched to it from the response received from the Identity Provider. Use the plus (+) button to add multiple attributes. If you configure multiple attributes for a rule, the Barracuda Web Application Firewall will look for all attributes in the response from the Identity Provider and match with their values. Access will be granted only if all attributes and their values are matched successfully. Example: Name = user1@<AD domain>, where Name is the attribute ID and user1@<AD domain> is the value. If this attribute and value is configured in the access rule and selected in Authorization Policy for a service, only user1 will have access to the website URL.
- Click Save to add the rule.
- On the ACCESS CONTROL > Authentication Policies page, in the Authentication Policies section:
- Click Add/Edit Authorization next to the service to which you want to apply the configured access rule(s) to authorize users accessing the service.
- Select the check box or check boxes next to the access rules that need to be applied in the authorization policy.
Configuring an Attribute with Multiple Values in Access Rules
If an attribute sent by the IDP in the SAML response contains multiple values, and you want one of those values to be matched in the request, do the following configuration:
As an example, consider “Role” is the attribute sent by the IdP in the SAML response with multiple values: admin, manager, guest, etc. You want the Barracuda Web Application Firewall to allow only admin and managers to access the resource. Perform the following steps to configure the attribute with multiple values in access rules:
- Go to the ACCESS CONTROL > Authentication Policies page.
- In the Authentication Policies section, click Edit Authentication next to the service, and add attribute name mapping for the attribute “Role” under Attributes Configuration. For more information on how to add an attribute, see Configuring SAML Attributes.

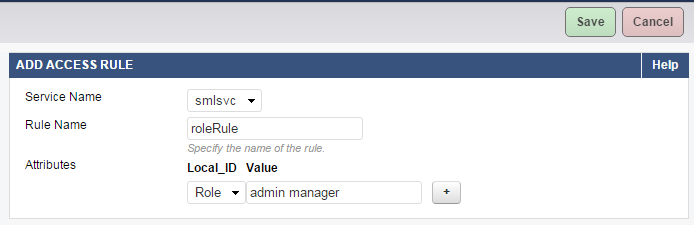
- In the Access Rules section, click Add Access Rule and specify values for the following fields:
- Rule Name - Enter a name for the rule.
- Attributes – Select the attribute and specify the value to be matched against the response(s) received from the Identity Provider (IdP).
- Local_ID: Select “Role” from the drop-down list.
- Value: Specify multiple values separated with a space. Example: admin manager
- Click Save.
- In the Authentication Policies section, click Edit next to the authorization policy associated with the service.
- On the Edit Authorization Policy page:
- Select the access rule you created in Step 1b next to Access Rules..
- Specify values for other parameters if required, and click Save.
- In the Authentication Policies section, click Edit Authentication next to the service, and add attribute name mapping for the attribute “Role” under Attributes Configuration. For more information on how to add an attribute, see Configuring SAML Attributes.
Configuring SAML Endpoints Manually on the Identity Provider Using the Service Provider Metadata
Locate and open the metadata file saved on your local machine using a text editor or a web browser to view the content. The metadata file of the service provider (SP) contains the following information:
- Certificate to be used for signing and encryption (optional).
- SAML login and logout endpoints.
- Organization details.
Perform the following steps to manually configure SAML endpoints on the Identity Provider using the SP metadata file:
As an example, consider the metadata file generated on the Barracuda Web Application Firewall contains the following details:
<md:SingleLogoutService Binding=
"urn:oasis:names:tc:SAML:2.0:bindings:HTTP-Redirect" Location="https://sp1.nc.com/Saml.sso/SLO/Redirect"/>
<md:AssertionConsumerService Binding=
"urn:oasis:names:tc:SAML:2.0:bindings:HTTP-POST" Location="https://sp1.nc.com/Saml.sso/SAML2/POST" index="1"/>
- Locate the “AssertionConsumerService” tag in the metadata file and copy the “Location” field value associated with it.
- Configure the copied value under the “Assertion Consumer Service” option on the Identity Provider’s web page. Some Identity Providers refer “AssertionConsumerService” as “Reply URL”.
- Locate the “SingleLogoutService” tag in the metadata file and copy the “Location” field value associated with it.
- Configure the copied value under the “SingleLogoutService” option on the Identity Provider’s web page.
- Save the configuration.