You can configure Automated Threat Response (ATR) via the SecureEdge Manager. When malicious intent is detected by external services in the Barracuda XDR platform, Barracuda XDR sends ATR requests to SecureEdge. An ATR request is a request to block access to the network for a given IP address or address range for users, URLs, and both public and private IPs in the network. In SecureEdge, these block requests translate to network ACL rules. By enabling and configuring ATR, malicious traffic can be blocked automatically, thereby reducing the time a threat remains active.
Requirements
You must have a valid Barracuda XDR subscription and an appropriate account in Barracuda XDR.
You must have access to Barracuda SecureEdge.
Barracuda XDR must be integrated in SecureEdge. For more information, see How to Configure Barracuda XDR in SecureEdge.
Step 1. Configure ATR in SecureEdge
Go to https://se.barracudanetworks.com and log in with your existing Barracuda Cloud Control account.
In the left menu, click the Tenants/Workspaces icon and select the workspace you want to configure ATR for.
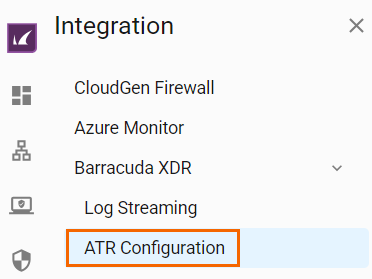
Go to Integration.
Expand the Barracuda XDR menu on the left and select ATR Configuration.
The ATR Configuration page opens. Specify values for the following:
Automated Threat Response – Click to enable/disable. By default, Automated Threat Response is disabled.
When Automated Threat Response is enabled, you can see the values for following parameters:
XDR Account – Displays the account name you have configured in the XDR system.
Authentication Token – You must copy the displayed authentication token. Note: You required this value in Step 2. After the XDR account is registered, the authentication token is no longer visible on the ATR Configuration page of SecureEdge.
When Automated Threat Response is disabled, you cannot configure Barracuda XDR ATR integration.

Click Save.
Copy the authentication token now, which you will need in the next step to complete the integration.
Step 2. Configure ATR within Barracuda XDR
Go to the Barracuda XDR platform and follow the instructions in Setting up ATR for SecureEdge.
After you provide the authentication token and complete the configuration, you can verify the status of your ATR configuration in SecureEdge for a selected workspace. The ATR status is shown as Connected on the ATR Configuration page in SecureEdge. All Block rules generated by ATR are audited appropriately in SecureEdge. For example, ATR integration is configured and enabled for a workspace, and XDR has created block rules in that workspace. You can see these rule entries have been made on the Reports >Audit Log page.
Additional Information
ATR Block Requests Translated to Network ACL Rules
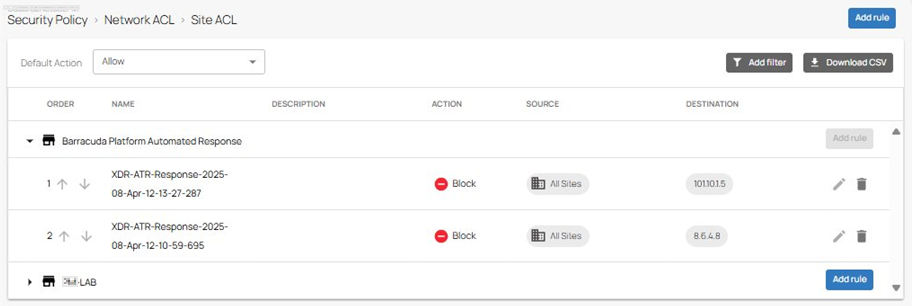
Each block action within XDR creates a new ACL rule in SecureEdge. For example, if you configure a network ACL rule for a specific workspace in SecureEdge to block traffic from a LAN client with the IP address 10.14.12.34 to an internet server with the IP address 8.6.4.8, this will result in the creation of a corresponding ACL rule. When Barracuda XDR detects malicious content, it sends an ATR request to SecureEdge. This request aims to block network access for the given IP address. In response, SecureEdge creates a block rule named XDR-ATR-Response-<Timestamp> in the Barracuda Platform Automated Response sections of the Site ACL rules with a source of All Sites. Note the following key points regarding ATR block rules:
The ACTION for these rules is set to Block. You can see these rules on the Security > Network ACL > Site ACL page or the Edge Service ACL page.
You cannot create rules within the Barracuda Platform Automated Response section.
The ATR block rules under the Barracuda Platform Automated Response section cannot be edited because the Edit icon is disabled. However, SecureEdge Manager users can delete these ATR policies. This can be done on an individual basis; for example, users can delete only the policy in the Edge Service ACL table while retaining the policy in the Site ACL table.
The ATR policies always take precedence over all other user-configured policies, which means they can override those policies when necessary.
You can disable SecureEdge to XDR ATR integration either by clearing the configuration from the XDR side or disabling Automated Threat Response on the SecureEdge side. When the XDR ATR integration with SecureEdge is disabled, the rules remain in the respective table of the Edge Service ACL or Site ACL and must be deleted by the admin manually.