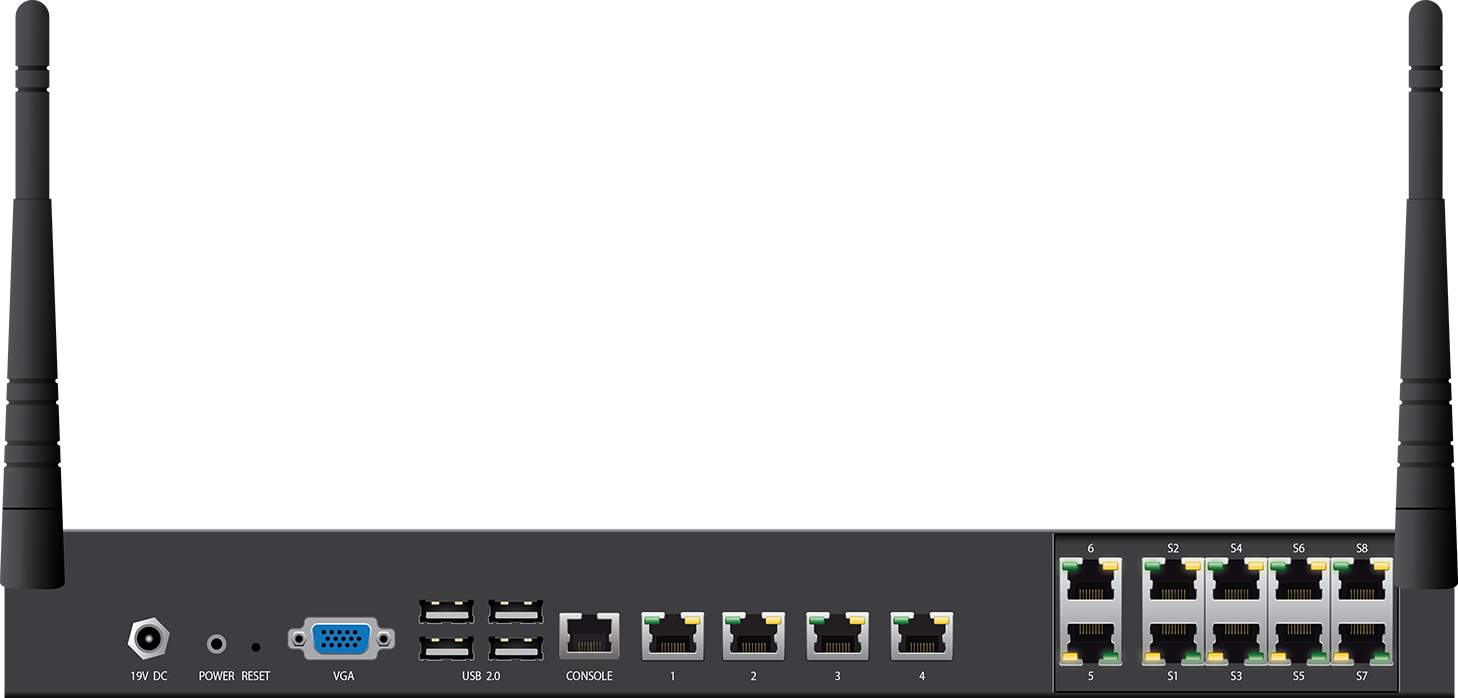
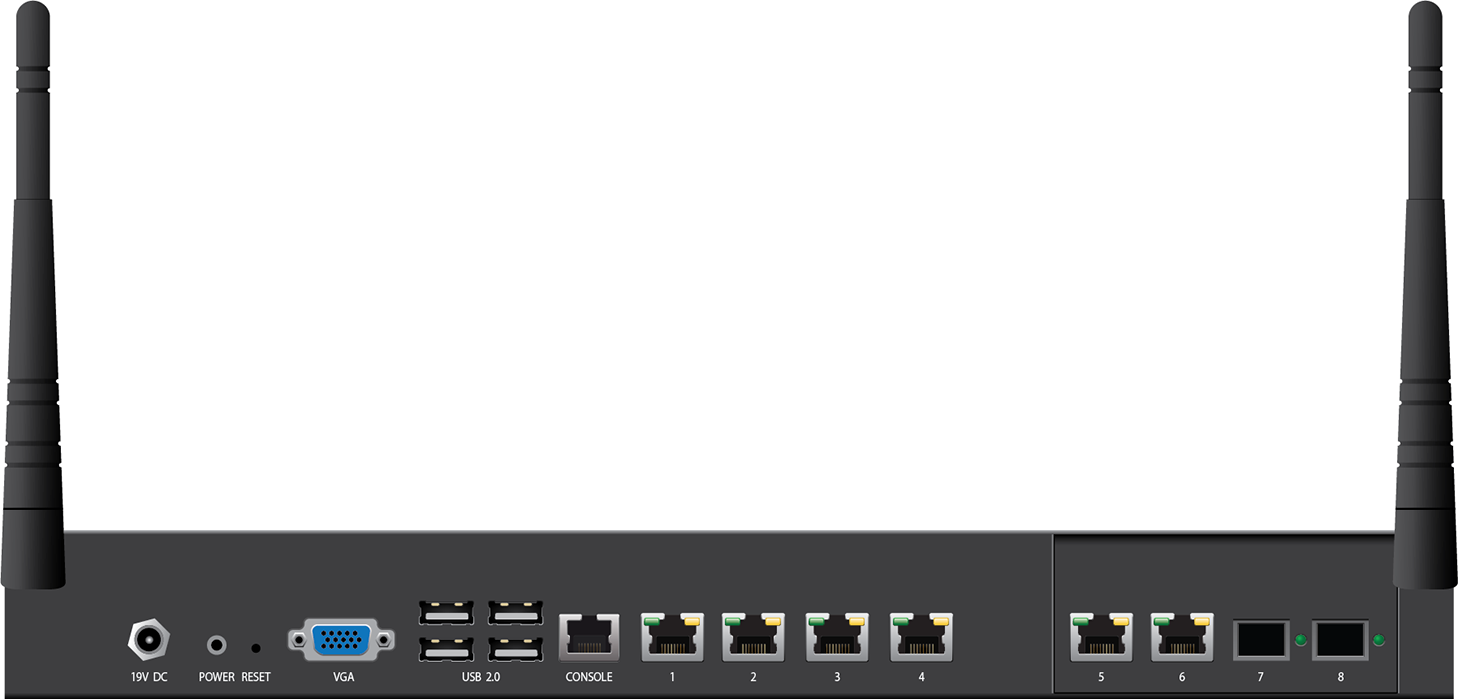
eF180 Rev. A Standard Model


Model F183 Rev. A


Default Port Configuration
Port Label | OS Notation | Speed/Type | Management Port |
|---|---|---|---|
1 | p1 | 10/100/1000 MBit RJ45 | X |
2 | p2 | 10/100/1000 MBit RJ45 |
|
3 | p3 | 10/100/1000 MBit RJ45 |
|
4 | p4 | 10/100/1000 MBit RJ45 |
|
5 | p5 | 10/100/1000 MBit RJ45 |
|
6 | p6 | 10/100/1000 MBit RJ45 |
|
s1-s8 | s | 10/100/1000 MBit RJ45 | switch |
Model F183 A Port Configuration
Port Label | OS Notation | Speed/Type | Management Port |
|---|---|---|---|
1 | p1 | 10/100/1000 MBit RJ45 | X |
2 | p2 | 10/100/1000 MBit RJ45 |
|
3 | p3 | 10/100/1000 MBit RJ45 |
|
4 | p4 | 10/100/1000 MBit RJ45 |
|
5 | p5 | 10/100/1000 MBit RJ45 |
|
6 | p6 | 10/100/1000 MBit RJ45 |
|
7 | p7 | 1 GbE Optical Fiber SFP |
|
8 | p8 | 1 GbE Optical Fiber SFP |
|
Hardware Specifications
Interface | |
|---|---|
Model F180 A | 6x 1 GbE RJ45 Ethernet & |
Model F183 A | 6x 1 GbE RJ45 Ethernet & |
USB 2.0 | 4 |
Serial console | 1 [RJ45] |
Integrated Wi-Fi (IEEE 802.11b/g/n) | Yes |
System | |
RAM [GB] | 2 or higher |
Mass Storage | |
Type | SSD |
Size [GB] | 80 |
Size, Weight, Dimensions | |
Appliance weight [kg] | 2.1 |
Carton weight with appliance [kg] | 4.5 |
Appliance size: width x depth x height [mm] | 378 x 162 x 44 |
Carton size: width x depth x height [mm] | 786 x 495 x 471 |
Form factor | Compact |
Hardware | |
Cooling | Fan |
Power supply | Single, external |
L-Shape rack mount bracket | Included in packaging |
Wall mount bracket | Included in packaging |
Environmental | |
Noise emission [db/A] | 60 |
Operating temperature [°C] | 0 to +35 |
Storage temperature [°C] | -20 to +70 |
Operating humidity (non-condensing) | 5% to 95% |
Certifications & Compliance | |
CE emissions | Yes |
CE electrical safety | Yes |
FCC emissions | Yes |
ROHS compliant | Yes |
Power & Efficiency | |
Power supply type | External |
Power type [AC/DC] | AC |
Input rating [Volts] | 100-240 |
Input frequency [Hz] | 50-60 |
Auto sense | Yes |
Wattage / max. power draw [W] | 45 |
Max. power draw (@ 230V) [A] | 0.2 |
Max. heat dissipation [W] | 19 |
Max. heat dissipation [BTU] | 65 |
Energy efficiency [average] | > 85% |
Wall Mount Kit
This appliances is shipped with a wall mount kit. Print the Barracuda CloudGen Firewall Wall Mount Jig to use as a template when drilling the required holes. Do not scale the PDF when printing.
LEDs and Acoustic Signals
Your appliance is equipped with a variety of LEDs and acoustic signals. The front panel of the Barracuda CloudGen Firewall F180 A and F183 A contains one power LED (blue), one disc LED (green), one status LED (red), and 4 port LEDs. On the back panel, you can see one power button LED and various port LEDs. Two acoustic signals indicate status of installation. The tables below show the different meanings of the different glowing states and acoustic signals:
LED Color | Status | Meaning Installation | Meaning Operation |
|---|---|---|---|
All LEDs Off | Off | Appliance is powered off or installation has not initialized far enough for LED control when installation is started. | Appliance is powered off. |
Power LED front side - BLUE | Steady | - | Appliance is plugged in and is on. |
Status LED front side - RED | Off | Installation has finished successfully. | Box is running normally. |
Status LED front side - RED | Steady | After a hotfix installation, the LED turns to red until the next reboot in case the hotfix installation failed. This feature requires firmware 7.1.3 or higher OR 7.2.2 or higher. | Appliance is halted and may be disconnected, or an error occurred preventing the appliance from entering the up state. |
Status LED front side - RED | Blinking slowly (1/s interval) | Normal installation. | Appliance is either booting, shutting down, or performing a system update. |
Status LED front side - RED | Blinking fast (4/s interval) | Error during installation. | Appliance is in ART mode. |
Disc LED - GREEN | Blinking | Appliance is reading or writing on storage. | Appliance is accessing the internal storage. |
Port LEDs - GREEN/YELLOW | Left blinking | Data transfer – Yellow (10/100 Mbps) | Port in use. |
| Right steady | - | Port is on. |
PSU LEDs - GREEN | Steady | PSU modules connected and running | Power supply unit is up and running. |
| Off | Power defective, standby, or shutdown | Power supply unit is off or in standby mode. |
Acoustic Signal | Frequency | Meaning |
|---|---|---|
Beep | 1 time (.) | Appliance is booting. |
Beep | 3 times (...) | Installation was completed successfully; appliance is halted for reboot. After reboot, one beep will again indicate booting. |
Beep | 3 times long (_ _ _) | Error during installation |
Serial Console Port
In order to establish a console connection to the appliance using an RJ45 serial cable, you need to configure the serial port on the terminal using the following parameters:
Parameter | Value |
|---|---|
Baud | 19200 |
Bits | 8 |
Stop bit | 1 |
Parity | None |
Handshake | None |
