

This article describes how to install the Google reporting button. Before beginning with the steps on this page, make sure that you have completed the steps described in Customization Options - Google Button.
Step 1: Creating your OAuth Application
- Log into the Google Cloud Platform Developer's site at https://console.developers.google.com/.
- Click New Project.
- Enter a name for the project, like Report Phish Button.
- Click Create.
- Enable the GMail API.
- In the left navigation panel, click OAuth consent screen. For the User/Application Type, select Internal. Then click Save.
- On the OAuth consent screen page, specify the following information, then click Save.
- Application type – Select Internal.
- Application Name – Provide a name for the button, like Report Phish Button.
- Application Logo – Select the logo you specified in the customization steps. This file is likely
phish128.png.
- Scopes – Do not change the values in this field. If you added the GMail API successfully in Step 5 above, this field includes email, profile, and openid.
The following fields are not required:
- Authorized domains
- Application Homepage link
- Application Privacy Policy link
- Application Terms of Service link
Step 2: Creating OAuth User Credentials
- While still in https://console.developers.google.com, in the left navigation panel, click Credentials.
- Click Create Credentials and select OAuth client ID from the menu.
- On the OAuth client ID page, provide the following information:
- Application Type – Select Chrome App.
- Name – Type the Application Name from above, adding the word Client at the end. For example, Client Report Phish Button Client.
- Application ID – The 32-character extension ID you obtained from the Chrome store at the end of the process described in Customization Options.
- Click Create.
- In the OAuth client IDs table, copy the Client ID, which looks similar to this example:
481663857010-k6dvoeisc89jlbh4ltikuv18dvbmjf52.apps.googleusercontent.com. You will use this ID in Step 3: Updating the Extension in the Chrome Store and in Step 5: Authorizing the Extension.
Step 3: Updating the Extension in the Chrome Store
In this section, you will use the ID you just received in Step 2 above to update the extension you uploaded in the steps described in the Customization Options page.
- Open the <
2.2.8.1>.zipfile that you downloaded from Barracuda. - Within the ZIP file, modify the
manifest.jsonfile:- Update the version to a larger number. For example, if the version was
2.2.8.1, make it2.2.8.2. If you do not update this version to a larger number, the upload will fail. - Locate the
oauth2section. In theclient_idkey, enter the value of the client ID you copied in Step 2 above.
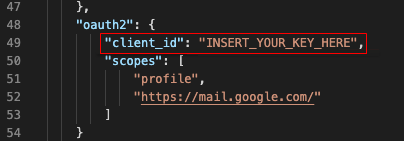
- Save the
manifest.jsonfile. Verify that the changes you made to themanifest.jsonwere saved, then add the modified JSON file to the ZIP file. - Re-upload the ZIP file to the Chrome store. As noted above, you cannot modify the extension until it is out of Pending Review stage.
- In the Chrome Store Developer Dashboard, click Edit.
- Re-upload the extension. Google might require you to wait for review again.
- Update the version to a larger number. For example, if the version was
- Click Publish to publish your changes.
Step 4: Add Configuration JSON and Set Automatic Installation
In this section, you will use the 32-character ID for your extension that you obtained at the end of the process described in Customization Options.
- Log into the Google Admin Console at https://admin.google.com/.
- Navigate to Devices > Chrome Management > Apps & Extensions to arrive on this page: https://admin.google.com/ac/chrome/apps/user.
- In the lower right portion of the screen, hover your mouse over the large yellow button and click Add Chrome app or extension by ID.
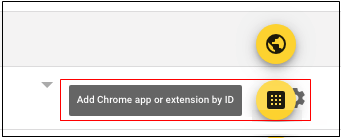
- When prompted for the Extension ID, paste the 32-character ID for your extension from the end of the process described in Customization Options. Then click Save.
- In the list of apps, locate the Report Phish Customized app and change the Installation Policy to Force Install and pin (original value = Install). Then click Save.
- Set policies for the app using the
google_button_config.jsonfile located in the ZIP file you downloaded from Barracuda.- Open the Zip file you downloaded as part of Customization Options - Google Button.
- Open the
google_button_config.jsonin a text or code editor, like Visual Studio Code, Sublime Text, or NotePad. Do not use a program like Microsoft Word. - Copy all of the text in the file. Be careful not to change the file.
- Back in the Google Admin Console, click the Report Phish Customized app. In the right panel, locate Policy for Extensions. Right-click in that field and paste the contents of the JSON file you copied.
- Click Save.
Step 5: Authorizing the Extension
In this step, you set up the system to automatically authorize the button for all users of your organization. This prevents users from having to authorize the button by themselves, and potentially not performing the authorization at all.
- Log into the Google Admin Console at https://admin.google.com/.
- Click Security, then click Show More.
If Show More is not visible, continue to the next step. - Click Advanced Settings, then click Authentication / Manage API client access.
- Enter the following data, then click Authorize.
- Client Name – Enter your Oauth Client ID from Step 2 above. It will look similar to
481463657710-k6dvoehsc8jjlb74ltikuva8dvbmjf52.apps.googleusercontent.com. - Scopes – Enter one or more scopes:
profile, https://mail.google.com.
- Client Name – Enter your Oauth Client ID from Step 2 above. It will look similar to
Step 7: Verify
- To verify the policy is loading correctly for your users, go to chrome://policy and verify that Report Phish by PhishLine is present in the list of policies.
- Verify that Policy Name myConfig has the expected values from your uploaded JSON file. If there are no values, restart your browser. If the values still do not display as expected, verify that you completed the steps on this page correctly. If you continue to have problems, contact Barracuda Networks Support.