This article demonstrates how to use the ConnectWise Automate Control Center RMM tool to install or uninstall the Barracuda Content Shield Agent for Windows on client (endpoint) machines. While there are many RMM (Remote Monitoring and Management) tools available, this article can guide you with the script examples here. To get the Barracuda Content Shield Agent for Windows, see How to Manage Deployment of the Barracuda Content Shield Agent for Windows.
To use the ConnectWise Automate Control Center:
- Log into your Automate Control Center application.
- Create the script you want to use, following examples in this guide.
- Run the script.
Create a Script to Install the Barracuda Content Shield Agent
Step 1: Create the initial script.
Follow these steps to create a basic script using the App Deployment Wizard. Example templates are shown below. Before you begin, note where you have stored the installer (BarracudaContentShieldSetup-[version].exe) as well as the account configuration file (bcs.key) from the Downloads page in Barracuda Content Shield Portal.
- Create a shared network drive or a server that is accessible from both Automate Control Center as well as the endpoint machine.
The two files mentioned above must be stored in the same location on the server for the agent installation to complete properly. - Go to the Automate Control Server Navigation Tree on the left part of the screen.
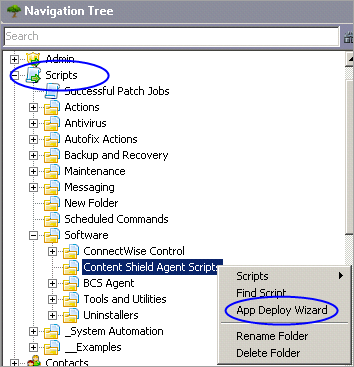
- To create and manage scripts, click to expand the Scripts folder in the tree (see below).
- Right-click on Scripts to add a new folder where you can organize your scripts. For example, you can title the new folder Content Shield Agent Scripts, then create and store your scripts there. The example below shows a Software folder that contains a folder titled Content Shield Agent Scripts, where you can store the agent scripts.
- Right-click on the new folder where you want to create and store scripts, and click App Deploy Wizard.
- When prompted "How do you want to deploy the application?", choose Install from a local network share. Click Next.
- For Installer Type, select Windows Installer (MSI).
- For Installer File, enter
BarracudaContentShieldSetup-[version].exe - For Install Parameters, enter /q.
- Check Copy Installer to Local Machine. Click Next.
- When prompted for Script Installer Conditions, select Always Run the Installer. Do not select Reboot After Install. Click Next.
- On the Finish Wizard and Create Script popup, give your script a name, and then click Create.
- Click Refresh in the upper left corner of the screen to see the script listed the folder you created in step 4 above.
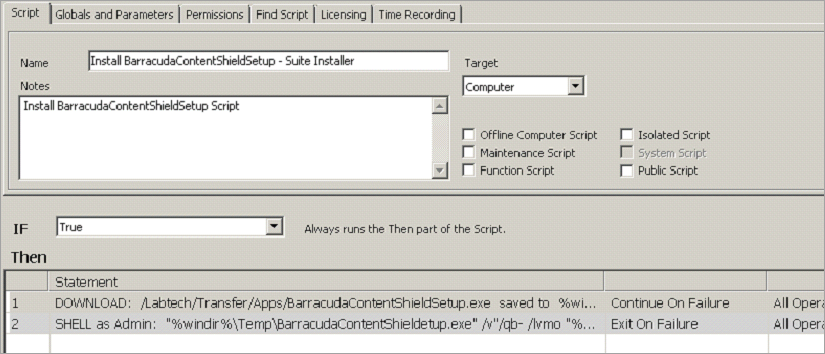
The initial script should look something like this:
Step 2: Edit the initial script.
You must edit your script to add a step that also puts the bcs.key file on the endpoint machine. This is critical for the agent to install properly. Follow these steps to edit your script.
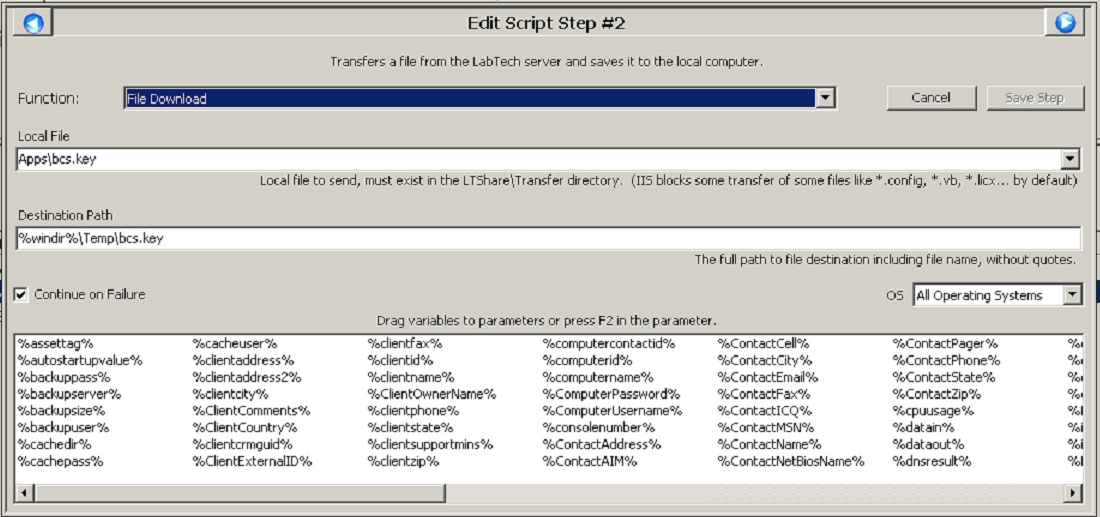
- After you complete the download, you must add a File Download function where the local file is bcs.key. Store this file with the installer on the server. Right-click in the script to add a step, or to move a step up or down.
- Click Save Step after editing.
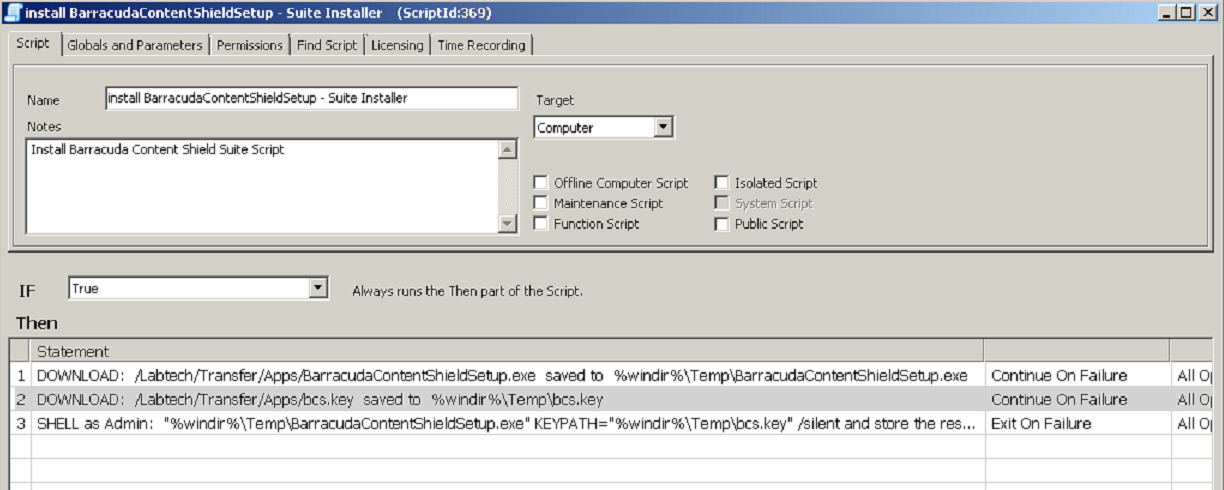
The final script should look something like this. Each step is described below under Script Contents.
Script Contents
The script shown above should run on the server.
- The first step downloads the installer,
BarracudaContentShieldSetup-[version].exe, to the endpoint machine.DOWNLOAD: /Labtech/Transfer/Apps/BarracudaContentShieldSetup-[version].exe saved to %windir%\Temp\BarracudaContentShieldSetup-[version].exe The second step downloads the
bcs.keyfile to the endpoint machine. Thebcs.keyfile should have been downloaded from the Downloads page of Barracuda Content Shield and stored in the same location as theBarracudaContentShieldSetup-[version].exeinstaller on the server.DOWNLOAD: /Labtech/Transfer/Apps/bcs.key saved to%windir%\Temp\bcs.key- The third step installs the software by running the downloaded bootstrap application. This also installs any prerequisites that might be missing on the endpoint machine. Note that you must run the script as Admin, which is why you see 'Shell as Admin'. (Note that wizard does this automatically.)
SHELL as Admin "%windir%\Temp\BarracudaContentShieldSetup-[version].exe" KEYPATH=%windir%\Temp\bcs.key /silent and store the result in %shellresult%Where:
%shellresult%returns the result (success or failure of the installation) to Automation Control Center.
Run the Install Script
- In the Navigation Tree, expand Clients to find the client machine. In the example below, the client is called CUDA-WIN10. If you do not see the client machine, you might need to reboot it, then wait a few minutes and refresh button triggers.
- Right-click on the client and select Scripts > Software.
- Navigate to the scripts location that you created in step 4 of Create a Script to Install the Barracuda Content Shield Agent above.
- Select the script you want to execute on the machine and select the time of execution. If it should be immediate, then use the default selection. Follow instructions in the script to finish the dialog.
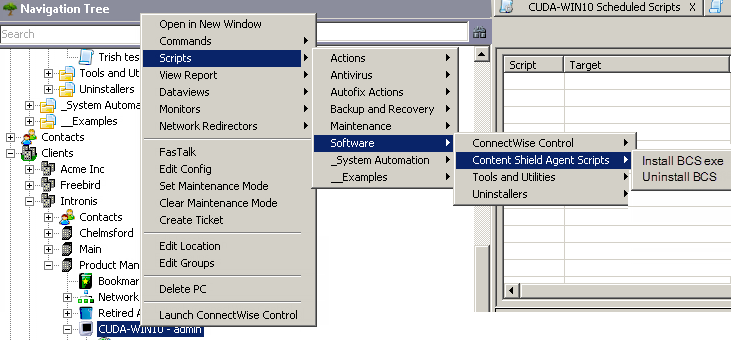
ConnectWise connects to the remote agent and passes on the execution command to the client machine, where the script is executed. You can view information about the client and follow script activity by double-clicking the client machine in the Navigation Tree. There is a script section where you can find information about scripts that have been scheduled, queued, or already executed.
Create the Uninstall Script
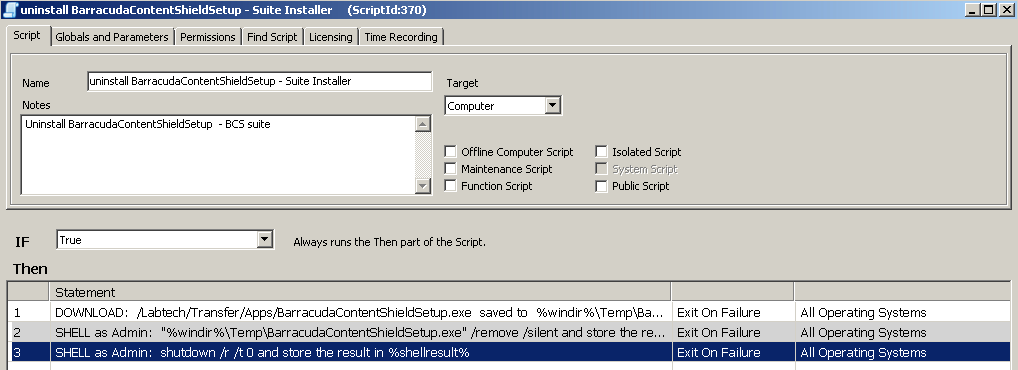
Your script should look something like this:
Updating the Agent
To update the Barracuda Content Shield Agent, first uninstall both components from the endpoint machine, and then install the latest version.

