

The Networks view allows you to view and configure network objects. Use network objects to reference networks, IP addresses, hostnames, or interfaces when you create access rules. A network object can also include other existing network objects. Access rule management is simplified with the use of network objects instead of explicit IP addresses. For example, if an IP address changes, you do not have to edit it in every rule that references it; you must only change the IP address in the network object. The IP address is then automatically updated for every rule that references the network object. To access the Networks window, click Networks under the Configuration menu on the left.
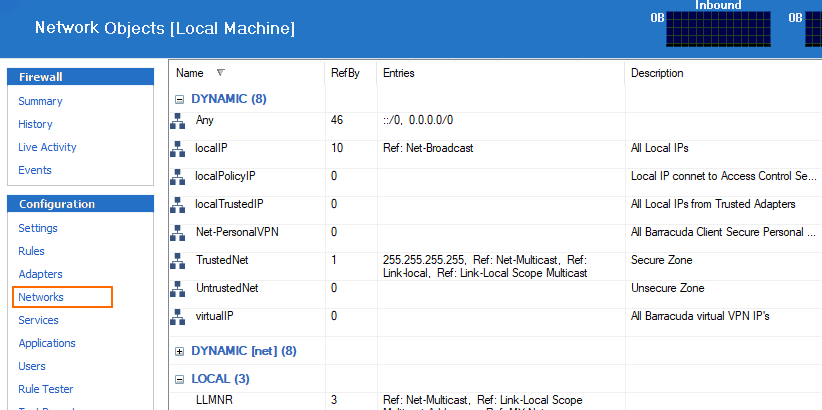
Default Network Objects
In the Network Objects list, a number of dynamic network objects, flagged with the respective icon, may be preconfigured. For example:
| Network Object | Description |
|---|---|
| localIP | This object contains all IP addresses that are configured on trusted adapters as well as a reference to the Net-Broadcast object. |
| virtualIP | This object contains the IP address assigned from the VPN server. The virtual IP address is only available while VPN connections are established. |
| Net-[Network Connection name] | These objects contain the network addresses of each specific adapter available on the system. The Network Connection name is retrieved from the Microsoft Windows Network Connections view (available within Start > Control > Network Connections). The 'logical' Microsoft Windows name, depending on the operating system’s language version (but not the device name), is applicable for object naming. Net-[Network Connection name] objects may be used to set up abstract rulesets. |
| InterNet | The InterNet object may be used for outbound connections to the Internet (the 0.0.0.0/0 network). |
| TrustedNet | Use the TrustedNet object to refer to trustworthy networks. The content of this object is dependent on assignment of an adapter as trusted or untrusted (see Adapter Objects). If an adapter is specified as trusted, the IP addresses living on it are added to the TrustedNet object. They are then deleted from it as soon as the trust assignment changes to untrusted. The TrustedNet object is also updated when the IP address configuration of a trusted adapter changes. |
| Net-PersonalVPN | The Net-PersonalVPN object contains the address of the network the virtualIP object is living in. (Secured routes are assigned to the Net-PersonalVPN object). |
| Net-Broadcast | This object contains the broadcast addresses of IP addresses configured on trusted adapters. The broadcast addresses are calculated directly from the IP addresses. |
| Net-Multicast | This object includes the multicast network 239.255.0.0/16. |
Dynamic objects are updated at runtime as soon as network configuration changes appear. They cannot be edited manually.
Create a Network Object
- Select New in the bottom bar or from the context menu in the Network Objects window.
- For the Type, select Hostname (DNS Resolved) when using a hostname for the network object. When using an IP address, select Generic (IP).
In the Name field, enter the hostname that should be used for the network object. When using an IP address, enter a descriptive name for the object.
- Optionally, enter a Description.
- In the Entry section, add the IP and network address(es) that should be included in the network object. Click New after each entry.
- Specify a Reference to the object if applicable. For example, select an existing network object to refer to another one. Click New Reference after each entry.
- In the Excluded Entry section, you can exclude specific addresses from the network object. Click New after each entry.
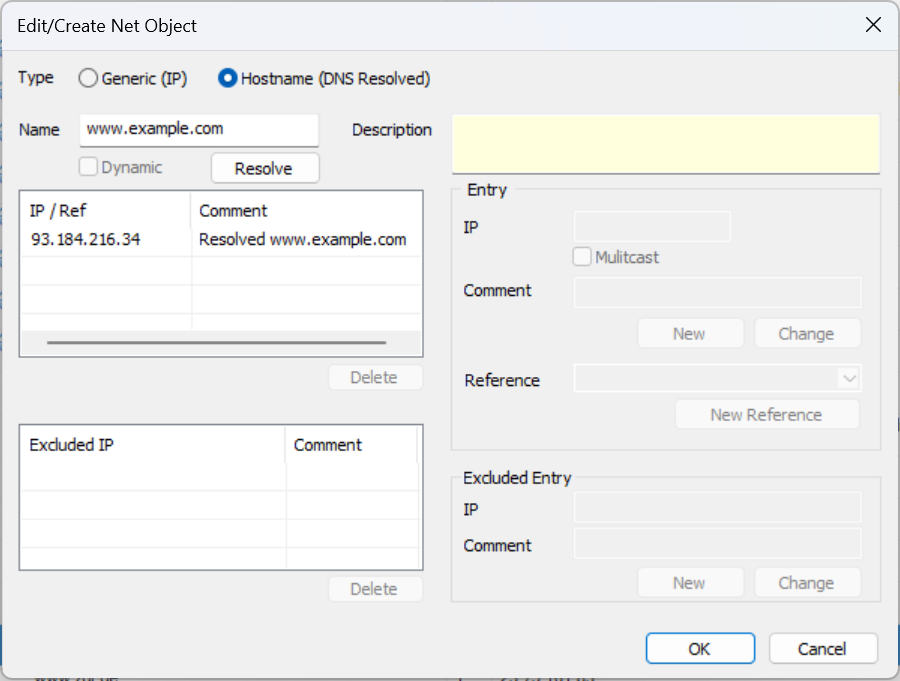
- Click OK.
To save configuration changes made on the Barracuda CloudGen Firewall, click Send Changes and Activate. To save configuration changes made on the Barracuda Personal Firewall, use the option provided on the page, or click the Alt key, expand the File menu, and select Save Configuration.