

You must configure the vpn client settings before you start the Barracuda VPN Client from the Linux or macOS command line. To run the Barracuda VPN Client, you must be root (or equivalent). Depending on your Linux distribution is may also be possible to change the permissions ( chmod 4755 /usr/sbin/barracudavpn ) of the VPN client to be able to run the vpnclient as a non-root user. When running the VPN client, the mandatory settings are displayed in orange boxes. The number of mandatory settings is dependent on your connection type. The <-> symbol indicates lists from which you can select one of several options. Navigate through these options by pressing < or > .
Before You Begin
For special characters in user credentials to work, the codepage must be configured to support UTF-8 on the Barracuda CloudGen Firewall. For more information, see Step 1 in How to Configure Offline Firewall Authentication in the CloudGen Firewall documentation.
Configure the Barracuda VPN Client
Configure your authentication and proxy settings. The IP address and port number are required. In some cases, the username is also required. If the server requires a password, you are prompted for it when you initiate a VPN connection. After editing and saving your configuration, you must terminate and reopen existing VPN connections to apply your changes.
Start the Barracuda VPN Client. At the command line, enter:
barracudavpnIn the main menu, select Configure Client.
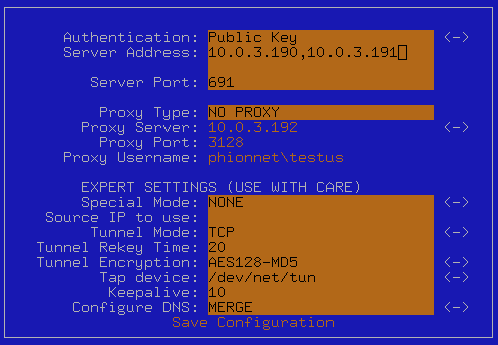
Configure the following settings.
Authentication – Select the authentication method to be used for successful VPN connections. You can select one of the following options:
- Personal License (Public Key) – Must be renamed and copied to
/etc/barracudavpn/vpnpers.lic - X509 Cert
- X509 Cert+User/Pass
- User/Pass only
- Personal License (Public Key) – Must be renamed and copied to
Server Address / Port – Enter the IP address or host name and the port of the VPN server. You can also enter a comma-delimited list of VPN servers.
- Proxy Type – If required, specify the proxy to be used. You can select one of the following types:
- No Proxy – Uses a direct connection to the VPN server.
- HTTP – Connect via an HTTP proxy, such as Squid.
- Socks4 – Connect via a SOCKS4 server.
- Socks5 – Connect via a SOCKS5 server.
- Proxy Server – Enter t he IP address or host name of the proxy server.
- Proxy Port – Enter the proxy server port, e.g.,
3128or8080 Proxy Username – Enter the username to authenticate at the proxy server.
Save your configuration.
Additional Settings
From the Main Menu, you can select the following additional options:
- Open / Close Connection – Opens / stops a VPN connection. For more information, see How to Establish a VPN Connection Using Barracuda VPN Client for Linux .
- Connection Status – Displays information about your VPN connection, such as its throughput, IP address, routes, gateway, DNS, and license.
- Change Server Password – Change the server password for VPN connections.
- Change Local Password – Change the password that is used to protect your license file.
Update Client – If a client update is available, you can load it onto your machine and install it. To update your client, you must be connected. Downloads are saved in the /tmp/ folder. Install the update in the same way that you installed the Barracuda VPN Client. For more information, see How to Update the Barracuda VPN Client for Linux.
- Exit – Exits the VPN client. Established connections are kept open.
Expert Settings
In the EXPERT SETTINGS section, you can specify more detailed settings for the Barracuda VPN Client. In this section, not all settings are mandatory. Some settings depend on the configured proxy type.
- Special Mode – You can deactivate keepalive packets to the VPN server. You can select one of the following modes:
- NONE – Normal operation.
- SILENT – Deactivate keepalive packets to the VPN server. This mode allows adapters, such as ISDN cards, to hang up the line when idle. Otherwise, a connection is always triggered by communication between the client and server.
- Source IP to use – The source IP address for your client.
Tunnel Mode – The protocol for the VPN tunnel. You can select TCP, UDP, or Hybrid. The Hybrid mode combines the best of both connection types: the reliability of TCP with the responsiveness of UDP.
Tunnel Rekey Time – Time in minutes after which the client and server must exchange new keys.
Tunnel Encryption – The tunnel encryption method. You can select methods such as AES, CAST, or Blowfish.
Tap device – The TAP device that is used for the VPN tunnel. Because Linux now uses the universal TUN/TAP driver, select /dev/net/tun.
Keepalive – The timeout interval for reconnecting the tunnel. If you are using a GPRS connection, increase this setting to avoid permanent reconnects due to dropouts.
Configure DNS – Specifies if the DNS configuration from the VPN or system is used. You can select one of the following options:
Yes – Use the DNS configuration that is provided by the VPN. The VPN domain that is configured on the VPN server is added to the search path in /etc/resolv.conf.
No – Use the DNS configuration from the system.
Merge – Merge the DNS configurations from the VPN and system.
After configuring the Barracuda VPN Client, you can start using it. Continue with How to Establish a VPN Connection Using Barracuda VPN Client for Linux.