

This article refers to Barracuda Backup version 6.2 and higher, and Microsoft SQL Server 2008 or higher databases using Microsoft SQL Server Management Studio.
- In Barracuda Backup version 6.2 and earlier, you can restore a SQL database—backed up using VDI—to a flat file by editing the Barracuda Backup Agent's configuration. A flat file allows you to import the database manually using SQL Management Studio.
- In Barracuda Backup version 6.3 and higher, you can perform a flat file restore of a database backed up using VDI directly from the Barracuda Backup Restore web interface.
Barracuda Backup Version 6.3 and Higher
This section assumes that the Microsoft SQL Server database was backed up using VDI. Microsoft SQL Server 2008 databases use VDI by default. Microsoft SQL 2012 and higher databases use VSS by default.
Step 1. Restore the Database
- Log in to Barracuda Backup, and go to Restore > Restore Browser.
- Drill down to and select the database revision to restore, and click Restore.
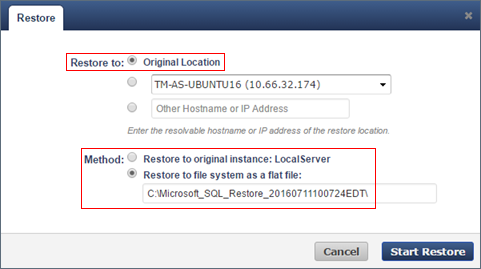
- In the Restore dialog, select Original Location under Restore to if you plan to restore the database back to the original server, then select Restore to file system as a flat file under Method:
- Click Start Restore. You can view the status of your restore by clicking Reports > Restore.
- Verify that your database was successfully restored to the target system:
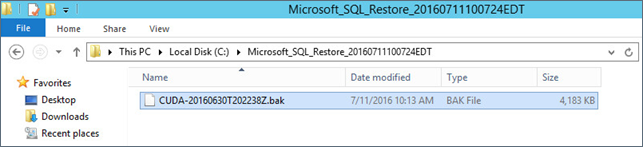
- The database is restored down to the server as a .bak file. If the restore is from an incremental backup, each backup has a separate .bak file that you can import back into SQL.
Step 2. Restore a Flat File Using SQL Management Studio
Once you restore the flat file, you can elect to Restore the Microsoft SQL Database to a Point-In-Time.
Use the following steps to restore the flat file using SQL Management Studio.
- After connecting to the appropriate instance of the Microsoft SQL Server Database Engine, in Object Explorer, click the server name to expand the server tree.
- Expand Databases, and, depending on the database, either select a user database or expand System Databases and select a system database.
- Right-click the database, point to Tasks, and click Restore.
- Click the type of restore operation you want (Database, Files and Filegroups, or Transaction Log). The corresponding restore dialog box displays.
- On the General page, in the Restore source section, click From device.
- Click browse for the From device text box; the Specify Backup dialog box displays.
- From the Backup media menu, select Backup Device, and click Add; the Select Backup Device dialog displays.
- In the Backup device menu, select the device you want to use for the restore operation.
Barracuda Backup Version 6.2
This section assumes that the Microsoft SQL Server database was backed up using VDI. Microsoft SQL Server 2008 databases use VDI by default. Microsoft SQL 2012 and higher databases use VSS by default; for information on switching to VDI, see How to Enable VDI Incremental Backups for Microsoft SQL Server.
Step 1. Modify the Agent Configuration File
- On the Microsoft SQL Server where you installed the Barracuda Backup Agent, open Services.
- Right-click on the Service Barracuda Backup Agent, and click Stop. The Service is now stopped.
- Open the config.ini file in a text editor such as Notepad; the file is located in the following directory:
/Program Files/Barracuda/Barracuda Backup Agent/config/config.ini -
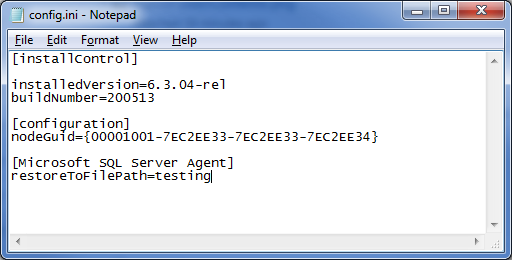
Add the following lines to the end of the file, where path to file represents the restore path:
[Microsoft SQL Server Agent]
restoreToFilePath=path to file
For example:
- Save and close the file.
- Open Services once again.
- Right-click on the Service Barracuda Backup Agent, and click Start. The Status field should display as Started.
Step 2. Restore the Database
Use the following steps to restore the database normally through the Barracuda Restore Browser to the path specified in Step 1. Modify the Agent Configuration File:
- Log in to Barracuda Backup, and go to Restore > Restore Browser.
- Drill down to and select the database revision to restore, and click Restore.
-
In the Restore dialog, select Original Location or select the third option and type the IP address of the destination server:
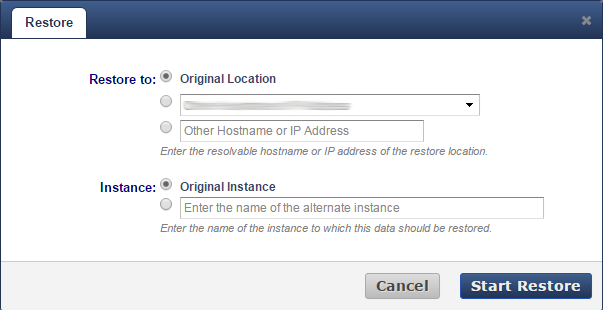
Click Start Restore.
- The database is restored down to the server as a .bak file. If the restore is from an incremental backup, each backup has a separate .bak file that can be imported back into SQL.
Step 3. Restore a Flat File into SQL Management Studio
Use the following steps to restore the flat file into SQL Management Studio:
- After connecting to the appropriate instance of the Microsoft SQL Server Database Engine, in Object Explorer, click the server name to expand the server tree.
- Expand Databases, and, depending on the database, either select a user database or expand System Databases and select a system database.
- Right-click the database, point to Tasks, and then click Restore.
- Click the type of restore operation you want (Database, Files and Filegroups, or Transaction Log). The corresponding restore dialog box opens.
- On the General page, in the Restore source section, click From device.
- Click the browse button for the From device text box; the Specify Backup dialog box displays.
- From the Backup media menu, select Backup Device, and click Add; the Select Backup Device dialog opens.
- In the Backup device menu, select the device you want to use for the restore operation.
You can now restore a SQL database to a point-in-time.