

This functionality is not available with the legacy Barracuda Email Protection Advanced plan. All other Email Protection Plans, including all current Email Protection Plans have this functionality. To upgrade to one of these plans, contact your Barracuda Networks Sales Representative.
Automated workflows enable you to take actions when certain events occur – automatically. You set up a workflow, then Incident Response automatically follows through, taking the actions you specify, without requiring further interaction from you.
Automated workflows consist of the three components:
Triggers – The activity that sets the workflow in motion.
Conditions – Optional. The status or value that must be met to continue the workflow. Based on the condition, the workflow travels through different paths. The conditions available are based on the trigger type.
Actions – The outcome of the workflow. Specify the details of each of these actions in the Settings. Refer to Automated Workflows Settings.
The following table describes the currently-available triggers, along with their associated conditions and actions. Conditions in bold indicate conditions specific for the associated trigger.
Triggers | Conditions (optional) | Actions |
|---|---|---|
Potential incident detected Prerequisite:
|
|
|
Sender Policy created in Email Gateway Defense Prerequisites:
|
| Same as above |
User-reported email submitted Prerequisites:
|
| Same as above |
Additional triggers will be added over time. | ||
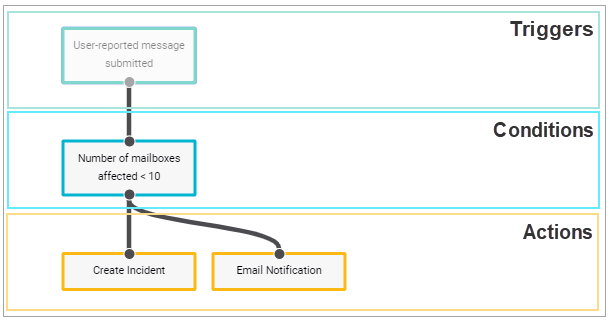
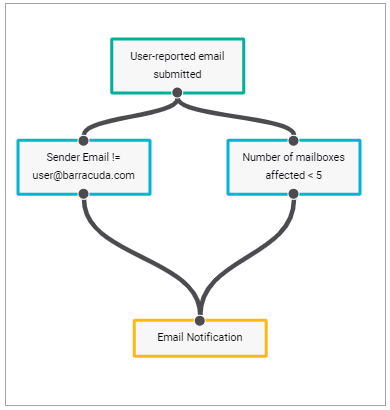
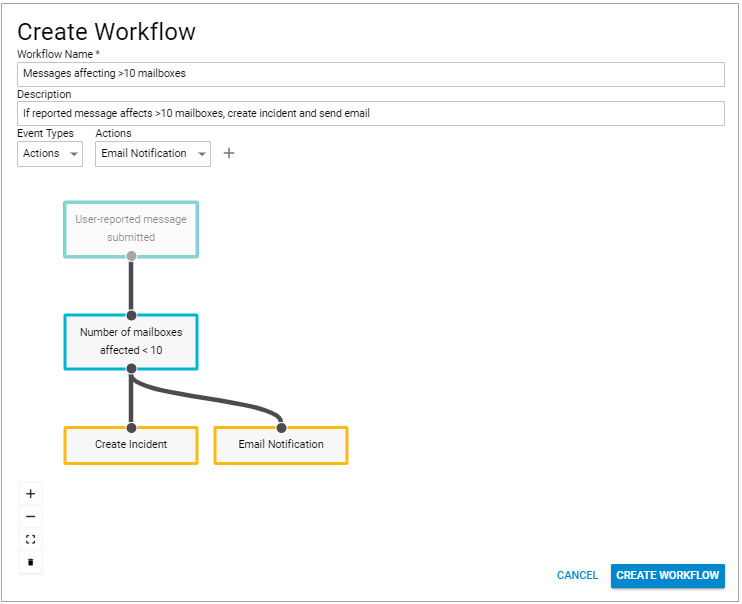
Triggers and Actions are required when creating an automated workflow; Conditions are not required. As shown in Figure A below, you can create a workflow that just has a Trigger, like a User-reported email submitted, and an action, like Create Slack notification. So whenever a new user-reported email is submitted – regardless of the subject, sender email, or other values – an alert notification is sent.
Figure A | Figure B | Figure C |
|---|---|---|
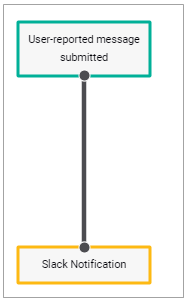 | 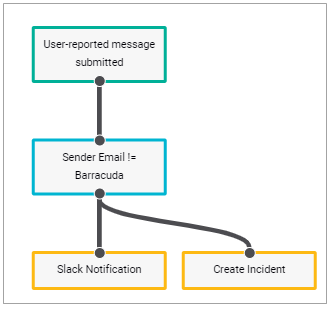 | 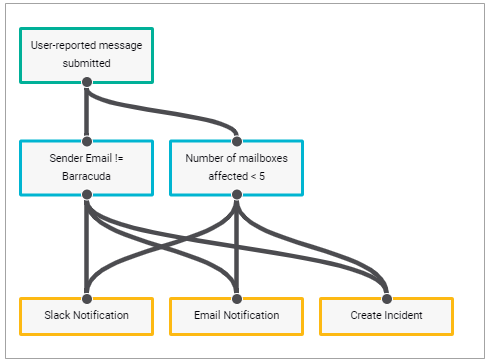 |
You can optionally specify multiple values per component in a single workflow. For example, as shown in Figure B above, you can create a workflow which requires triggers for both the sender email and email subject. Then, you can choose to have both an action to create an incident and another action to send a Slack notification. Figure C shows both multiple conditions and multiple actions.
Specifying AND vs OR Conditions
When creating workflow with two or more conditions, you might want to specify whether individual conditions can set off an action (OR scenario) or whether a combination of conditions is required (AND scenario) before an action can be taken.
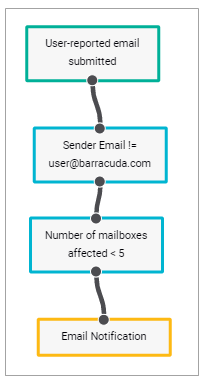
Figure D below shows an OR scenario, where either of the conditions' being met is enough to set the action in motion. You might think of OR scenarios as a parallel flow. When you create workflows, they are created as OR scenarios by default.
Figure E below shows an AND scenario, where both conditions must be met before the action can be taken. You might think of AND scenarios as a serial flow. When you create workflows and want to change from the default OR scenario to an AND scenario, you must rearrange the nodes, delete some of the original connections, and draw new connections. Check that the nodes in your workflow are all connected and will produce your desired effect. If, for example, you have competing conditions, the actions in your workflow will never be taken.
The examples in Figure D and Figure E are relatively simple. You can create much more complex workflows with combinations of AND and OR scenarios.
Figure D OR Scenario – Only One Condition Must Be Met | Figure E AND Scenario – Both Conditions Must Be Met |
|---|---|
 |  |
Workflow Templates
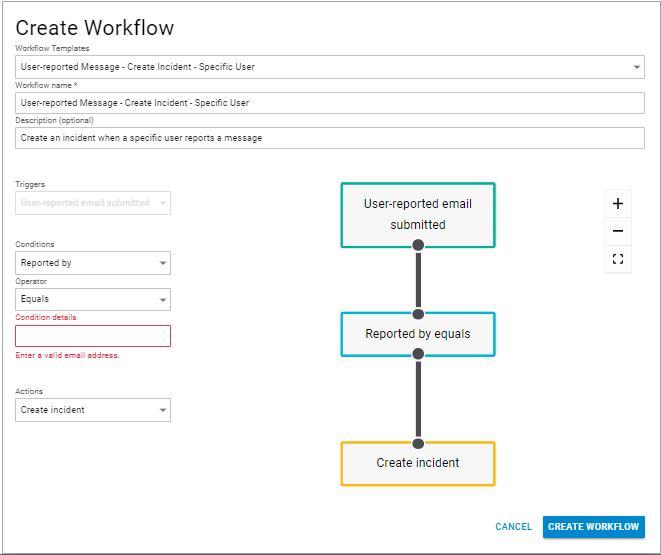
Rather than creating a completely new automated workflow, you can use workflow templates as a starting point to create workflows for common scenarios. For example, you can use the User-reported Message - Create Incident - Specific User template to create a workflow to create an incident whenever a specific user reports a message. When you select the template, the workflow appears automatically. On the left side of the page, you are prompted to complete the condition, in this case, to specify the user who is reporting the message. You can optionally change other parts of the workflow, for example, to change the condition to add another user, to add the number of affected mailboxes, and so on. Be sure to specify a unique name for each workflow you create.
Additional workflow templates will be added over time.
Creating an Automated Workflow
To create a workflow using a template, refer to the next section, Creating an Automated Workflow using a Template.
To create an automated workflow:
Open Incident Response.
From the menu in the upper left corner, select Automated Workflows.
On the Automated Workflows page, click Create Workflow.
Under Workflow Templates, select Blank Template. To use a specific template, see the following section.
Provide a unique name for the workflow.
Optional. Provide a description for the workflow.
Select a trigger from the Triggers list. Click the plus (+) icon. The trigger appears in the graphical workflow space.
Optional. In the Event Types menu, switch your selection to Conditions. Select a condition from the Conditions list. Specify an operator (Equals, Does not equal, Greater than, Less than, Contains, Does not contain), then specify the value in the Condition Details field. Click the plus (+) icon. The condition appears in the graphical workflow space.
For example, you might specify that the Number of mailboxes affected is Greater than 10.
If needed, repeat this step for additional conditions in this workflow.In the Event Types menu, switch your selection to Actions. Select an action from the Actions list. Click the plus (+) icon. The action appears in the graphical workflow space.
If needed, repeat this step for additional actions in this workflow.Review the graphical representation of the workflow. Triggers are shown in the top level, followed by Conditions, then Actions on the lowest level.
Take the following actions, if needed:Check connections – Check that connections exist between the various parts of your workflow. If your workflow actions are not connected to the rest of your workflow, they can not be taken.
Rearrange components – Click and drag components to new locations.
Add components – Repeat the step above to add one or more new components.
Change the value for a condition – Remove the condition component, then add a new condition component with the desired value.
Remove connections – If you are changing from an OR to an AND scenario, be sure to remove any unneeded connections. Click the connection to select it, then click the trash icon
 in the toolbar.
 Remove a workflow component – Click the component to select it, then click the trash icon
in the toolbar. Note that you cannot delete a trigger if it has associated conditions. Either delete all of the conditions and then delete the trigger, or click Cancel and start a new workflow.
Zoom in/out/re-center – Use the +/- icons in the toolbar to zoom in and out on your workflow. To re-center the workflow, click
 in the toolbar.
Click Create Workflow.
The workflow appears in table on the Automated Workflows page. It is ready to launch whenever it is triggered.
Creating an Automated Workflow using a Template
To create an automated workflow using a template:
Open Incident Response.
From the menu in the upper left corner, select Automated Workflows.
On the Automated Workflows page, click Create Workflow.
Under Workflow Templates, a specific template, such as User-reported Message - Create Incident - Specific User, to use as the basis for creating a workflow.
Provide a unique name for the workflow.
Optional. Provide a description for the workflow.
On the left side of the page, red text indicates conditions you must enter to customize the template. In this example, provide the email address for the user who is reporting emails. Complete the information. Notice it automatically updates in the workflow.
Optionally add more conditions or actions, as described in the section above.
Review the graphical representation of the workflow. If needed, take actions as described in the section above.
Click Create Workflow.
The workflow appears in table on the Automated Workflows page. It is ready to launch whenever it is triggered.
Reviewing and Taking Action with Automated Workflows
To review and take action on automated workflows:
Open Incident Response.
From the menu in the upper left corner, select Automated Workflows.
The Automated Workflows table displays all automated workflows created for your account.
For each automated workflow, you can view the following information:Created on – Date the admin created the workflow.
Workflow Name – Name given to the workflow by the creator.
Edited By – The last person to edit the workflow.
Times Triggered – How many occurrences of the trigger event have occurred.
Conditions Checked – How many times the conditions in the workflow were checked. In a workflow like that shown in Figure B above, where the number of conditions and triggers are equal, the Conditions Checked value equals the Times Triggered value. In a workflow like that shown in Figure C above, there are twice as many conditions as triggers, so the Conditions Checked value should be twice that of the Times Triggered value.
Actions Taken – How many times the action(s) for this workflow have been completed. In a workflow like that shown in Figure A above, where the number of triggers and actions are equal, the Actions Taken value equals the Times Triggered value. In a workflow like that shown in Figure B above, there are twice as many actions as triggers, so the Actions Taken value should be twice that of the Times Triggered value.
To edit a workflow, click the pencil
.png) icon in the Actions column.
icon in the Actions column.
To disable a workflow, click the pause icon in the Actions column. The workflow disappears from the Automated Workflows table and is available when you click Show Disabled.
To view details about the workflow, click the clipboard icon in the Actions column.
Viewing and Reactivating Disabled Automated Workflows
To view disabled workflows, click Show Disabled. You can edit workflows in the disabled state.
To re-enable a workflow on this list, click the play icon in the Actions column. Click Show Enabled to view it.
Viewing Incidents Created by Automated Workflows
To view an Incident from within Automated Workflows:
in the Automated Workflows table, locate the workflow that created the incident you want to see. Click View Workflow
 .
.
The View Workflow page displays.In the Automated Workflow Runs table, click the plus icon
 next to the run of this workflow you want to investigate.
 In the Event Result column, click Incident created.
The View Incident page displays. There you can view the details of the incident. Click the Automated Workflow link to return to the View Workflow page.
Viewing an Incident from the Incidents Page
Incidents created by automated workflows are listed on the Incidents page, along with all other incidents, and are shown as being created by an automated workflow. When you view the incident details, click the Automated Workflow link to see the workflow that initiated the incident. For more information on viewing incidents, refer to Reviewing Incidents.