The Barracuda Web Application Firewall (WAF) and CloudGen Firewall can work in tandem to block IP addresses from which malicious activity was detected. While the WAF is very good at detecting application layer attacks, the CloudGen Firewall is more efficient on the network layer. Connections blocked by the firewall are never forwarded to the WAF, thereby freeing resources that would otherwise have to be used to block known-bad connections.
The CloudGen Firewall is located at the perimeter with the WAF behind it. IP addresses that are blocked by the WAF are synced to the fourth custom external network object on the firewall via REST API calls. For the WAF to see the public IP address of the request and to block the public IP address associated with the request, the WAF must use the firewall as the default gateway.
Blocking IP Addresses for a Detected Attack:
- Incoming HTTP/HTTPS connections are forwarded to the WAF.
- If an attack is detected by the WAF, the attack is blocked and the IP address is added to the CustomExternalNetworkObject4 on the CloudGen Firewall via REST API call.
- Subsequent attacks from the blocked IP address are blocked on the firewall, freeing up resources on the WAF.
- After the defined timeout, the IP address is removed from the blocked IP addresses on the WAF and removed from the custom external network object on the firewall via REST API call.

Limitations for High Availability Clusters in the Public Cloud
- The WAF can only send REST API calls to one firewall. High availability CloudGen Firewall clusters in the public cloud cannot be both updated by one REST API call. An internal load balancer between the WAF and the firewalls can be used to update only the active firewall.
Before You Begin
- The WAF must use the firewall as the default gateway.
- In the public cloud, the WAF and the firewall must be deployed into two different subnets.
Step 1. Configure Admin for Accessing the REST API
- Go to CONFIGURATION > Configuration Tree > Box > Administrators.
- Click Lock.
- In the Administrators section, click + to add an administrator account.
Enter
restadminfor the Name and click OK. The Administrators window opens.- Configure the admin:
- Full Name – Enter
REST Admin. - Assigned Roles – Select Manager.
- System Level Access – Select No OS Login.
- Authentication Level – Select Password.
- Password Validation – Select Against Local Password.
- Password – Enter the password.
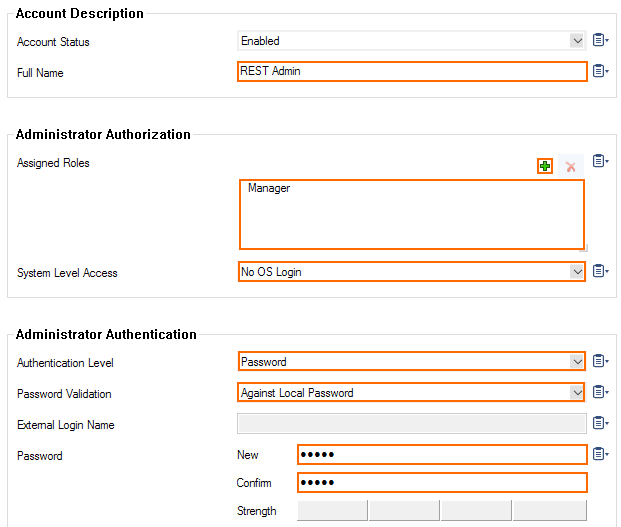
- (optional) Peer IP Restriction – Add the IP address of the WAF and remove the 0.0.0.0/0 entry.

- Full Name – Enter
- Click OK.
- Click Send Changes and Activate.
Step 2. Enable REST API for HTTP or HTTPS
- Go to CONFIGURATION > Configuration Tree > Box > Infrastructure Services > REST API Service.
- Click Lock.
- Verify that either the HTTP or HTTPS Interface of the REST API is enabled. For more information, see REST API.
- Click Send Changes and Activate.
Step 3. Create App Redirect Rule for REST API Calls from the WAF
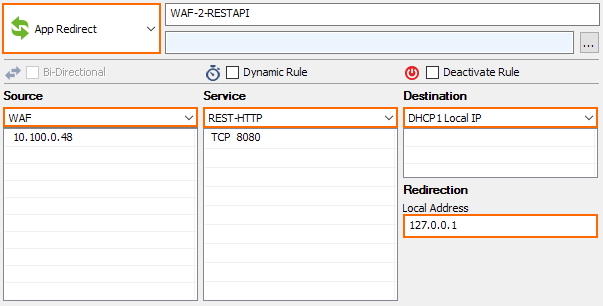
Allow REST API calls for HTTP or HTTPS from the WAF and redirect them to the rest daemon listening on 127.0.0.1:8080 (HTTP) or 127.0.0.1:8443 (HTTPS).
Create an access rule to redirect incoming REST API calls to the REST daemon:
- Action – Select App Redirect.
- Source – Enter the IP address of the WAF.
- Service – Select HTTP or HTTPS.
- Destination – Select the box IP address the WAF uses for the REST API call. In the public cloud, select DHCP Local IP1.
- Redirection – Enter
127.0.0.1for the HTTP REST endpoint.
Step 3. Create a DST NAT Rule to Forward Web Traffic to the WAF
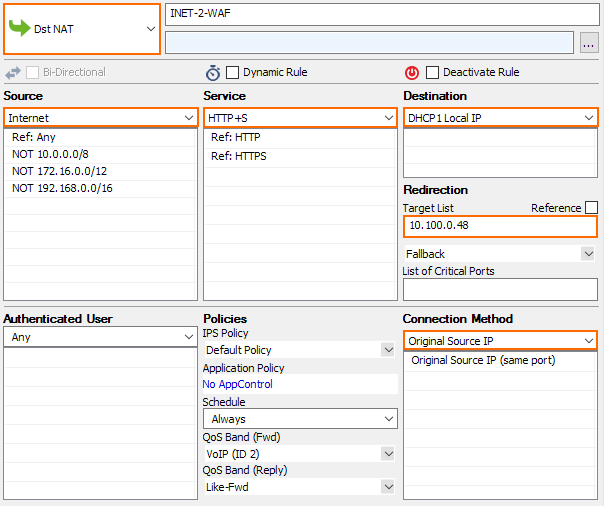
Create an access rule to forward all incoming HTTP and/or HTTPS traffic to the WAF:
- Action – Select Dst NAT.
- Source – Select Internet.
- Service – Select HTTP, HTTPS, or HTTP+S depending on the type of web traffic forwarded to the WAF.
- Destination – Enter the public IP address of the firewall, or the network object for the dynamic WAN connection.
- Redirection – Enter the IP address for the WAF.
- Connection Method – Select Original Source IP.
Step 4. Create an Access Rule to Block Malicious IP Addresses
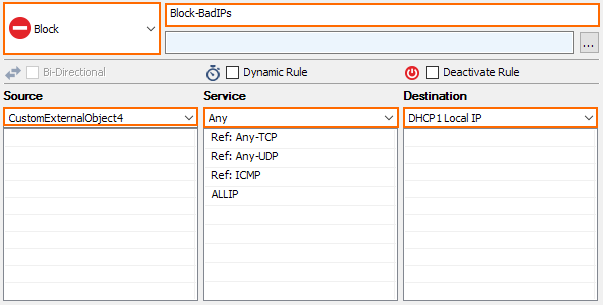
Create an access rule to block the malicious IP address stored in the custom external object number 4.
- Action – Select Block.
- Source – Select CustomExternalObject4 .
- Service – Select HTTP, HTTPS, or HTTP+S depending on the type of application.
- Destination – Enter the public IP address of the firewall, or the network object for the dynamic WAN connection.
Step 5. Configure the Barracuda Web Application Firewall
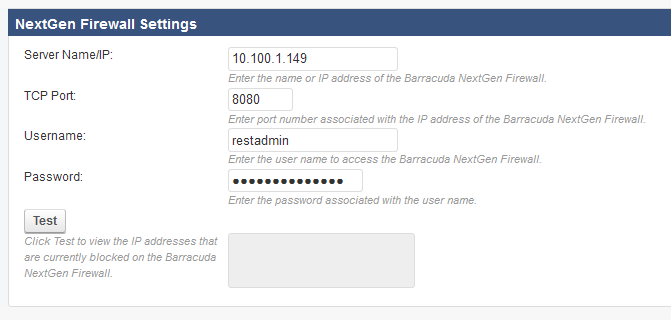
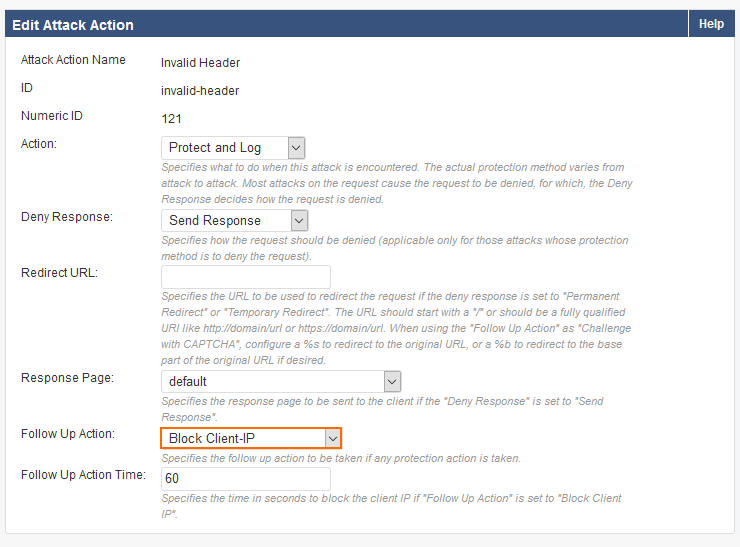
Go to ADVANCED > CloudGen Firewall Settings and configure the IP address and user for the REST API calls. Go to SECURITY POLICIES > Action Policies to edit the Attack action for the security policies to use Block Client-IP as the Follow Up Action.
For more information, see Upstream Firewall Configuration and Security Policies.
