If you are assigned static IPv6 addresses for your WAN connection, you must create a default gateway on box level and then assign the IP address(es) to the firewall.

Before You Begin
- Connect the network equipment installed by your provider to an unused port (not the management port) of your Barracuda CloudGen Firewall.
- Enable IPv6. For more information, see How to Enable IPv6.
Step 1. Add a Direct Route
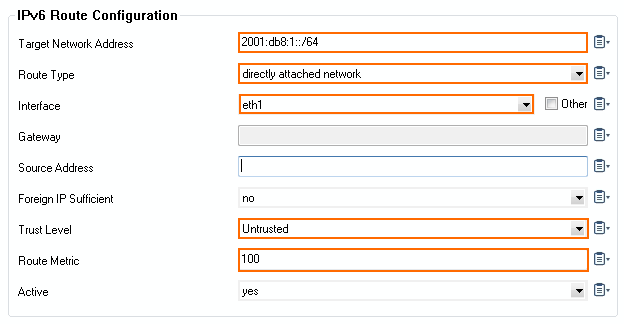
Create a direct attached route entry to create the network on box level of the Barracuda CloudGen Firewall. Be sure to create the route on the port the ISP is plugged into.
- Go to CONFIGURATION > Configuration Tree > Box > Network.
- In the left menu, select Routing.
- Click Lock.
- In the IPv6 Routing Table, click + to add a new route.
- Enter a Name for the route and click OK.
- In the Target Network Address field, enter the IP address of the target network.
- Select directly attached network as the Route Type .
- From the Interface Name list, select the port the ISP is connected to. E.g.,: eth1
- If the default route will be introduced in an environment where multiple dynamic links are available, specify a Route Metric.
- Select Untrusted as the Trust Level.

- Click OK.
- Click Send Changes and Activate.
Step 2. Add a Default Route
Create a direct attached route entry to create the network on box level of the Barracuda CloudGen Firewall. Be sure to create the route on the port the ISP is plugged into.
- Go to CONFIGURATION > Configuration Tree > Box > Network.
- In the left menu, select Routing.
- Click Lock.
- In the IPv6 Routing Table, click + to add a new route.
- Enter a Name for the route and click OK.
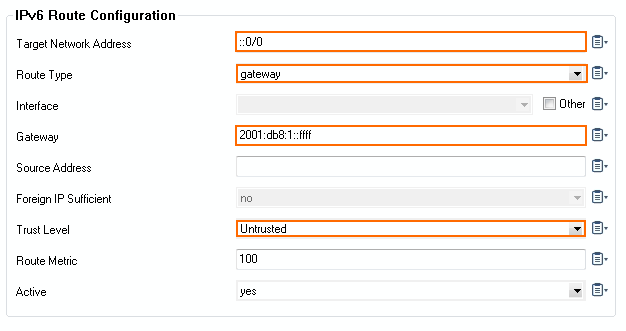
- In the Target Network Address field, enter
::0/0
- From the Route Type list, select gateway.
Enter the IPv6 address of the Gateway.
- (optional) Enter the Route Metric.
- From the Trust Level list, select Untrusted.

- Click OK.
- Click Send Changes and Activate.
Step 3. Network Activation
A network activation is required to activate the network configuration changes. Active sessions might time out during the activation.
- Go to CONTROL > Box.
- In the left menu, expand the Network section and click Activate new network configuration.
- Click Activate now.
Your route is now displayed as a disabled route (grey X icon) in CONTROL > Network.
Step 4. Add the Static IP Address to the Firewall
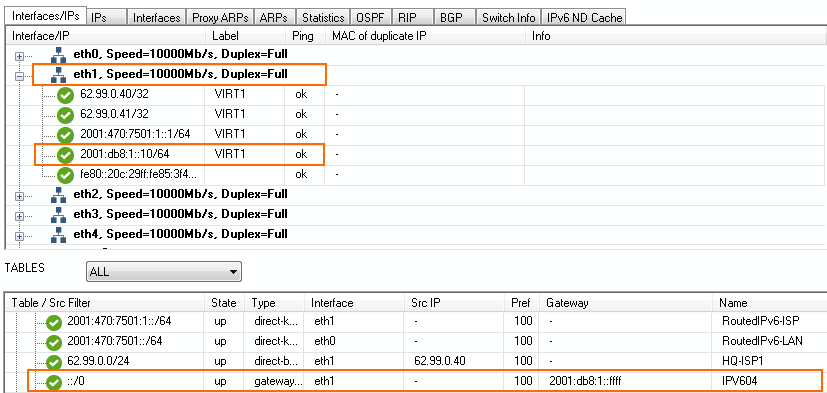
Assign the individual WAN IP addresses you want to use as a Shared IP on the Barracuda CloudGen Firewall. By introducing the external IP addresses as a shared IP address, you can use a high availability (HA) cluster to transfer the WAN address to the secondary firewall and still be reachable under the same IP address. In our example, you would enter 2001:db8:1::10 to Shared Networks and IPs and label it as the First-IP, Second-IP or Additional IP address.
For more information, see Assigned Services.
Verify the Network Configuration
Open the CONTROL > Network page to verify that all network routes have been introduced successfully. Verify that the WAN IP addresses are displayed with a green status icon and that the introduced routes are available in the Main and Default tables. In addition, ensure that the default route is directing traffic through your ISP connection.

