

If you are running a firewall with multiple configured network interfaces, the mapping of the interface names to the corresponding MAC addresses and the order of the interface names (e.g., eth0, eth1, eth2...) are the result of your first configuration. However, it might be necessary at a later time to add further interfaces or change the mapping of interface names to the MAC addresses. To ensure that a special MAC address maps to the correct interface name, you must bind the interface names to their corresponding MAC addresses in a special MAC to Interface Mapping table.
Before You Begin
If you are not operating an HA cluster, continue with Step 1.
With an HA cluster, the configuration must be done separately for both firewalls because each one has unique MAC addresses on the respective interfaces. Therefore, you must make provisions for getting configuration access to the Interface tab on the secondary firewall.
Option #1: For a standalone HA-cluster:
- Log into the primary firewall.
- Go to CONFIGURATION > Configuration Tree > Box > Properties > Operational.
- In the left menu bar, click Configuration Mode to expand the list.
- Click Switch to Advanced.
- Click Lock.
- In the section Operational Settings, select yes for Dedicated Secondary Config.
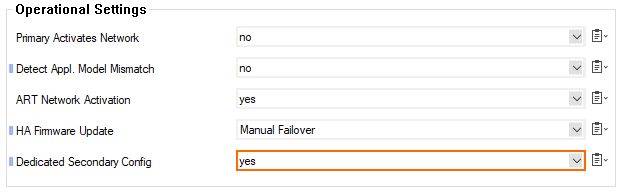
- Click Send Changes / Activate.
Option #2: For a CC managed HA-cluster:
- Log into the Control Center.
- Go to CONFIGURATION > Configuration Tree > Multi-Range > your range > your cluster > Boxes > your primary firewall > Properties > Operational.
- In the left menu bar, click Configuration Mode to expand the list.
- Click Switch to Advanced.
- Click Lock.
- In the section Operational Settings, select yes for Dedicated Secondary Config.
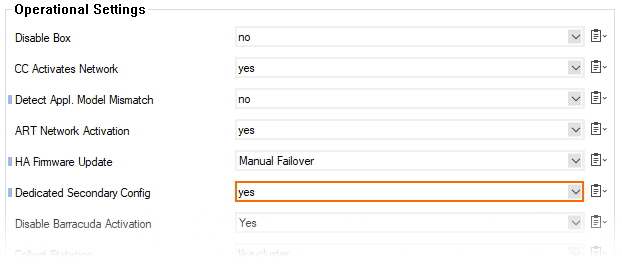
- Click Send Changes / Activate.
The secondary firewall will now be displayed in the configuration tree. You can now configure the interface settings individually for both firewalls.
Step 1. Navigate to the respective Window to see the Interface Settings
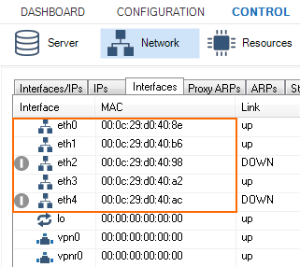
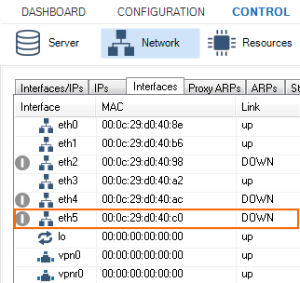
- Go to CONTROL > Network.
- In the upper area, click Interfaces to see which MAC addresses map to which interface names and write down their mapping.
Step 2. Verify the Mapping of MAC Addresses to the Interface Names
- Go to CONTROL > Network.
Verify the mapping of MAC addresses to the interface names after adding the new Ethernet adapter. In this example, the newly added interface (eth3) incorrectly shows up between the previous order of interfaces.

Step 3. Add a Mapping Table to Correctly Bind the MAC Addresses to the Corresponding Interface Names
- Go to CONFIGURATION > Configuration Tree > Box > Network > Interfaces.
- Click Lock .
- In the left menu, click Switch to Advanced View.
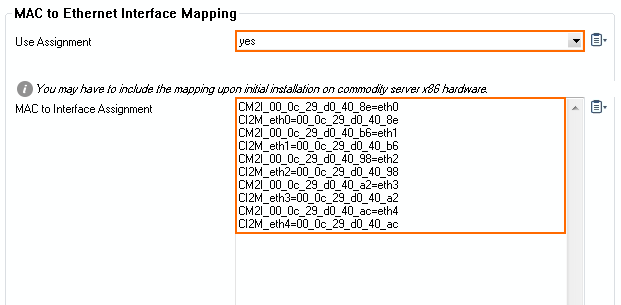
- Click Set....
- The MAC Mapping window opens.
- Set Use Assignment to yes.
For each network interface name and its corresponding MAC address that you wrote down earlier, add two entries in the MAC to Interface Assignment table complying with the following template:
- Entry #1:
CM2I_aa_bb_cc_dd_ee_ff=ethX. Replace the lettersaatoffby the real numbers from the corresponding MAC address. Replace X by the number of the corresponding interface number. Example: CM2I_00_11_22_33_44_55=eth0. - Entry #2:
CI2M_ethX=aa_bb_cc_dd_ee_ff. Replace the lettersaatoffby the real numbers from the corresponding MAC address. Replace X by the number of the corresponding interface number. Example: CI2M_eth0=00_11_22_33_44_55.
- Entry #1:
- Add two further entries for the new interface name and MAC address according to the two templates shown above. In this example, the new Ethernet adapter must be placed at the end (=eth5) of the former list of Ethernet adapters:
- Entry #1:
CM2I_aa_bb_cc_dd_ee_ff=ethX. - Entry #2:
CI2M_ethX=aa_bb_cc_dd_ee_ff.
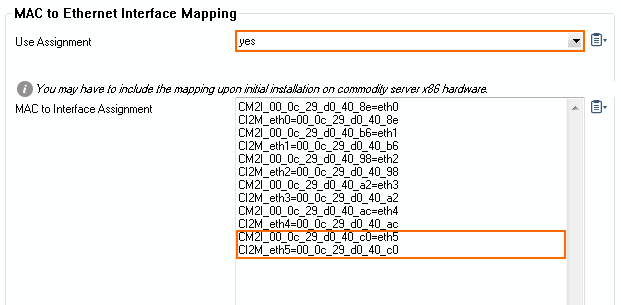
- Entry #1:
- Click OK.
- Click Send Changes and Activate.
Step 4. Activate the Network Configuration
You must activate the network changes.
- Go to CONTROL > Box.
- In the left menu, expand the Network section and click Activate new network configuration.
- Select Failsafe. The 'Failsafe Activation Succeeded' message is displayed after your new network configurations have been successfully activated.
Step 5. Verify the Correct Mapping of All MAC Addresses to Their Corresponding Interface Names
- Go to CONTROL > Network.
- In the upper area, click Interfaces to see which MAC addresses map to which interface name and write down the mapping.
The newly added interface is now listed according to the MAC to Interface Mapping table.
Step 6 (optional). Revert Visibility for Dedicated Secondary Configuration
With an HA cluster, you now can revert the setting for Dedicated Secondary Config in case you executed the steps in the paragraph Before You Begin.
- Follow the steps described in the section Before You Begin and set Dedicated Secondary Configuration to no.
- The secondary firewall node will no longer be displayed in the configuration tree of the primary firewall.