Install a Network Policy Server (NPS) extension for Azure Multi-Factor Authentication (MFA), configure an Azure Multi-Factor Authentication (MFA) server, and set up RADIUS authentication with the CloudGen Firewall as RADIUS client. The Azure MFA server supports only PAP and MSCHAPv2 when acting as a RADIUS server. Multi-Factor Authentication using Time-Based One-Time Passwords (TOTP) requires an Advanced Remote Access subscription. For more information, see Subscriptions.
Configure the Network Policy Server (NPS) Extension for Azure MFA
- Install your NPS extension for Azure MFA. For detailed instructions, see: https://docs.microsoft.com/en-us/azure/active-directory/authentication/howto-mfa-nps-extension.
- Configure the NPS server:
- Add a new RADIUS client with the IP address of the Barracuda CloudGen Firewall.
- Create a suitable Shared Secret.
- In the Advanced settings, set Vendor to RADIUS Standard.
- Configure connection and network policies as required.
- For Barracuda VPN Client support, you must enable Unencrypted authentication between the Firewall and the NPS.
- For Microsoft IPSECv2 clients, you can use a suitable Microsoft method such as MS-CHAP-v2 or EAP-MSCHAP-v2.
- (Optional) Lock the Connection Request Policy to the Barracuda IP address using the NAS IPv4 Address condition.
- (Optional) Use Settings / Attributes to translate an external and internal domain if necessary, or follow the advanced instructions for the NPS extension.
Configure the MFA Server
- Install your MFA server as described in https://docs.microsoft.com/en-gb/azure/multi-factor-authentication/multi-factor-authentication-get-started-server-radius.
- On the MFA server, configure RADIUS authentication with the CloudGen Firewall as RADIUS client. Ideally, enable Require Multi-Factor Authentication user match, but you can also import/create the users manually.
- In the MFA RADIUS authentication, you can assign a group in one of two ways:
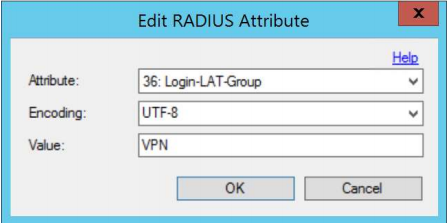
- To set one manually, go to Attributes on the MFA server, add Login-LAT-Group, and provide a value. Note that the firewall expects a group provided from the RADIUS server.

Or: - The CloudGen Firewall can take the groups from Active Directory if LDAP servers are available. For more information, see How to Configure MSAD Authentication .
- To set one manually, go to Attributes on the MFA server, add Login-LAT-Group, and provide a value. Note that the firewall expects a group provided from the RADIUS server.
Configure RADIUS Authentication on the CloudGen Firewall
- On the firewall, go to CONFIGURATION > Configuration Tree > Box > Infrastructure Services > Authentication Service.
- In the left navigation pane, select RADIUS Authentication.
- Click Lock.
- From the Configuration Mode menu on the left, select Advanced View.
- Enable the RADIUS scheme and add a new RADIUS server. Configure the settings with the correct IP address and port to match your MFA server details. For more information, see How to Configure RADIUS Authentication.
- In combination with manual group setup, leave Group Attribute values as default.
- To allow the firewall to look up the users group via the MSAD scheme:
- Enter the NAS IP Address if you wish to use that attribute to lock this to a connection profile.
Increase the Timeout to 60 seconds or more to handle MFA delays.
- Click OK.
- Set User Info Helper Scheme to MSAD.
- Set OTP Preserves State to Yes.
- In the left navigation pane, select Timeouts and Logging.
- Increase the Request Timeout [s] value from 10 to 130. (You may need to increase this value if your users are struggling to authenticate in time.)
Go to CONFIGURATION > Configuration Tree > Box > Assigned Services > VPN-Service > VPN Settings.
- In the left navigation bar, click General.
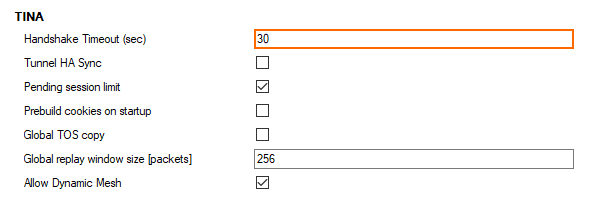
- In the section TINA, increase the value for Handshake Timeout (sec) to 30. (You may need to increase this value if users are struggling to complete authentication in time).

- Go to CONFIGURATION > Configuration Tree > Box > Assigned Services > VPN-Service > Client to Site.
- Go to External CA and click the Rules tab.
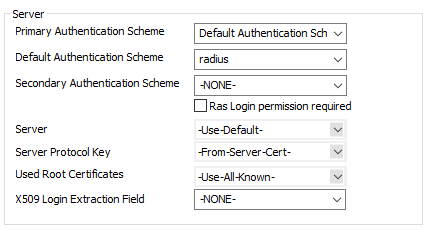
- Select Click here for options and select radius as the Default Authentication Scheme. If you are not using MSAD as the Group Helper, configure the VPN group attribute value found to match the value you provided.

- Click Send Changes and Activate.
- On the VPN clients, you may also need to go into the Advanced Settings of the profile and adjust the Connect Timeout from the default of 10 to 60 (or greater) to give users enough time to complete the process.
The more complex the method, the more time users will need. - Configure the remaining settings as recommended at Client-to-Site VPN.
MFA Validation Methods
In the Microsoft MFA methods, you can configure the method either globally (Company Settings) or per user.
To support OTP via the firewall:
- Go to CONFIGURATION > Configuration Tree > Box > Infrastructure Services > Authentication Service.
- In the left navigation pane, select RADIUS Authentication.
- Make sure that OTP Preserves State is set to Yes.

