Follow the instructions in this article to configure a client-to-site L2TP/IPsec VPN. With this configuration, IPsec encrypts the payload data of the VPN because L2TP does not provide encryption. L2TP/IPsec VPN connections can only be created between two devices using IPv4 addresses.

Supported VPN Clients
Use a standard-compliant L2TP/IPsec client, such as the native Windows VPN client.
Before You Begin
Set up the VPN certificates for External CA. For more information, see How to Set Up External CA VPN Certificates.
Configure an external authentication scheme. If an authentication service other than MSCHAPv2 or local DB is used, the client must transmit the password in plaintext (PAP). For more information, see Authentication.
Step 1. Configure General Settings
Configure the general settings to be applied to all L2TP/IPsec connections.
Open the L2TP/PPTP Settings page for the VPN service (Configuration > Configuration Tree > Box > Assigned Services > VPN-Service).
Click Lock.
Edit the following general settings for L2TP/IPsec access:
First DNS | Second DNS – The IP addresses of the first and secondary DNS servers for the VPN client.
First WINS | Second WINS – The IP addresses of the primary and secondary WINS server.
Static IP – To assign static IP addresses to your VPN clients, select yes. If you enable this option, you must also configure a user list. See Step 4.
Click Send Changes and Activate.
Step 2. Configure L2TP/IPsec VPN
Enable L2TP and configure the L2TP-specific settings.
Go to CONFIGURATION > Configuration Tree > Box > Assigned Services > VPN-Service > L2TP/PPTP Settings.
In the left menu, select L2TP/IPSEC.
Click Lock.
From the Enable L2TP list, select yes.
In the L2TP Settings section, specify the following settings:
L2TP Listen IP – The IP address that the L2TP/IPsec service will listen on, or, in other words, the public IP address on the WAN that the L2TP client connects to.
Local Tunnel IP – The gateway's IP address in the VPN subnet (e.g.,
10.0.10.1).Pool IP-Begin – The first IP address for L2TP/IPsec clients accessing the VPN subnet (e.g.,
10.0.10.2).Pool Size – The number of addresses that are available for L2TP/IPsec clients (e.g.,
50).
In the Authentication Settings section, specify the L2TP authentication settings:
User Authentication – The authentication service.
Authentication Scheme (external authentication only) – The authentication scheme. For more information, see Authentication.
Allowed Users (MS-CHAP-v2 only) – The specific users who are allowed to connect to the VPN. To allow all users, leave this table empty.
Allowed Groups (MS-CHAP-v2 only) – The specific groups that are allowed to connect to the VPN. To allow all groups, leave this table empty.
Click Send Changes and Activate.
Step 3. Configure IPsec PSK
You must configure the pre-shared key in the IPSec settings.
Go to CONFIGURATION > Configuration Tree > Box > Assigned Services > VPN > VPN Settings.
Click Lock.
Verify that the Default Server Certificate and Private key are both valid (green). If the Default Server Certificate and Private key are not valid, see How to Set Up Barracuda VPN CA VPN Certificates.
In the left menu, select IPSec.
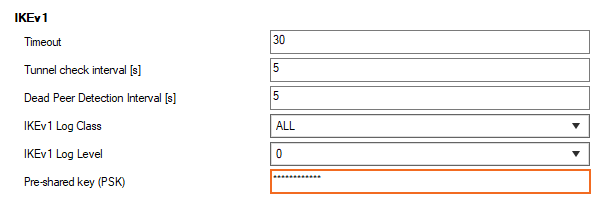
In the IKEv1 section, enter the Pre-shared key. E.g.,
pre$haredKey

Click OK.
Click Send Changes and Activate.
Step 4. (For Local Authentication or Static IP Addresses) Configure a User List
If you are not using an external authentication scheme or must assign static IP addresses, you can also create a list of L2TP/IPsec users who can access the VPN. Specify the username, password, and optional static IP address for each user.
Go to CONFIGURATION > Configuration Tree > Box > Assigned Services > VPN-Service > L2TP/PPTP Settings.
In the left menu, select User List.
Click Lock.
In the Username table, add the L2TP/IPsec users.
Click Send Changes and Activate.
Step 5. Create a Host Firewall Rule
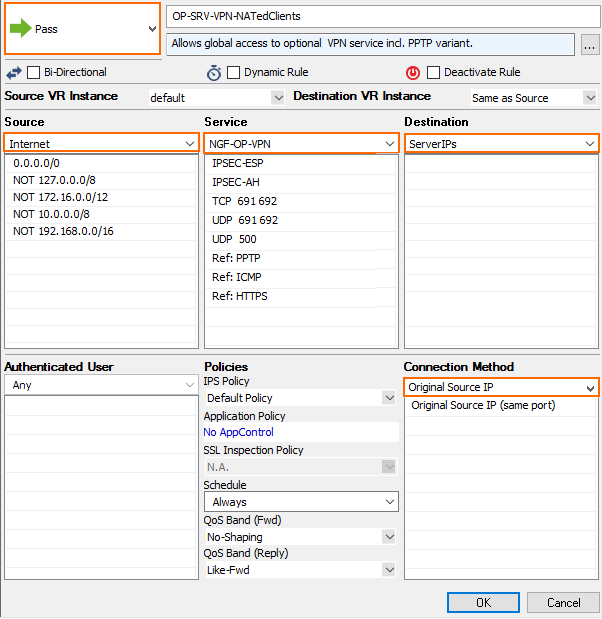
To allow multiple clients behind the same NATed IP address to connect to the CloudGen Firewall, you must create an additional host firewall rule.
Go to CONFIGURATION > Configuration Tree > Box > Infrastructure Services > Host Firewall Rules.
Click Lock.
Click the plus icon (+) at the top right of the ruleset, or right-click the ruleset and select New > Rule.

Specify the following settings that must be matched by the traffic to be handled by the access rule:
Action – Select PASS.
Source – Select Internet.
Service – Select NGF-OP-VPN.
Destination – Select Server IPs.
Connection Method – Double click and select Original Source IP from the Translated Source IP list.

In the left menu, click Advanced.
In the Dynamic Interface Handling section, set Source Interface to Any.

Click OK.
Place the host firewall rule directly above the OP-SRV-VPN rule in the Inbound ruleset.
Click Send Changes and Activate.
Step 6. Create an Access Rule for L2TP/IPsec Clients
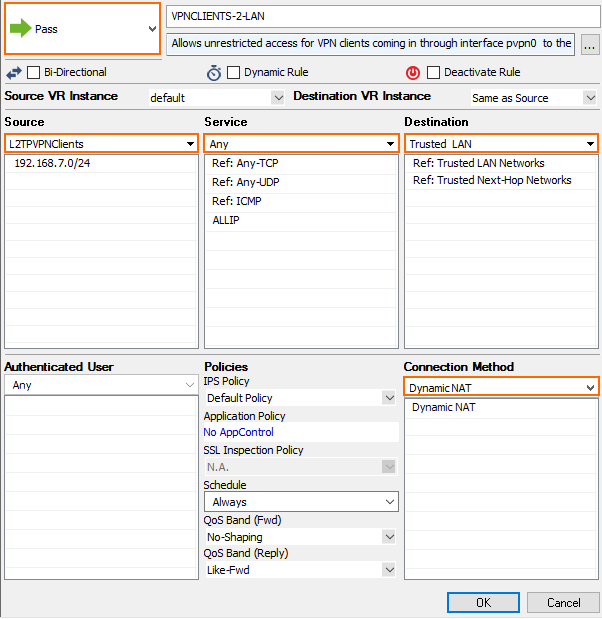
To allow traffic from connected L2TP clients into your network, you must create an access rule.
Go to CONFIGURATION > Configuration Tree > Box > Assigned Services > Firewall > Forwarding Rules.
Click Lock.
Click the plus icon (+) at the top right of the ruleset, or right-click the rule set and select New > Rule.

Specify the following settings that must be matched by the traffic to be handled by the access rule:
Action – Select PASS.
Source – Select the network object containing the L2TP VPN clients. Alternatively, use 0.0.0.0/0 with source interface pvpn0 as the source.
Service – Select ANY.
Destination – Select Trusted LAN.
Connection Method – Select Dynamic NAT.

In the left menu, click Advanced.
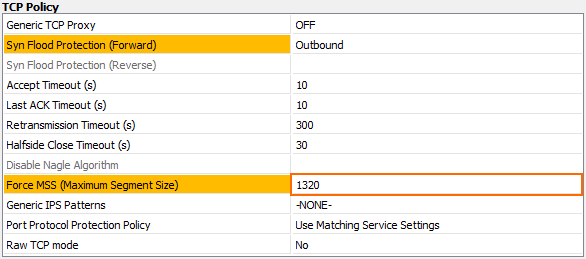
In the TCP Policy section, set the Force MSS (Maximum Segment Size) to at least 40 bytes less than the MTU of the interface. E.g.,
1320

In the Miscellaneous section, set the Clear DF Bit to yes.
.png)
Click OK.
Place the access rule so that no rule above it matches this traffic.
Click Send Changes and Activate.
Troubleshooting
To troubleshoot VPN connections, see the \VPN\l2tpd log file. For more information, see LOGS Tab.
