Create a client-to-site group policy for remote users connecting to your network in a CloudGen Firewall Auto Scaling Cluster in AWS. Configure a VPN client network, create the policy, and configure the network settings for the client-to-site connections. Then, create a Source NAT access rule to allow the clients to connect to your network. VPN clients can be authenticated either through external authentication schemes, client certificates, or a combination thereof.
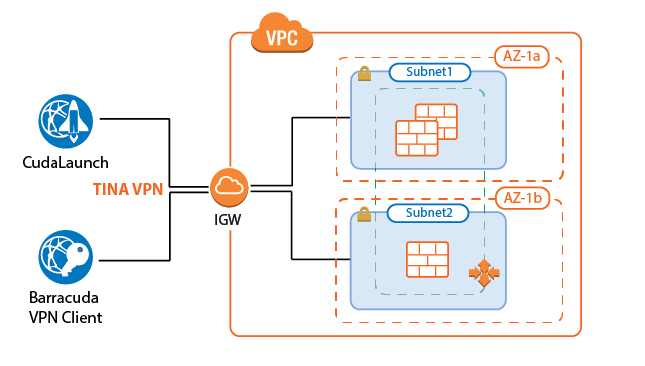
Supported Clients
- Barracuda VPN Client for Windows, macOS, Linux, and OpenBSD
- CudaLaunch for Windows, macOS, and Android. A CudaLaunch version for iOS with support for CloudGen Firewall clusters is coming soon.
Before You Begin
- Set up the VPN certificates for External CA or Barracuda VPN CA. For more information, see How to Set Up External CA VPN Certificates, or How to Set Up Barracuda VPN CA VPN Certificates.
- Configure the required authentication schemes. For more information, see Authentication.
Step 1. Disable Port 443 for Client-to-Site VPN
To use SSL VPN and client-to-site VPN simultaneously, the listener on port 443 for the VPN service must be disabled.
- Go to CONFIGURATION > Configuration Tree > Box > Assigned Services > VPN > VPN Settings.
- Click Lock.
- Set Listen on port 443 to No.
- Click OK.
- Click Send Changes and Activate.
Step 2. Configure the VPN Client Network
Configure the client network. When the VPN clients connect, they are assigned an IP address out of this network. Make sure to size the client-to-site network according to the number of client-to-site connections you are expecting to use on one instance of your Auto Scaling cluster. The source IP address for all connections from the VPN client network are rewritten to use the firewall's IP address.
- Go to CONFIGURATION > Configuration Tree > Box > Assigned Services > VPN > VPN Settings.
- Click Lock.
- In the left menu, select Client Networks.
- Right-click the table, and select New Client Network.
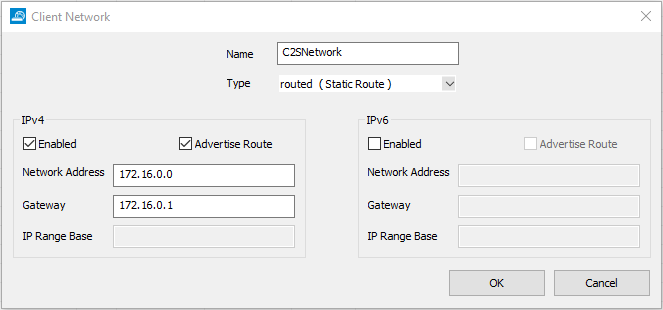
- In the Client Network window, configure the following settings:
- Name – Enter a descriptive name for the network.
- Network Address – Enter the default network address, e.g.:
172.16.0.0
- Gateway – Enter the gateway network address, e.g.:
172.16.0.1 - Type – Select routed (Static Route). A static route on the firewall routes traffic between the VPN client subnet and the local network.
- Click OK.
- Click Send Changes and Activate.
Step 3. Configure Group Policy Settings
Configure the authentication setting for the client-to-site VPN. The firewall must have access to the authentication service.
- Go to CONFIGURATION > Configuration Tree > Box > Assigned Services > VPN > Client-to-Site.
- Click Lock.
- Click the External CA tab and then the Group Policy tab.
- Click the Click here for options link.
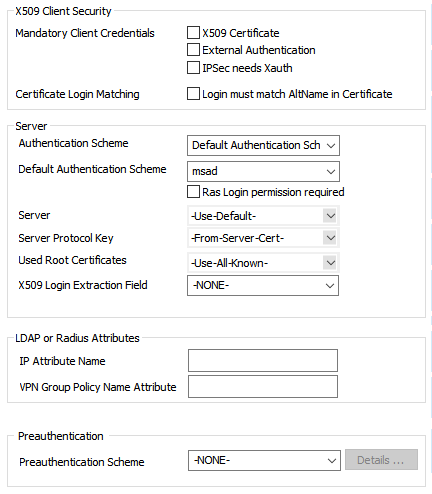
- Select the Authentication Scheme:
- Default Authentication Scheme – The default authentication scheme is used for all VPN group policies.
- Extract from username – The authentication scheme is appended to the username. The authentication scheme with the appended name is used with the default authentication scheme acting as a fallback if the authentication scheme name is not present on the firewall. E.g.,
user1@msad1oruser2@domain.com@HQldap.
- Select the Default Authentication Scheme from the drop-down list. This authentication scheme must be configured on box level of the firewall.
- Configure which certificates are used. By selecting a specific certificate, all VPN group policies must use this certificate:
- (optional) Server – Select a server certificate, or use the default server certificate configured in the VPN settings.
- Server Protocol Key – Select the service certificate.
- (optional) Used Root Certificates – Select a root certificate, or use the default server certificate configured in the VPN settings.
- (optional) X509 Login Extraction Field – Select the X.509 field containing the username.
- (optional) If needed, select the Preauthentication Scheme.
Click OK.
Step 4. Create a VPN Group Policy
Create a group policy and configure the network settings for the client-to-site connections. If you want the client to send all traffic through the VPN tunnel, enter 0.0.0.0/0 as the network.
- Go to CONFIGURATION > Configuration Tree > Box > Assigned Services > VPN > Client-to-Site.
- Click the External CA tab and then click the Group Policy tab.
- Right-click the table and select New Group Policy.
- In the Edit Group Policy window, edit the following settings:
- Name – Enter a name for this policy.
- Common Settings – Select the check box.
- Statistics Name – To better allocate statistics entries, enter a name.
- Network – Select the required client network.
- DNS – Enter a DNS server for the clients.
- Network Routes – Add all networks that should be reachable by the VPN clients. Enter
0.0.0.0/0for all traffic to be sent through the client-to-site VPN.
Right-click the Group Policy Condition field and select New Rule.
In the X509 Certificate Conditions section of the Group Policy Condition window, set filters for the certificate. For example, to let everyone with a valid certificate log on, click Edit/Show to add the following condition to the Subject field:
CN=*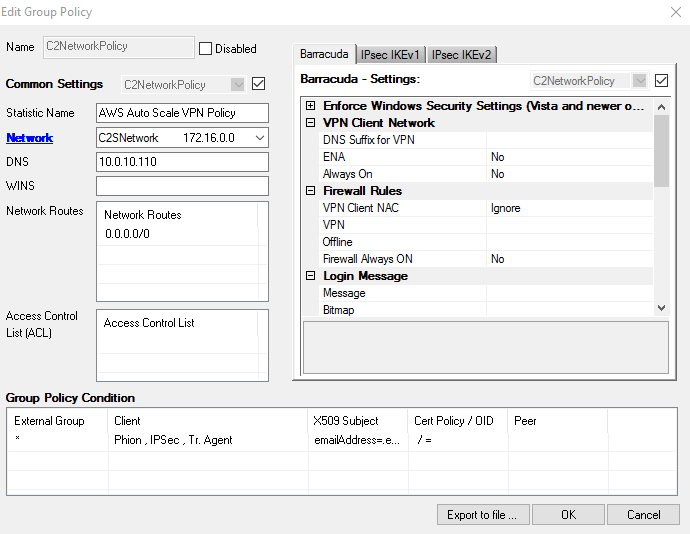
- Click OK.
- Click OK.
- Click Send Changes and Activate.
Step 5. (optional) Adjust Barracuda (TINA) Settings
- Go to CONFIGURATION > Configuration Tree > Box > Assigned Services > VPN-Service > Client-to-Site.
- Click Lock.
- Click the External CA tab and then click the Group Policy tab.
- Double-click the VPN group policy created in Step 3.
- In the Barracuda tab configure:
- Windows Security Settings
- VPN Client Network
- Firewall Rules
- Login Message
- Ciphers
- Click OK.
- Click Send Changes and Activate.
Step 9. Add Access Rules
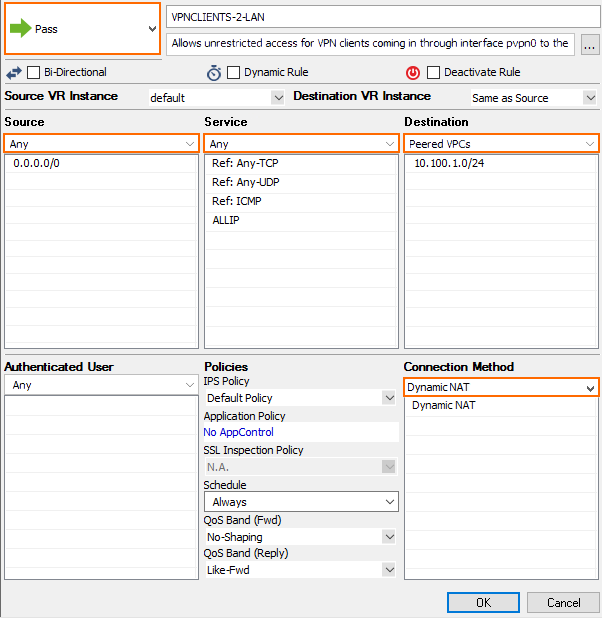
For each service and/or destination network, create an access rule to allow traffic from the client VPN network to your AWS resources. The access rules must always use a Dynamic NAT or Translated IP from DHCP connection method.
- Action – Select Pass.
- Source – Select Any.
- Service – Select the allowed services, or Any to allow all services.
- Destination – Select the network object containing the networks the VPN clients can access in AWS.
- Connection Method – Select Dynamic NAT.
Configure a Custom Login Message
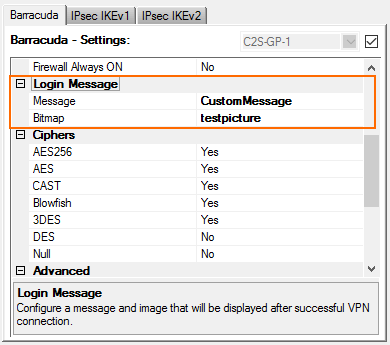
When using a Barracuda VPN client, you can define a custom welcome message as well as upload your company logo as a custom Picture. Custom message and picture can be selected in the Barracuda - Settings of the VPN group policy.
- Messages – Create a custom message in the Message tab of the Client-to-Site page, and then select the customized welcome message in the Barracuda Settings tab of the VPN group policies.
- Bitmap/Pictures – Upload a 150x80 pixel, 256 color BMP bitmap in the Pictures tab of the Client-to-Site page, and then select the custom bitmap in the Barracuda Settings tab of the VPN group policies.
Troubleshooting
Barracuda Firewall Admin only displays the logs on one firewall instance. To troubleshoot multiple client-to-site connections in an AWS Auto Scaling cluster, use CloudWatch.
For more information, see How to Configure Log Streaming to AWS CloudWatch.
Next Steps
- Configure the remote access clients to connect to the client-to-site VPN. For more information, see Remote Access Clients.
- Configure SSL VPN and CudaLaunch. For more information, see SSL VPN and CloudGen Firewall Configuration for CudaLaunch.
