

Packet-Based Balancing distributes traffic on a per-packet basis over multiple VPN transports in the same transport class. VPN transports using Packet-Based Balancing must have the same bandwidth and latency (Round Trip Time). In most cases, using Adaptive Session Balancing is preferable to Packet-Based Balancing because it allows for different link-quality requirements.
Limitations
- VPN transports must be in the same transport class.
- WAN links must have the same bandwidth and latency. For example: multiple identical WAN links from the same ISP.
Before You Begin
Create a multi-transport VPN tunnel between two CloudGen Firewalls:
- Create a TINA site-to-site VPN tunnel. For more information, see How to Create a TINA VPN Tunnel between CloudGen Firewalls or How to Create a VPN Tunnel with the VPN GTI Editor.
- Add one or more additional transports in the same SD-WAN class to the VPN tunnel. For more information, see How to Add a VPN Transport to a TINA VPN Tunnel with Explicit Transport Selection or How to Configure SD-WAN Using the VPN GTI Editor.
Step 1. Enable Packet-Based Balancing
Packet-Based Balancing must be enabled for all transports in the transport class.
- Go to CONFIGURATION > Configuration Tree > Box > Assigned Services > VPN-Service > Site to Site VPN.
- Click Lock.
- Double-click the TINA VPN tunnel. The TINA Tunnel window opens.
- Click the Advanced tab.
- From the Packet Balancing list, select Cycle within a Transport Class.

- Click OK.
- Click Send Changes and Activate.
Step 2. Create a Custom Connection Object for the SD-WAN Primary
- Go to CONFIGURATION > Configuration Tree > Box > Assigned Services > Firewall > Forwarding Rules.
- In the left menu, click Connections.
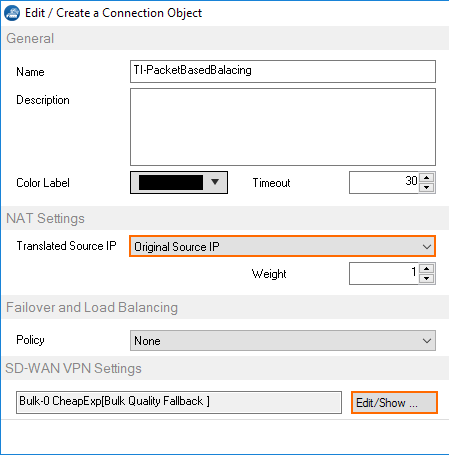
- Right-click the table and select New Connection. The Edit/Create a Connection Object window opens.
- Enter a Name
- From the Translated Source IP list, select Original Source IP.
.png)
- To edit the VPN SD-WAN settings, click Edit/Show . The SD-WAN Settings window opens.
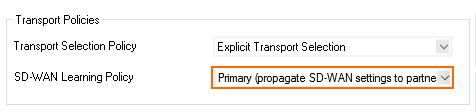
- From the SD-WAN Learning Policy list, select Primary.
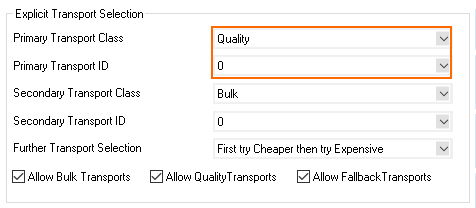
- From the Primary Transport Class list, select the primary transport class.
- From the Primary Transport ID list, select the ID for the primary transport.
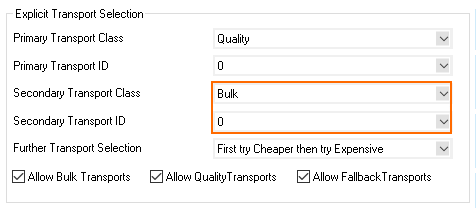
- From the Secondary Transport Class list, select the same transport class used for the primary transport.
- From the Secondary Transport ID list, select the ID for the secondary transport.
- Click OK.
- Click Send Changes and Activate.
Step 3. Create a Custom Connection Object for the SD-WAN Secondary
- Go to CONFIGURATION > Configuration Tree > Box > Assigned Services > Firewall > Forwarding Rules.
- In the left menu, click Connections.
- Right-click the table and select New Connection. The Edit/Create a Connection Object window opens.
- Enter a Name.
- From the Translated Source IP list, select Original Source IP.
- To edit the VPN SD-WAN settings, click Edit/Show. The SD-WAN Settings window opens.
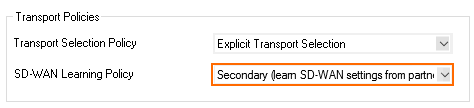
- From the SD-WAN Learning Policy drop-down list, select Secondary.
- Click OK.
- Click Send Changes and Activate.
Step 4. Modify Access Rule on the Firewall Acting as SD-WAN Primary
- Go to CONFIGURATION > Configuration Tree > Box > Assigned Services > Firewall > Forwarding Rules.
- Click Lock.
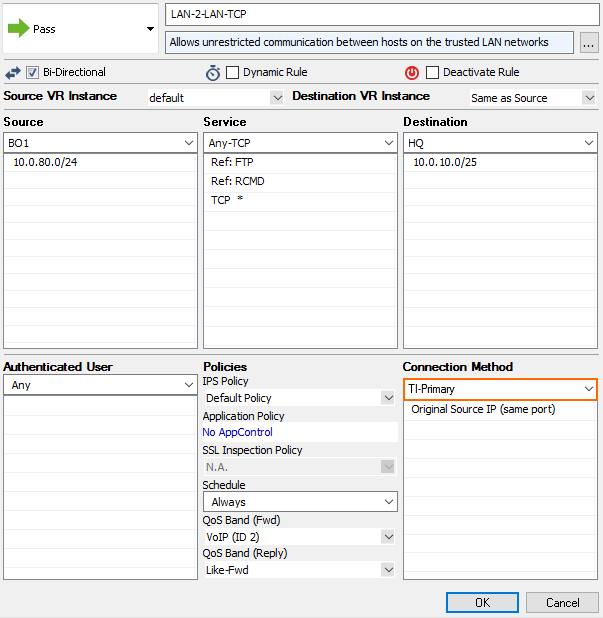
- Right-click the ruleset and select New > Rule to create an access rule to match the VPN traffic you want to balance:
- Action – Select Pass.
- Bi-Directional – Select the check box to apply the rule in both directions.
- Source – Select a network object for all local networks.
- Service – Select a service object from the list.
- Destination – Select the network object containing the remote networks.
- Connection Method – Select the connection object for the SD-WAN primary created in Step 2.
- Click OK.
- Click Send Changes and Activate.
Step 5. Modify Access Rule on the Firewall Acting as SD-WAN Secondary.
- Go to CONFIGURATION > Configuration Tree > Box > Assigned Services > Firewall > Forwarding Rules.
- Click Lock.
- Right-click the ruleset and select New > Rule to create an access rule to match the VPN traffic you want to balance:
- Action – Select Pass.
- Bi-Directional – Select the check box to apply the rule in both directions.
- Source – Select a network object for all local networks.
- Service – Select a service object from the list.
- Destination – Select the network object containing the remote networks.
- Connection Method – Select the connection object for the SD-WAN secondary created in Step 3.
 a
a - Click OK.
- Click Send Changes and Activate.
Traffic matching these access rules and using the VPN transports are now balanced per packet within the transport class.