ONCRPC, also known as SUNRPC allows services to register on a server, which then makes them available on dynamic TCP/UDP ports. By means of this mechanism, ports required for specific purposes (for example NFS), can be dynamically enabled without weakening a strict security policy.
The heart of ONCRPC is the so-called portmapper, an interface responsible for allocation of ports and protocols to services. If an application demands a certain service, a request is sent to the portmapper. The portmapper's answer contains the required port and protocol, which are then used for connection establishment.
Configuring Passive ONCRPC
Step 1. Enable Access to the Portmapper
- Go to the CONFIGURATION tab and click Simple Configuration.
- In the Operational Configuration table, click Ruleset under the Firewall section. The Configuration Overview/Forwarding Rules page opens.
- Create a PASS rule for portmapper access using a corresponding service object.
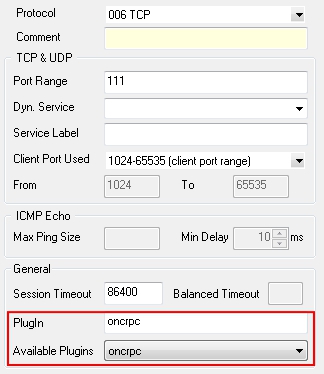
- When configuring the service entry, select either UDP or TCP as protocol and set the parameter Port Range to port 111.
- Last but not least, you need to select ONCRPC in the Available Plugins drop-down menu.
Step 2. Create a Second Rule for the Required Service (For Example NFS)
- Create a second firewall rule. Again, as mentioned in step 1, the settings for the service object are of interest.
- In the service object, select the required protocol (either UDP or TCP) and use parameter Dyn. Service for defining the service information (which means servicename:serviceID; for example ONCRPC:100003).
Step 3. Check the Ruleset Hierarchy
- For successful usage of dynamic services it is mandatory to have the general rule (created during step 1) situated above the service rules (created during step 2). You can move the rules up or downwards within the ruleset by drag-and-drop.
Configuring Active ONCRPC
Step 1. Configure the RPC Server Information
- Go to the CONFIGURATION > Configuration Tr ee > Box > Assigned Services > Firewall > Firewall Forwarding Settings page.
- From the Configuration menu on the left, select RPC.
- Click Lock.
- In the Default Poll Time (secs) field, you can define the interval for requesting RPC information from the RPC server (default: 300).
- In the ONC/RPC Servers section, click the + icon to create a new server entry.
- Enter a descriptive name and click OK to access the ONC/RPC Servers configuration.
- In the Portmapper IP field, enter the IP address of the considered RPC server.
- The other parameters are specified as follows:
Portmapper Port [111] – Defines the port where portmapper is listening on.
- Optional Source IP [0.0.0.0] – This parameter allows you to define an explicit IP address that is used when connecting to the RPC server. This comes handy as soon you are using policy routing. The default value of 0.0.0.0 deactivates this parameter and the correct bind IP address will be specified via the routing table.
- Polling Time (secs)[300] – Here the interval for requesting RPC information from the RPC server is defined.
- Additional Addresses (NAT) – If you want to use NAT, enter the corresponding addresses in this section by clicking the + icon.
- Click Send Changes and then click Activate.
Step 2: Enable Access to the Portmapper
- Create a PASS rule for portmapper access using a corresponding service object.
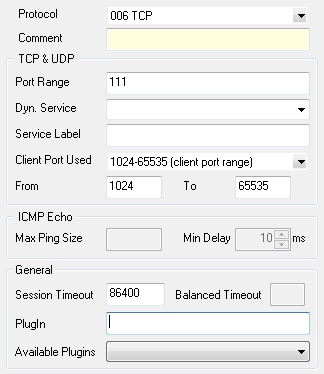
- When configuring the service entry, select either UDP or TCP as protocol and set the parameter Port Range to port 111 (see figure below).
General service object required for creating a PASS rule to enable active ONCRPC:
Step 3. Create a Second Rule for the Required Service (For Example NFS)
- Create a second firewall rule. Again, as mentioned in step 1, the settings for the service object are of interest.
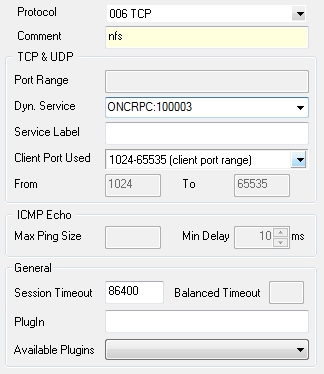
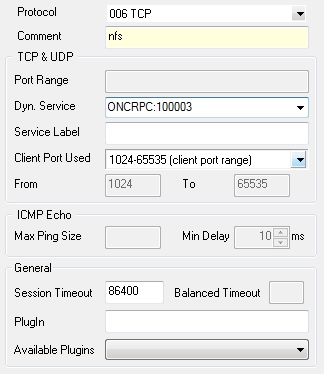
- Select the required protocol (either UDP or TCP) and use parameter Dyn. Service for defining the service information (servicename:serviceID; in our example this would be nfs:100003).
Service object needed for enabling nfs usage via a portmapper:
Step 4: Check the Ruleset Hierarchy
- For successful usage of dynamic services it is mandatory to have the general rule (created during step 2) situated above the service rules (created during step 3). You can move the rules up or downwards within the ruleset by drag-and-drop.
Configure Active & Passive ONCRPC (recommended)
Step 1: Configure the RPC Server Information
- Configure the RPC Server information as described above in step 1 (Configure the RPC Server Information).
Step 2: Enable Access to the Portmapper
- Create a PASS access rule for portmapper access using a corresponding service object.
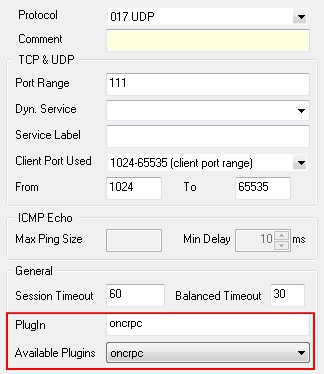
- When configuring the service entry, select UDP or TCP as protocol and set the parameter Port Range to port 111.
- Select oncrpc in the Available Plugins drop-down menu. (see figure below).
General service object needed for creating a PASS rule to enable active & passive ONCRPC:
Step 3. Create Access Rule for the Service
- Create a second access rule. Again, as mentioned in step 1, the settings for the service object are of interest.
- Select the required protocol (either UDP or TCP) and use parameter Dyn. Service for defining the service information (servicename:serviceID; in our example this would be nfs:100003).
Service object required for enabling nfs usage via a portmapper:
Step 4: Check the Ruleset Hierarchy
Verify that the access rule created in step 2 is located above the service rules created in step 3.
