

F or user authentication with the HTTP Proxy, the external authentication scheme that you can use depends on the proxy mode. With a transparent or reverse proxy, you can only use the Barracuda DC Agent. With the forwarding proxy, you can use either MS-CHAP or Kerberos for transparent authentication. In case these authentication methods fail, you can configure one of several other authentication schemes, such as NGF-Local, MS-AD, LDAP, or Radius, to serve as a fallback.
To configure access control, you have the following options:
- Access Control Policy – An access control policy is composed of ACL entries that define the connections to be restricted or allowed. An ACL entry can define IP addresses, domains, users, groups, browsers, MIME types, URLs, protocols, ports, connections, and times.
Access control policies are processed one by one, according to their priority numbers. You can specify the priority of a policy when you create it. - Access Control File List – In addition to ACL entries and policies, you can also configure ACL file lists. ACL file lists are processed before ACL entries and policies.
- Legacy ACL Settings – With this option, you can configure ACL files using the squid.conf syntax. From the command line, you can check the syntax of the squid.conf file.
Depending on the HTTP Proxy mode, different authentication schemes are supported:
Forward Proxy Mode – MS-CHAP or Kerberos. For more information, see How to Configure MS-CHAP Authentication or How to Configure Kerberos Authentication.
- Forward Proxy Mode without transparent authentication – In case MS-CHAPv2 or Kerberos are not available, you can configure an authentication fallback.
- Transparent Proxy Authentication – DC Client. For more information, see How to Configure MSAD DC Client Authentication and Barracuda DC Agent for User Authentication.
Configure User Authentication
Step 1. Enable User Authentication
For the forward proxy, you can use either MS-CHAP or Kerberos. For the transparent or reverse proxy, only DC Client for authentication is supported.
- Go to CONFIGURATION > Configuration Tree > Box > Assigned Services > HTTP Proxy Settings.
- Click Lock.
- In the left menu, select User Authentication.
- Next to Authentication Settings, click Set.
- To use MS-CHAPv2, edit the settings in the MS-CHAPv2 Settings section.
- To use Kerberos, edit the settings in the Kerberos Settings section.
- Click OK.
- Click Send Changes and Activate.
Step 2. (optional) Configure User Authentication for Forwarding Proxy Without Transparent Authentication
In case MS-CHAPv2 or Kerberos is not available, you can configure an authentication fallback, e.g., NGF Local.
- Go to CONFIGURATION > Configuration Tree > Box > Assigned Services > HTTP Proxy Settings.
- Click Lock.
- In the left menu, select User Authentication.
- In the Authentication Service Settings, configure:Click OK.
- Authentication Text – Enter a welcome message that is displayed when a user is prompted by the fallback authentication scheme.
- Authentication Scheme – Select your fallback authentication scheme, e.g., NGF Local.
- Use FW Login as Authentication – Select Yes. The HTTP Proxy service queries the firewall login status of the client. If the client is already authenticated, no further HTTP Proxy authentication is needed.
- User List Policy – In case there are users that are not allowed to use the proxy service, select deny-explicit. In case only domain users listed in the User List are allowed to use the proxy service, select allow-only.
- User List – Click + to add users to the list that must fulfill the User List policy.
- User names case sensitive – Select yes if every single letter in the user name must match lower-case or capital letters; otherwise, select no.
- Click Send Changes and Activate.
Step 3. Configure Access Control Policy
First create the ACL entries that are required by the policy. Next, create the access control policy by adding the ACL entries and selecting an action to handle them.
- Go to CONFIGURATION > Configuration Tr ee > Box > Assigned Services > HTTP-Proxy > HTTP Proxy Settings.
- In the left menu, select Access Control.
- Click Lock.
From the Default Access Control Policy list, select Allow.
- For each ACL, click + to add entries to the ACL Entries table:
- Enter a Name and click OK.
Configure the Access Control Policy:- ACL Priority – Enter a number. Highest numbers are processed first.
- Action – Select the action:
- Allow
- Deny
- Deny and redirect – Enter an external Redirection address.
- Limit-Size – Enter the Overall Maximum File Size (MB).
- Outgoing Address – Set the Outgoing IP Address for the connection.
- Include – Select additional ACL Files to include into the configuration.
- ACL Entries for this Action – Select the ACL Entries this ACL is applied to.
- Enter a Name and click OK.
In the Access Control Policies table, add the policy.
- Enter a name for the policy and click OK.
- In the Access Control Policies configuration window, specify the priority, required ACL entries, and action for the policy. Then click OK.
For more details on the settings that you can configure for the ACL entries or access control policies, see Access Control Settings.
- Click Send Changes and Activate.
Step 4. (optional) Configure Access Control File List
- Go to CONFIGURATION > Configuration Tr ee > Box > Assigned Services > HTTP-Proxy > HTTP Proxy Settings.
- In the left menu, select Access Control.
- In the left menu, expand the Configuration Mode section, and click Switch to Advanced View.
- Click Lock.
From the Default Access Control Policy list, select Allow.
- In the ACL FileList table, add the ACL file list.
- Enter a name for the list, and click OK. The name must be numerical. It determines the priority of the ACL file list. To assign higher priority to the ACL file list, enter a lower number.
- In the ACL FileList window, configure the file list. Specify the following settings:
Filename – The name of the ACL file. By default, the file is saved to the
/var/phion/preserve/proxy/<servername>_<servicename>/root/directory.
You can save the file to a different location, but this is not recommended. First verify that the destination directory has been properly created. When you specify the file name, add the absolute path to the destination directory.ACL entries – The entries that are written to the file. ACL entries are processed line by line. If a line must exceed 1012 characters, use the forward slash (
/)to section lines.
- Click OK.
- Click Send Changes and Activate.
Step 5. (optional) Leg acy ACL Settings
If you must configure squid settings in legacy ACL in squid.conf syntax, enable the legacy ACL settings mode.
- Go to CONFIGURATION > Configuration Tr ee > Box > Assigned Services > HTTP-Proxy > HTTP Proxy Settings.
- In the left menu, select Access Control.
- From the Configuration Mode menu in the left navigation pane, click Switch to Advanced View.
- Click Lock.
- From the Default Access Control Policy list, select Allow.
- From the Access Configuration list, select legacy.
Next to Legacy, click Set.
In the Access Control Entries field, enter your ACL entries. These entries must use the
squid.confsyntax. You can enter complete ACLs, as well as entries from the ACL file list.Click OK.
Click Send Changes and Activate.
Check the squid.conf syntax
To check the syntax of the squid.conf file from the command line, enter:
squid -X -N -f /phion0/preserve/proxy/<servername_servicename>/root/squid.conf
If there are any errors in your configuration, the number of the row that contains the error is printed.
Access Control Policy Example
These sections provide steps to configure two example access control policies and an explanation of how the policies are processed:
Creating the Example Access Control Policies
This example procedure configures two access control policies that limit FTP and HTTP access for a client at 10.0.8.1 to the following days and times:
| Access Control Policy | Access Times |
|---|---|
| FTP Access | Mondays, 08:00 - 12:00 and 14:00 - 17:00 |
| HTTP Access | Mondays to Fridays, 08:00 - 17:00 |
First create all of the required ACL entries. Then add these entries to the policies.
- Go to CONFIGURATION > Configuration Tr ee > Box > Assigned Services > HTTP-Proxy > HTTP Proxy Settings.
- In the left menu, select Access Control.
- Click Lock.
- From the Default Access Control Policy list, select Allow.
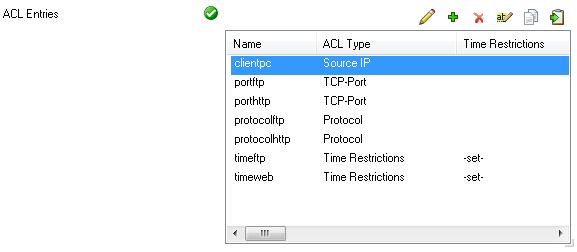
In the ACL Entries table, create these ACL entries:
ACL Entry Name ACL Entry Type Settings clientpc Source IP - IP Configuration: Singlemode
- Set IPs: 10.0.81
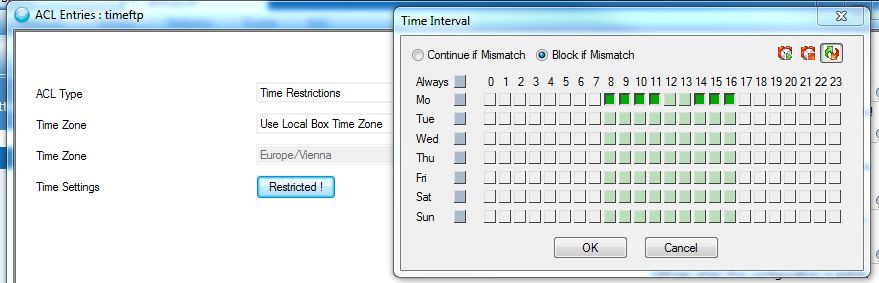
portftp TCP-Port Specify Destination Port Address: 21 porthttp TCP-Port Specify Destination Port Address: 80 protocolftp Protocol Define Transfer Protocol: FTP protocolhttp Protocol Define Transfer Protocol: HTTP timeftp Time
RestrictionsAccess is enabled Mondays from 08:00 to 12:00 and 14:00 to 17:00:
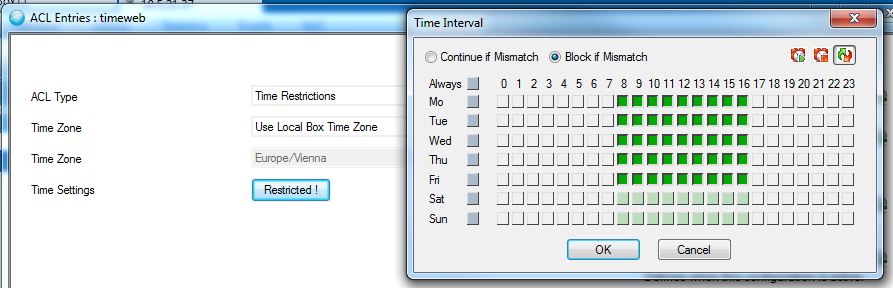
timeweb Time
RestrictionsAccess is enabled Mondays to Fridays from 08:00 to 17:00:
After all of the required ACL entries are created, they are displayed in the ACL Entries table as follows:
In the Access Control Policies table, create these access control policies:
Access Control Policy Name Settings webaccess - ACL Priority: 1
- Action: Allow
- ACL Entries for this Action:
- clientpc
- porthttp
- protocolhttp
- timeweb
ftpaccess - ACL Priority: 2
- Action: Allow
- ACL Entries for this Action:
- clientpc
- portftp
- protocolftp
- timeftp
After the access control policies are created, they are displayed in the Access Control Policies as follows:

Processing the Example Policies
When the HTTP proxy URL filter is configured with the example webaccess and ftpaccess policies, it grants access to connections that match the ACL entries that are included in the policies. To determine if access should be granted, the HTTP proxy URL filter first processes the webaccess policy (which has higher priority) for a match. If the connection does not match the webaccess policy, the ftpaccess policy is then processed. The policies are processed as follows:
- If clientpc AND porthttp AND protocolhttp AND timeweb are TRUE, grant access and stop processing rules.
Otherwise, proceed to the next rule. - If clientpc AND portftp AND protocolftp AND timeftp are TRUE, grant access.
Example Scenarios
It is Monday at 9:00. If a user at 10.0.81 tries to access the Internet on port 80, the first rule is processed. The connection is allowed by the http_access rule because clientpc AND porthttp AND protocolhttp AND timeweb are TRUE. No other rules are processed.
It is Monday at 18:00. If a user at 10.0.81 tries to access an FTP server on port 21, the the first rule is processed and determined to be FALSE because the connection does not match any criteria except for clientpc. Subsequently, the second rule is processed, but it is determined that the connection does not match timeftp. The connection attempt is then rejected because it does not match both rules.
Access Control Settings
These sections provide more detailed descriptions of the settings that you configure for ACL entries and access control policies:
ACL Entries Settings
This table provides descriptions of the setting that you can configure for each ACL entry type:
| ACL Type | Description |
|---|---|
| Time Restrictions | Defines times and days. For this ACL entry type, you can configure the following settings:
If time restriction applies, the label of the button changes to Restricted!. |
| Source IP | Destination IP | Source IPv6 | Destination IPv6 | Defines the source or destination IP address of a connection. For these ACL entry types, you can configure the following settings:
|
Source Domain | | Defines client domains. Add the domains to the Domains table. Include a dot before the domain names. Example: .barracuda.com. Processing delays may be caused when using domain names. Squid needs to reverse DNS lookups (from client IP address to client domain name) before it can interpret the ACL. |
| User Authentication | Defines users who must authenticate themselves in an external authentication program. For this ACL entry type, you can configure the following settings:
|
| Groups | Defines groups. In case you want to access MSAD-groups with NTLM via MSCHAP, you must configure the MSAD authentication service to provide this information. For more information, see How to Configure MSAD Authentication. For this ACL entry type, you can configure the following settings:
|
| URL Path | Defines URL path regular expressions (urlpath_regex) that match the URL, but not the protocol or hostname. In the URL Path Extensions table, add regular expressions, words, or word patterns. All entries are treated as case-insensitive. The urlpath_regex looks for the specified value in the URL path following the hostname. For example, with http://www.exampledomain.com/example/domain/index.htm , the word "example" will only be looked for within the path "/example/domain/index.htm". |
| URL | Defines URL extensions (url_regex) considering protocol and hostname (ACL Type = urlextension). In the URL Path Extensions table, add regular expressions, words, or word patterns. All entries are treated as case-insensitive. The url_regex looks for the specified value in the URL path including the protocol and hostname. |
| Maximum Connections | Defines the maximum number of connections from a single client IP address. In the Define Maximum Connections field, enter this limit. The value of the ACL is TRUE if the limit is exceeded. |
| Protocol | Defines a list of protocols. In the Define Transfer Protocol table, add transfer protocols such as HTTP. |
| Requestmethod | Defines a list of request methods. In the Define Request Method table, add request methods such as GET, POST, or UPDATE. |
| TCP Port | Defines a destination's port address. In the Specify Destination Port Address field, enter the destination server’s port number. |
| Browser | Defines regular expression patterns or words, matching the user-agent header transmitted during the request. In the Define Browser Access table, add the regular expressions or words. For example, if you add Firefox, it will be searched for in the user-agent header of an incoming request. |
| Mime Types | Defines a list of MIME types. In the Mime Types table, add mime type expressions. For more information, see http://www.iana.org/assignments/media-types . |
| URL Filter Categories | Defines an ACL consisting of URL filter categories. For this ACL entry type, you can configure the following settings:
|
| External | Defines an ACL by using external helper programs. For this ACL entry type, you can configure the following settings:
|
Access Control Policies Settings
This table provides descriptions of the settings that you can configure for access control policies:
| Setting | Description |
|---|---|
| ACL Priority | Enter a number to specify the priority for this policy. To assign higher priority to a policy, enter a lower number. Access control policies with higher priority are processed first. |
| Action | Specifies how to handle the ACL entries that are added to this policy. You can select Allow, Deny or, Limit-Size. |
| ACL Entries for this Action | In this table, add the ACL entries to which the selected action will be applied. |
| Overall Maximum File Size | If the selected action for this policy is Limit-Size, enter the maximum size of files that can be downloaded. To disable this setting, enter 0. This setting may be configured more granularly as ACL. |
| ACL Policy Description | Brief description of the policy action and the ACL entries that it affects. |