

Administrative profiles define the authentication setup for admin users, and specify which ranges/clusters, services, and configuration areas that users can access on a Barracuda Firewall Control Center and its managed Barracuda CloudGen Firewall systems.
When creating an administrative profile, a user with an administrative role must be filed with the user's login information and the type of authentication. Next, all rights must be associated with a certain scope to that new administrator.
The corresponding configuration window marks mandatory input fields with an 'X' in a red bullet icon. The dialog window cannot be closed by clicking the OK button until these marked input fields in both tabs of the window are filled in with the required data. A green check mark indicates that the data is OK for either the corresponding category or for all input fields.
Step 1. Add a Control Center Administrator (for editing, see Step 1.a.)
- Click the ADMINS tab.
- Click +New Admin.
- The Create new CC Admin window is displayed.

Step 1.a. Edit an Existing Control Center Administrator's Profile
To edit the profile of a CC-admin, proceed as follows:
- Click the ADMINS tab.
- To edit the entry, you now have two options:
- Option #1:
- Right-click the entry of the CC-admin.
- Click Lock in the list.
- Double-click the entry of the CC-admin.
- The Edit Standard Admin window is displayed.
- Option #2:
- Double-click the entry of the CC-admin.
- The Edit Standard Admin window is displayed.
- Click Lock in the upper-right corner of the window.
- Option #1:
You can now continue with configuring the administrator's profile.
Step 2. Configure General Settings
- Disabled – Select the check box to disable the record for the admin.
- Login – Enter the login name for the administrator.
Full Name – Enter the full name for the administrator.
External Authentication – Select the check box to configure external authentication. In this case, continue with Step 2a.
For more information, see Authentication.
- Continue with Step 3.
Step 2a. Configure External Authentication Settings
For configuring external authentication, you have the following options:
- Authentication Scheme - Select the required authentication scheme from the list. The possible options are as follows:
- LDAP
- MS Active Directory
- MSNT
- CGF Local
- Radius
- Redirect Authentication
- RSA SecurID
- TacPlus
- No authentication (Template Admin)
- External Login – Enter the login name that an administrator can use for external authentication.
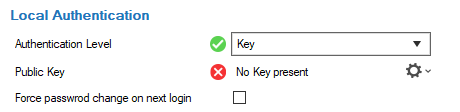
Step 3. Configure Local Authentication Settings
For an internal authentication, the following options are presented in different ways in the configuration window, depending on the selection for the authentication level.
Authentication Level
Input Field Password OR Key Password AND Key Password Key Password Y Y Y - Last Password
ChangeY Y Y - Public Key Y Y - Y Enforce password
strengthY Y Y - Force password
change on next
loginY Y Y Y Force regular
password changeY Y Y - Click image to
enlarge -->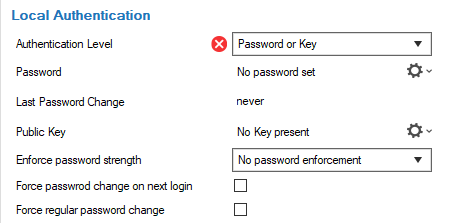
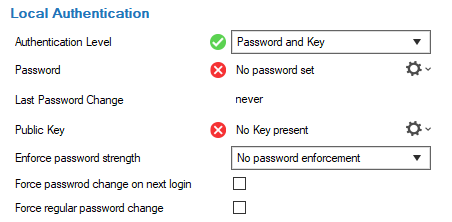
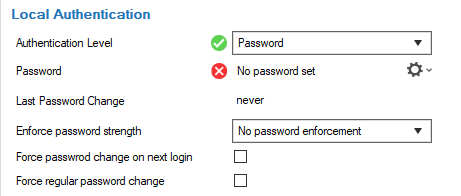
Password – Click the small cog wheel to enter a new password.
Last Password Change – Indicates the number of days since the last password change.
Public key – Click the small cog wheel to either import the public key or to create a new one.
Enforce password strength – Select the strength the password must conform to. The strength of the password is determined by the usage of different uppercase and lowercase letters, digits, special characters, and length. Passwords are rated best when characters of all types are used at least twice, and the length of the password is at least 16.
Chose the required password strength from the following options:- No password enforcement
- Weak
- Medium
- Strong
- Best
Force password on next login – Select the check box to force the user to enter a new password on the next login.
Force regular password change – Select the check box to force the user to re-enter a new password regularly. After selecting the check box, the following sub-options are available:
Force password change every – Enter the number of days or weeks after which the password must be renewed.
- Warning period before expiration – Enter the number of days the user is presented a warning before the current password expires.
Grace period after expiration – Enter the number of days the user has to enter a new password after the expiration period.
During the grace period, administrators can reset a password on their own.
After the grace period ends, administrators can no longer log in. Then, another administrator with higher configuration privileges must reset the password of the affected administrator.
Step 4. Configure Additional Settings
- Assigned Range – This option in combination with linked ranges controls which entries an administrator can see in CONFIGURATION > State Info > Sessions..., in the window Configuration Sessions.
- Login Event – Chose between the following options of possible associated events:
- Service default
- Silent
- Type 1
- Type 2
- Type 3
For more information on events, see Events.
- ACL – Click + to configure access restriction for the admin to certain IP addresses or networks.
Step 5. Add a New Instance to Configure the Administrative Scope and Rights
After creating the account, one or more specific scope(s) must be defined that will be associated with the new CC-administrator.
For more information on administrative roles, see How to Configure Administrative Roles.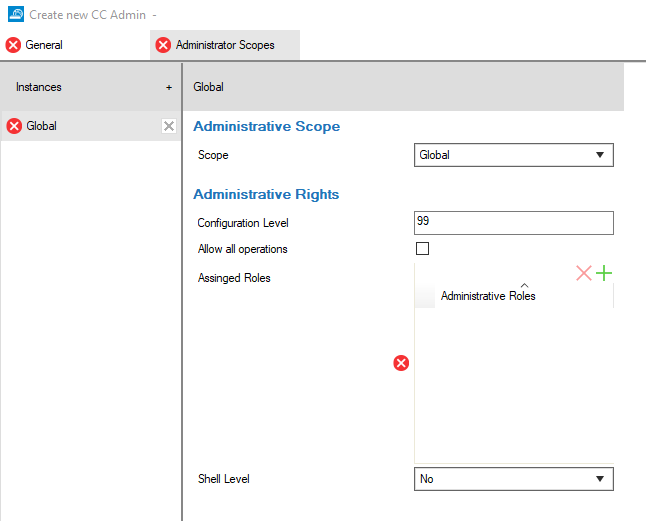
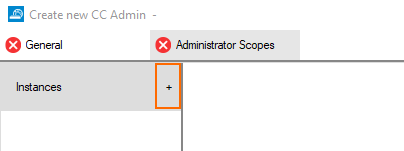
- In the window, click the Administrator Scopes tab.
- Click + next to Instances.
- A new instance of the category Global is displayed.
Step 5.1. Configure Administrative Scope
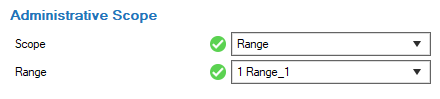
The administrative scope can be selected from the following options:
- Global
- Global linked
- Range
- Range linked
- Cluster
The options Global, Range, and Cluster signify that the configured administrative rights apply to every node in CONFIGURATION > Configuration Tree at or below the node Global, Range, or Cluster that must be selected at configuration.
The options Global linked and Range linked associate the configured administrative rights with any individually selected node (in the list Links) at or below a configured Global linked or Range linked node (in the list Range).
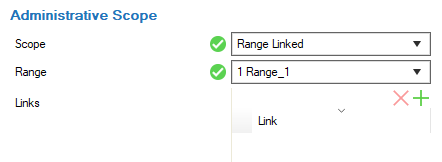
Click + to add selected nodes to the Links list.
Step 5.2. Configure Administrative Rights
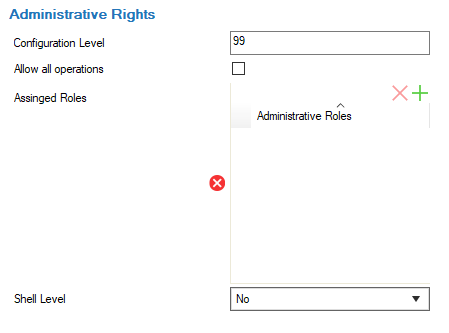
- Configuration Level – Administrative rights are filed individually on a per-administrator basis. When an administrator's configuration level is lower than or equal to the configured number, the administrator is granted access according to his or her filed administrative rights.
A configuration level of 2 or lower means write access, 99 or lower means read access. Usually, the write level is lower than the read level.
For more information on the configuration level, see Control Center Admins. - Allow all operations – Select the check box to allow all operations within the configured administrative scope. This overrides all administrative roles that have been assigned to the administrator.
- Assign Roles – Click + to add roles for the CC-administrator.
Administrative roles are configured in CONFIGURATION > Configuration Tree > Global Settings. - Shell Level – Select from the list what permissions are granted for shell level access.
- No login – Shell access is denied.
- Standard Login – Allows access on the OS layer via a default user account (home directory: user/phion/home/username).
- Restricted Login – Permits access via restricted shell (rbash) with limitations (e.g., specifying command containing slashes, changing directories by entering cd, ...). A restricted login confines any saving action to the user's home directory.
Step 6. Save the Administrator's Configuration
After entering all information into the mandatory input fields, continue with the following:
- Click OK to save the data.
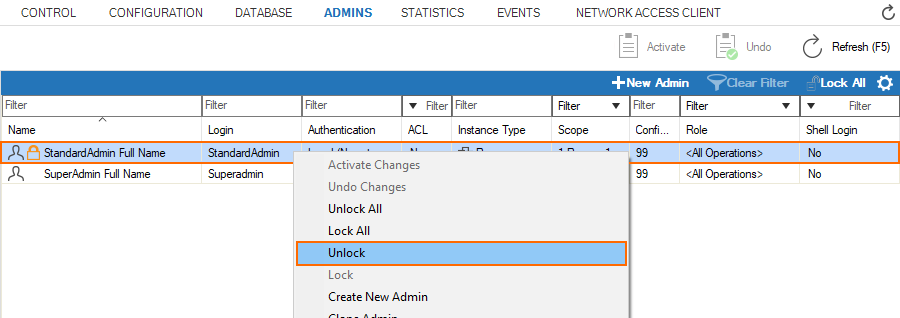
- Depending on the lock state of the created/edited entry/entries:
- If you have edited a single entry:
- Right-click the edited entry.
- Select Unlock from the list.
- If you have edited multiple entries:
- Select Unlock All.
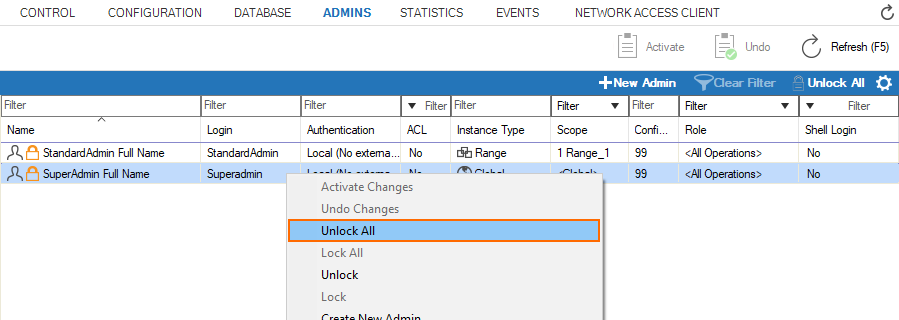
- Select Unlock All.
- If you have edited a single entry:
The following screenshot shows what an entry looks like in the list of the overview window.
