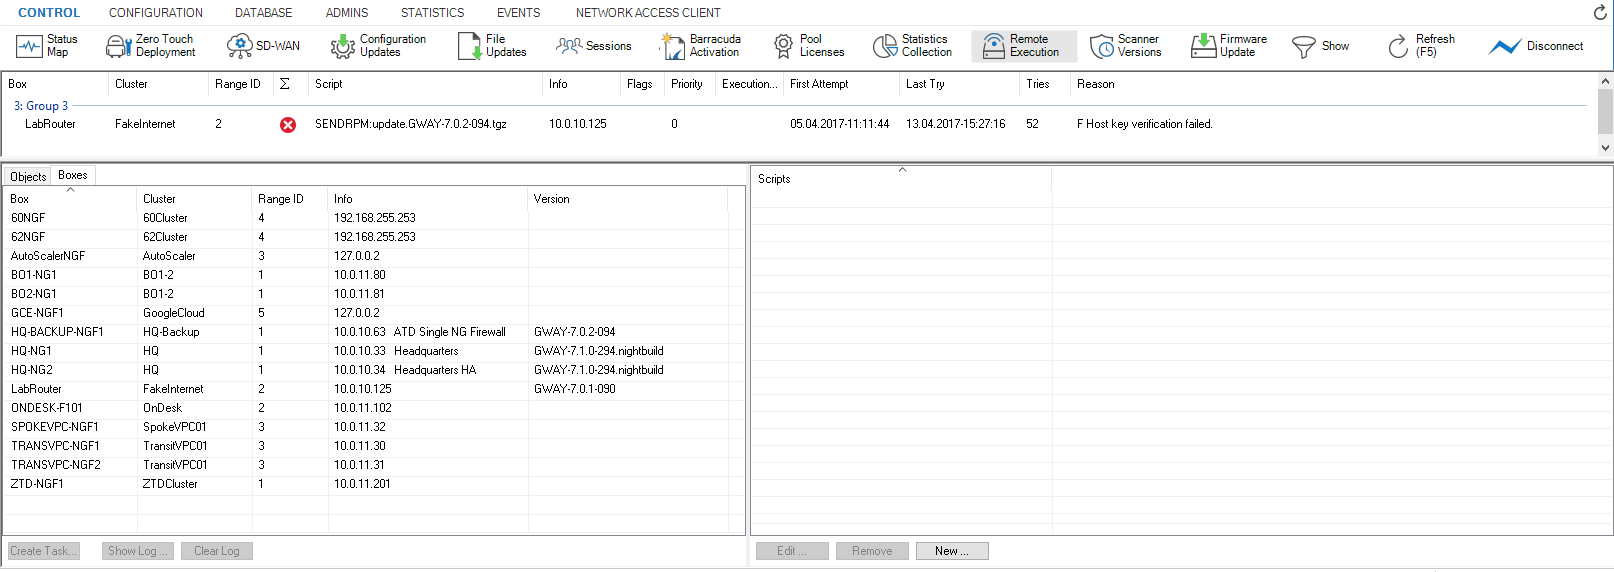
Remote execution can be used to execute nonrecurring tasks, such as removing unwanted files or terminating processes, on several CloudGen Firewall boxes simultaneously and in a single administrative step. For this purpose, a collection of scripts is maintained at the Control Center. These scripts can be edited, added, and removed by the administrator. To access the Remote Execution page on the Barracuda Firewall Control Center, click the CONTROL tab and select the Remote Execution icon.

In the Remote Execution window, information and configuration elements are divided into the following sections:
- Task List
- Objects Tab
- Boxes Tab
- Scripts List
- Action Bars
Task List
The task list in the upper section of the page shows all tasks that have been created for firewall boxes. The list is divided into the following columns:
- Box – The name of the firewall unit a task has been created for.
- Cluster – The name of the cluster the box resides in.
- Range ID – The name of the range the cluster and box belong to.
- Box Icon – Depicts the status of an executed task.
- Box State – Displays the status of the firewall unit.
- Script – The name of the script that is currently executed.
- Info – Lists additional information, such as IP address and short name.
- Flags – Flags depict the current task state. The following states are available:
- F – SSH failed (SSH-network connection or login failed)
- G – Script failed (Script returned a non-zero value)
- D – Deleted (Box was removed from the CC)
- U – Untrusted (Peer authentication check is disabled)
- Priority – This is the assigned task priority. The following priorities are available:
- 0 – High priority
- 1 – Normal priority
- 2 – Low priority
- Execution Time – The time the task is currently running.
- First Attempt – Provides information about date and time the first execution attempt was started (syntax used is yyyy mm dd hh:mm:ss).
- Last Try – Informs on the date and time when the last execution attempt was started (syntax used is yyyy mm dd hh:mm:ss).
- Tries – The number of execution tries.
- Reason – The failure reason in case the last execution attempt failed.
Scripts List
This section lists scripts and allows the creation of scripts to be executed on firewall boxes. In the Scripts section on the right, scripts provided for execution on boxes can be created, modified, and deleted. Use the buttons from the action menu on the bottom of the page to perform the following operations:
- Edit – Select a script and click this button to modify it.
- Remove – Discards a script stored on the Control Center.
- New – Click this button to create a new script. Choose a name for the script and enter a sequence of bash commands to be executed.
Objects Tab
The Objects tab allows you to create groups to simplify the remote execution process and displays the boxes that are arranged as grouped objects. In this section, you can select groups of boxes for task execution. Under the Objects tab, multiple boxes can be combined to form group objects for quick task creation. Control Center objects are saved to the Windows System Registry on the client PC. They can be exchanged between multiple clients by exporting and then importing them again.
To create a new object:
- Click New in the action menu of the Objects tab. This opens a new window that enables box selection.
- Enter a name for the new object in the Object Name field.
- Select all desired boxes by simultaneously pressing the shift/CTRL key and clicking a box.
- Click Save Object to save the object. When reopening the object after it has been saved, the configuration window displays only the selected boxes.
- Select the Show All Boxes check box to display a view that shows all available boxes. The boxes belonging to a saved object are highlighted.
The following buttons in the Edit Object window allow further actions:
- Show Log – Displays a view of the box log file containing entries about the last executed task. Box log files are stored on the Control Center. You can also view them by double-clicking a box entry in the list.
- Clear Log – Clears a box log file’s contents. This should be done before executing a new task.
- Remove Box – Removes the box from the saved object.
- Reload Object – Refreshes the view to display boxes saved in the object only.
- Create Copy – Creates a copy of an object already saved.
Boxes Tab
The Boxes tab lists all firewalls managed by the Control Center. From here, you can select your units for the remote execution process. When a box is selected, it is highlighted. Multiple boxes can be selected by simultaneously pressing of the shift/CTRL key and clicking a box. The following detailed information is provided in the box list:
- Box / Cluster / Range ID columns – These data sets describe the membership of the CloudGen Firewall, that is, its name and the names of cluster and range it belongs to.
- Info – Displays additional box information (IP address and short name).
- Version – Displays the installed version number of the firewall.
Action Bars
Depending on the selected tab, the action bars provide a selection of options that might be required when creating a task. On the bottom of the page, the following action menu applies for both tabs in the box list:
Create Task – This button becomes active when a Box/Object/Script combination is chosen from the Scripts and Box lists. Task creation opens the Schedule Task window, and allows you to specify when and how the task should be executed. The following values can be specified within the Schedule Task configuration window:
- Box Authentication – The following two modes can be selected:
- Trusted (Validate Key)
- Untrusted (Ignore Key) – The untrusted mode enables boxes to be updated that are not known to the Control Center. Untrusted updates can also be used on boxes in case problems with authentication keys arise. Otherwise, trusted mode should always be used.
- Scheduling Mode – By default, tasks are scheduled for Immediate Execution. The option Delayed Execution activates the parameter Scheduled Time, where task execution time can be configured in detail.
- Scheduled Time – These two fields require a scheduling time for task execution.
- Priority – When multiple tasks are configured for execution, this setting defines the execution priority. You can select Low, Normal, or High.
The following action menu applies only to the Boxes tab:
- Show Log – Displays a view of the box log file containing entries about the last executed task. Box log files are stored on the Control Center. You can view them by double-clicking a box entry in the list.
- Clear Log – Clears the log files of all selected boxes. This should be done before executing a new task.
The following action menu applies only to the Objects tab:
- Edit – Clicking this button allows you to edit a selected object.
- New – Creates a new object.
- Remove – Removes the selected object.
- Import – Imports an object into the Microsoft Windows System registry.
Export – Exports an object from the Microsoft Windows System registry. Box group objects are saved to Control Center Object (*.mco) files.
Perform a Remote Execution Task
Execution of the script can be triggered by selecting a particular script and a firewall unit. During execution, all output of the script is directed to a box log file that is held at the Control Center and can be reviewed by the administrator after execution. Consult these files for verbose output or error logging of the script. The following section describes the process of a remote execution task that cleans up the /tmp directory on selected firewalls.
Step 1. Create a Script
- Click New in the Script list window.
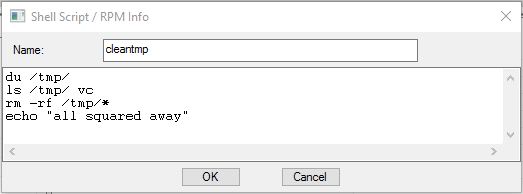
- Enter
cleantmpas script name and insert the command sequence as shown here:

Step 2. Create the Tasks
- Select all boxes on the Boxes tab in the Box list window and the cleantmp script in the Script list window simultaneously.
- Click Create Task.
- Schedule the tasks for Immediate Execution in the Schedule Task window.

The newly created tasks appear as entries with a green indicator and disappear as soon as the task is finished.

If a task fails, the corresponding entry remains in the task list and is shown with a red indicator. See the Reason column for an explanation of the failure.
Step 4. Review the Log Files
Double-click the firewalls to view the log files and verify that the desired actions have been taken.
Step 5. Reschedule or Delete Failed Tasks
To reschedule or delete a task, right-click it and select Reschedule or Delete Task from the context menu.
Popular Scripts
| Name | Content | Function |
|---|---|---|
| wipeevent |
| Simultaneously clears all events from the selected firewall unit(s). |
| relcheck |
| Performs a release check on newly installed firewall unit(s). |
| redbutton |
| Initiates an emergency stop on the selected firewall unit(s). |
