

The Revision Control System (RCS) provides information on all configuration changes to your system and is available to be operated both on the box and CC levels. On a Control Center, it is possible to configure and run the RCS separately both on the box and/or the CC level for the configuration of the managed appliances.
Once activated, the RCS puts a copy of every configuration set into its own storage. Because the number of created copies increases with each configuration change, the RCS provides the option to restore an earlier version of already stored configurations on request. The RCS can also generate reports to help monitor configuration changes.
Functioning and Limitations of the RCS System
The RCS system is disabled by default. If you want to use the RCS system, you first must enable and configure it to match your requirements. After disconnecting and reconnecting to your appliance via Firewall Admin, you can then create RCS reports selectively for any configuration node. When activated, RCS logs all configuration changes on a configuration tree node or service with the exception of:
- DNS Service
- VPN > VPN Settings
- VPN > Client-to-site VPN
- VPN > Site-to-Site VPN
How to Configure and Use the Revision Control System
The Revision Control System provides the following options:
- Activating and configuring the RCS.
- Viewing RCS content versions.
- How to create a report based on the changes.
- Reverting a configuration to a specific version.
1. Activating and Configuring the RCS
- Log into your firewall / Control Center.
- (On the box level): Go to CONFIGURATION > Box > Administrative Settings.
- (On the CC level): Go to CONFIGURATION > Configuration Tree > Multi-Range > Global Settings > CC Parameters.
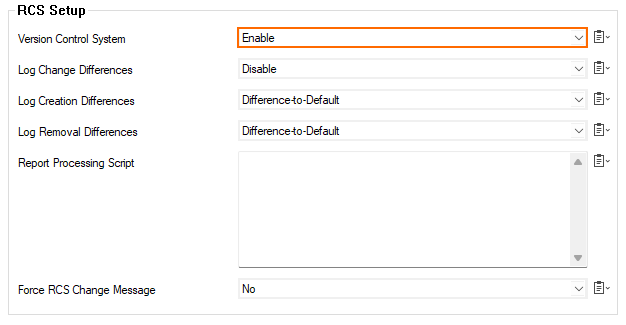
- In the left menu, select RCS Setup.
- Click Lock.
From the Version Control System list, select Enable.
- Define the following RCS settings:
- Log Change Differences – Enables or disables the RCS log (file name: servicename_changes) of all configuration changes.
- Log Creation Differences – Specifies how configuration changes are logged. You can select one of the following settings:
- Disable – Log change differences will be ignored.
- Difference-to-Default – Only differences to the default settings are listed.
- Full-Info – Every configuration option is listed.
- None – Only changes are listed.
- Log Removal Differences – Specifies how to log file removals. You can select one of the following settings:
- Difference-to-Default – Only differences to the default settings are listed.
- Full-Info – Every action is listed.
- None – The removal of files is not listed.
- Report Processing Script – You can enter a script to automate the transmission of change reports to other destinations. The shell script can invoke Secure Copy (
scp) or email delivery. See the table in the following paragraph for some scripting examples. - Force RCS Change Message – To enter a comment for every RCS check-in, select yes.
- Log Change Differences – Enables or disables the RCS log (file name: servicename_changes) of all configuration changes.
- Click Send Changes and Activate.
Report Processing Script Examples
The following table displays examples of scripts that you can enter in the Report Processing Script table for transmitting your change reports via scp or mailclt. In your script, use the $REPORT variable. The name of the report file is stored in $REPORT.
| Method | Example Script |
|---|---|
scp | scp "$REPORT" root@recipient.com |
|
|
Activate the RCS by disconnecting and then reconnecting to the Barracuda CloudGen Firewall. Click Disconnect and then click Connect. After configuring and activating RCS, you can view change reports for each configuration tree node.
2. Viewing RCS Content Versions
After a change has been made to a certain node, the new configuration set will replace its preceding version. You can inspect all revisions that the RCS has stored.
This example assumes that you have made changes to the Network node.
- Log into your firewall if not already done.
- (On the box level): Go to CONFIGURATION > Configuration Tree > Box > Network.
- (On the CC level): Go to CONFIGURATION > Configuration Tree > Multi-Range > your range > your cluster > Boxes > your box > Network.
- Right-click the Network node.
- A popup menu list is displayed that shows all valid options associated with the node.
- Click Show RCS Versions... in the list.
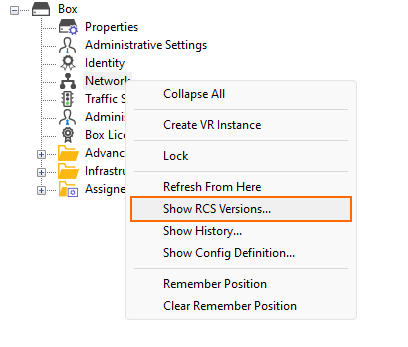
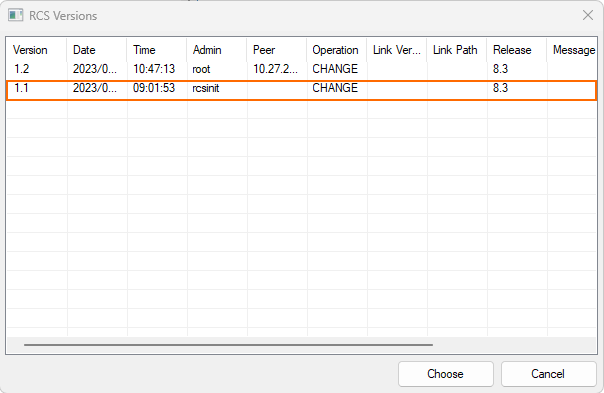
The RCS Versions window is displayed.
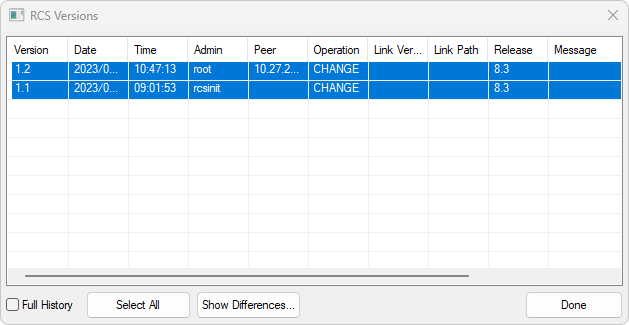
The RCS Versions window displays a list of all versions of a configuration page. It displays the following information:
- If you want to close the window, click Done.
- Alternatively, if you want to create a report, perform the steps following next.
3. How to Create a Report Based on the Changes
In the RCS Versions window, you can generate an RCS report to compare and view information for specific configuration versions. For configuration objects that contain at least one sub-node, you can also filter RCS reports for specific time periods and administrator IP addresses.
- Open the RCS versions page.
- Select the versions that you want to include in the report. To select a range of versions, click the first version and last version in the range of interest. Then select the Full History check box. To select all versions, click Select All.
- Click the button Show Differences... .
The RCS Report window is displayed.
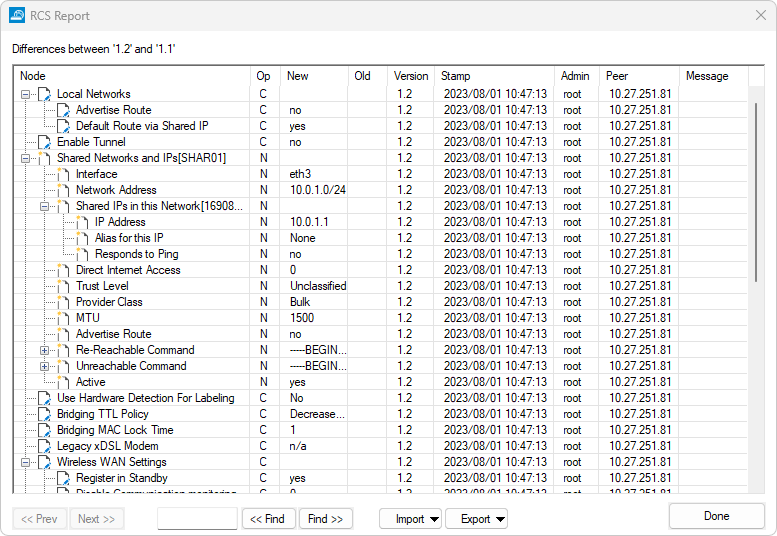
The RCS Report window displays the following information:
Querying Details from the Report
- At this point, you have the option to get more detailed information from the report:
You can right-click the RCS Report columns and select any of the following options to modify the column view or print the report:
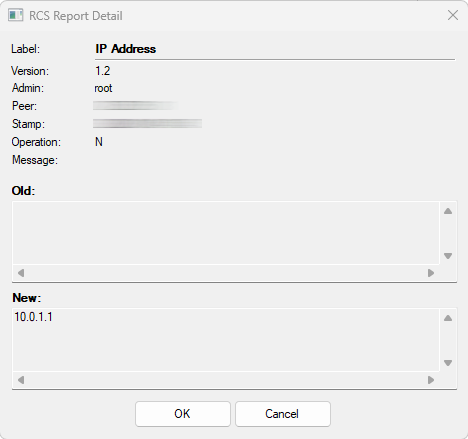
- Details – Opens the RCS Report Detail window, which displays the column information in a more readable format (recommended for multi-line entries).
- Expand and Expand All – Expands a selected node or all nodes.
- Collapse and Collapse (All) – Collapses a selected node or all nodes.
- Print (Visible Only, Landscape/Portrait) – Prints the display as it is displayed. You can print the report in landscape or portrait orientation. The landscape orientation is recommended.
- Print (All, Landscape/Portrait) – Prints all the information in the report. You can print the report in landscape or portrait orientation. The landscape orientation is recommended.
The toolbar at the bottom of the RCS Report window offers the following functionalities:
- Details – Opens the RCS Report Detail window, which displays the column information in a more readable format (recommended for multi-line entries).
- Search String – In this empty field, you can enter the string you want to search for. Wildcards are not supported.
- << Find / Find >> – Navigate up and down the report to find the specified search string.
- Import … / Export … – Export the report into a
*.prpfile for archiving purposes or import an archivedprpfile. - << Prev / Next >> – Navigate between the selected configuration versions.
- If you want to export the list of changes, click Export.
- Enter a filename in the file creation window and click Save.
- If you want to close the window, click Done.
4. Reverting a Configuration to a Specific Version
With the exception of the nodes and services mentioned at the beginning of this article, you can revert any specific configuration to an earlier stored configuration.
This example assumes that you want to revert the Network node.
- Go to CONFIGURATION > Configuration Tree > Box > Network.
- Click Lock.
- Click RCS in the blue ribbon bar.
- A drop-down menu list is displayed.
- In the list, click Retrieve versions... .
- The RCS Versions window is displayed.
- Select the required line of the version for which you want to restore the configuration.
- Click Choose.
- The configuration page now displays all values that were stored under the selected version.
- Click RCS.
- The drop-down menu is displayed and now shows the entry Accept Version.

- Select Accept Version.
- A dialog window opens and asks if you want to accept using an old version of the configuration.
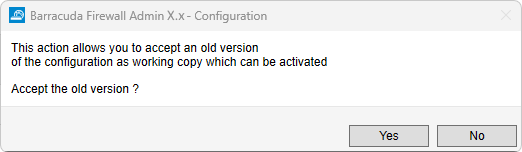
- Click the Yes button to accept your selected old version.
- Click Send Changes.
- Click Activate.