

An IPFIX template is a collection of information elements. In Barracuda Firewall Admin, you can configure such templates for your individual requirements. This is recommended only if none of the predefined templates are compatible with your collector.
When you open the corresponding configuration window, a preconfigured set of information elements is displayed. The original set of selectable information elements can be accessed by clicking the green + in the upper-right corner, which opens a menu list. This list also contains several Barracuda-specific information elements, e.g., barracudaFirewallRule, barracudaTrafficType, etc.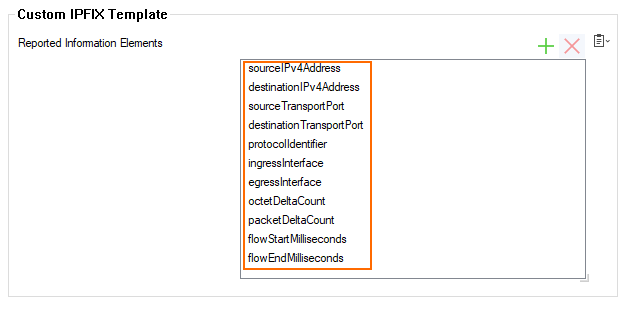
In this window, you can add or remove elements to configure your individual template. To do so, complete the following steps:
- Go to CONFIGURATION > Configuration Tree > Box > Infrastructure Services > General Firewall Configuration.
- In the left menu, select Audit and Reporting.
- In the left menu, expand Configuration Mode and click Switch to Advanced View.
- Click Lock.
- In the section IPFIX Export, click the menu field for Template.
- From the menu list, select Custom.
- The Edit... button for Custom Template is displayed as activated.
- Click the Edit... button.
- The window Custom Template is displayed.
- The list for Reported Information Elements contains a collection of predefined information elements.
- You now have two options:
- To add a new element, click the green + to add a new element to the list.
- A menu list is displayed.
- Select the required information field from the list.
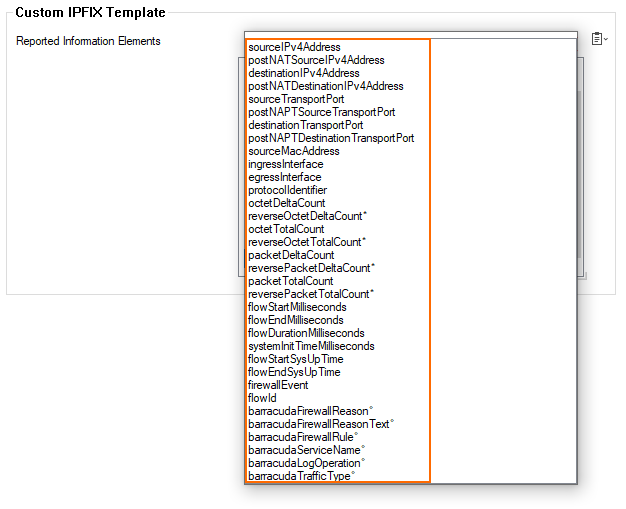
- The selected information field is appended to the list of Reported Information Elements.
- To delete an element, click the red X to remove the element from the list.
- (optional) Continue building your custom template with Step 11.
- To add a new element, click the green + to add a new element to the list.
- Click OK to finish your template configuration.
- Click Send Changes / Activate.