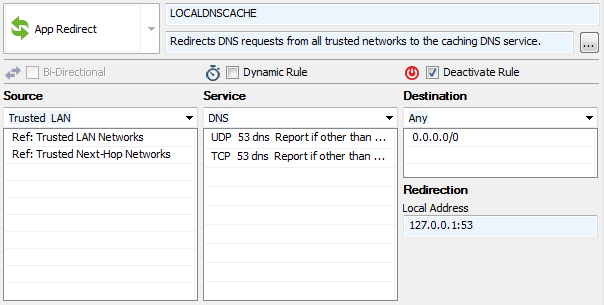
The caching DNS service is a box-level service that acts as a DNS proxy to speed up DNS queries. Do not run both the forwarding/caching DNS (bdns) service and a DNS service. The forwarding/caching DNS (bdns) configuration will collide with the DNS service. The caching DNS service listens on 127.0.0.1 and is accessed by the clients via an app redirect access rule in the forwarding ruleset. Depending on the rule, all DNS traffic can be routed over the DNS proxy, securing against misconfigured clients and servers attempting to use non-authorized external DNS servers.
In the DNS Query ACL table, add the IP range for the networks allowed to access the caching DNS server. Add 0.0.0.0/0 to allow everyone. Since the firewall services also use IP to communicate with the caching DNS service, these IP addresses must be added to the ACL to allow them to connect.

The speed of DNS caching can also be increased by forwarding queries to specific DNS servers. To do so, you must switch to Advanced Mode in Barracuda Firewall Admin. Then, the required DNS servers must be registered by their IP address in a list. Depending on the selected option for the parameter Forwarder Selection, an incoming DNS request is forwarded to one or more servers in that list in different ways:
Only – With this option, no further DNS servers are probed in case of a failure. This option requires reliable and fast DNS forwarders.
First – This is the default value for the 8.3.x firmware. If neither of the forwarders responds successfully in time, another query is sent to a downstream DNS server as a fallback. This option can have security and operative implications since internal domain names might show up in request to public DNS servers if the forwarders for internal domains do not respond in time.
Step 1. Configure Caching DNS Settings
Go to CONFIGURATION > Configuration Tree > Box > Administrative Settings .
From the Configuration Mode menu, select Switch to Advanced View.
In the left menu, click Caching DNS Service.
Click Lock.
From the Run Forwarding/Caching DNS list, activate the local caching/forwarding DNS service.
From the Run Secondary DNS list, activate a local secondary DNS service if applicable. Configure the settings as described in How to Configure DNS Settings.
From the Query Source Address list, select which IP address to use as source address when querying the DNS or Primary DNS servers. You can select one of the following options:
Wildcard (default) – IP selection is accounted for dynamically according to definitions in the routing table.
VIP (managed firewalls only) – Uses the firewall's VIP IP address.
MIP – Uses the system’s management IP address, which is the Main Box IP.
Other – Select this check box to explicitly specify an IPv4 or IPv6 address.
In the DNS Query ACL table, add the single IPv4 / IPv6 addresses or netmasks that can access the DNS service via an App Redirect access rule.
Forwarders Selection – Select one of the following options:
First – The value First is the default for the 8.3.x firmware. If neither of the forwarders responds successfully in time, another query is sent to a downstream DNS server as a fallback.
Only – If you prefer that no further DNS servers are probed in case of a failure, select this option. However, be aware that this option can have security and operative implications since internal domain names might show up in request to public DNS servers if the forwarders for internal domains do not respond in time.
Enable Log DNS Queries to log every DNS query.
Click Send Changes and Activate.
Step 2. Create an App Redirect Access Rule
Per default, access to the caching DNS service is handled by the LOCALDNSCACHE access rule. If this rule is not present on your firewall, add an App Redirect access rule to redirect DNS requests from the clients to the caching DNS service.
Action – Select App Redirect.
Source – Select the client network.
Service – Select DNS.
Destination – Select Any.
Redirection – Enter the IP address and port the caching DNS service listens on.

