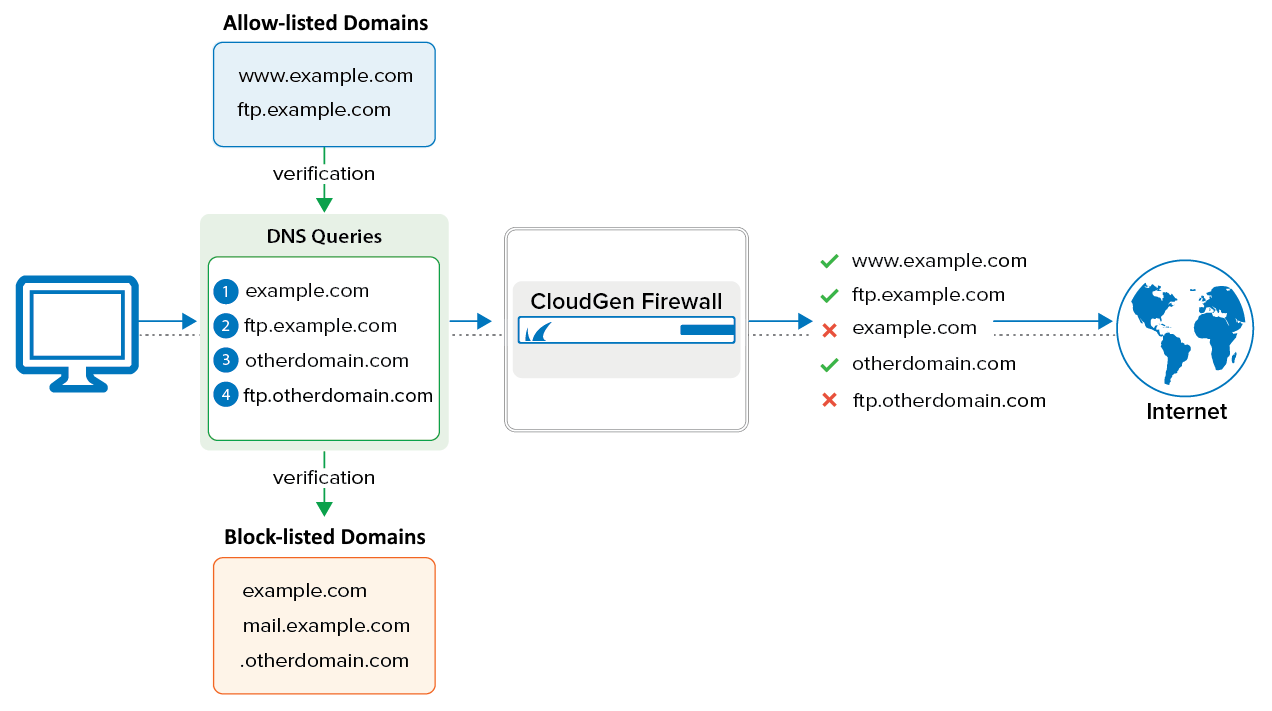
The DNS Interception feature intercepts and replaces DNS queries matching the configured patterns. You can also allow-list domains. Allow-listed domains always take precedence over the DNS Interception policies. Subdomains of intercepted domains must be explicitly added. They are not intercepted automatically. You must run a caching DNS server to use DNS interception.
Matching of Domains
Matching of domains can be done either to allow or to intercept DNS queries (allow-listing vs. block-listing). If neither allow-listed nor block-listed entries are configured, all queries are resolved. Because allow-listing entries are checked prior to block-listing entries, queries that match allow-lists are passed even in case a contradictory entry can be found in the block list.
In order to intercept access to domains, two types of domain entries can be matched:
- Single domain: Enter a domain name without any preceding characters, e.g.,
example.com
Only the domainexample.comwill be verified for matching. - Multiple subdomains: Enter a domain with a leading period as a prefix for the domain, e.g.,
.example.com
All subdomains ofexample.comwill be verified for matching, e.g.,mail.example.com, www.example.com, ftp.example.com
The domainexample.comwill not be verified.
DNS Interception Process
The DNS Interception feature handles DNS requests as follows:
- A host behind the firewall sends a DNS query to the DNS server.
- If the DNS request is for a domain that is allow-listed, the request is forwarded.
If the DNS request is for a domain that is listed in the DNS Interception policy (blocklist), the firewall sends one of the following replies depending on the configured policy:
Blackhole (NXDOMAIN reply) – Returns a non-existent domain message (NXDOMAIN) to the client indicating that the requested hostname does not exist.
No Data – Returns the information that, although the domain exists, there is no IP (no data) assigned to it.
Return Other Domain (CNAME) – Returns the hostname that is specified in the policy settings.
Return IP Address – Returns the IP address that is specified in the policy settings.
Examples
In the following example, several (sub-)domains are configured in the allow list and block list. The image illustrates which DNS queries from a client will be answered with valid IP addresses in order to connect to the appropriate site.

| Action | DNS Resolving Request | Note |
|---|---|---|
| OK | www.example.com | Will be forwarded because the subdomain is allow-listed. |
| OK | ftp.example.com | Will be forwarded because the subdomain is allow-listed. |
| X | example.com | Will be blocked because the domain is block-listed. |
| OK | otherdomain.com | Will be forwarded because the domain is not listed anywhere. |
| X | ftp.otherdomain.com | Will be blocked because it is block-listed as part of the entry.otherdomain.com (leading colon). |
Before You Begin
Enable and configure DNS Caching.
Add Domains to the Allow List
To add a domain to the DNS Interception allow list:
- Go to CONFIGURATION > Configuration Tree > Box > Administrative Settings .
- From the left menu, select DNS Interception.
- Click Lock.
- In the DNS Interception Exceptions section, click the plus sign (+).
- In the Allowed Domains window, enter the Matched Domain to be allowed.
- Click OK.
- Click Send Changes and Activate.
Add Domains to the DNS Interception Policy
To add a domain to the DNS Interception policy:
- Go to CONFIGURATION > Configuration Tree > Box > Administrative Settings .
- From the left menu, select DNS Interception.
- Click Lock.
- In the DNS Interception Policy section, click the plus sign (+).
- In the Intercepted Domains window, specify the following settings:
- Matched Domain – Enter the domain to be intercepted. E.g.,
example.com
Wildcards or special characters are not allowed. - Action – Select how the intercepted queries are answered. Depending on which action you select, you might also have to specify these settings:
- Returned IP – If you select the Return IP Address action, enter the IP address that is returned to the user.
- Returned Domain – If you select the Return Other Domain (CNAME) action, enter the domain that the queries are redirected to.
- Matched Domain – Enter the domain to be intercepted. E.g.,
- Click OK.
- Click Send Changes and Activate.
