The Barracuda CloudGen Firewall F-Series can parse authentication information contained in the syslog stream of supported wireless access points. Wi-Fi access points typically use authentication services such as RADIUS servers to authenticate users before allowing them to connect. The Barracuda CloudGen Firewall F-Series monitors the syslog files sent by the Wi-Fi access points for the username and the associated IP address of logged-in users. Depending on the access point, the Barracuda CloudGen Firewall F-Series receives login and/or logout information.
Supported Wi-Fi access points
Aerohive (login only)
Ruckus (login and logout)
Aruba (login only)
Aruba Instant (login only)
Video
Watch the following video to see the Barracuda CloudGen Firewall F-Series receive user information via Wi-Fi Access Point authentication from an Aerohive Access Point:


Videolink:
https://campus.barracuda.com/Before you Begin
Configure the Wi-Fi access point to stream the syslog to the Barracuda CloudGen Firewall F-Series. For more information, see:
Step 1. Configure a Box Level IP Address
Add an IP address to the box level that can be reached by the wireless access point.
Go to CONFIGURATION > Configuration Tree > Box > Network.
Click Lock.
Click + to add an Additional Local IP.
Enter a Name.
Select the interface from the Interface Name drop-down list.
Enter the IP Address and Associated Netmask.
Click OK.
Click Send Changes and Activate.
Step 2. Configure Wi-Fi AP Authentication
If the Wi-Fi access point is using an SSL-encrypted connection, the certificate can be imported from a PEM or PKCS12 file. For non-standard Wi-Fi Access Point syslog streaming ports, change the port in Advanced View and edit the port in the BOX-AUTH-WIFI-SYNC rule accordingly.
Go to CONFIGURATION > Configuration Tree > Box > Infrastructure Services > Authentication.
Click Lock.
In the left menu, click Wi-Fi AP Authentication.
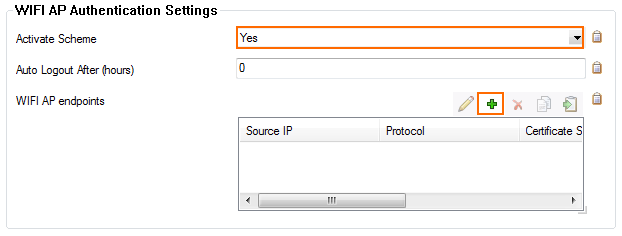
Set Activate Scheme to yes.
Click + to add a Wi-Fi AP Endpoint. The Wi-Fi AP Endpoints window opens.

Enter the Source IP. This is the IP address of your Wi-Fi access point.
Select the Protocol used by the Wi-Fi access point to send the syslog.
UDP
TCP
SSL
(SSL only) Enter the Certificate Subject Alternative Name for the SSL certificate.
(SSL only) Click Ex/Import and import the Certificate File.
Select the manufacturer of your Wi-Fi access point from the Wi-Fi AP Model drop-down list.

Click OK.
Click Send Changes and Activate.
You can now use the authentication information from your Wi-Fi access point. Go to Firewall > Users. All users with Wi-Fi-AP in the Origin column are authenticated via the Wi-Fi access point.
