To integrate Secure Connectors into your network, you must configure the Secure Access Controller and the Firewall Control Center to manage and route traffic from and to the Secure Connector VIP networks. The Control Center can manage multiple Secure Access Controllers. There must be at least one management network per Access Controller, configured in the global settings. The size of the network is read only. If more IP addresses are needed, additional networks can be added to the Access Controller. The data networks must be configured on cluster level, preferably in the cluster where the Access Controller is configured. To deploy Secure Connector devices, you must have the license tokens for the Secure Access Controller and a Secure Connector Energize Updates pool license.
Deploy and Configure a Secure Access Controller (AC)
Before You Begin
- Deploy a Firewall Control Center (CC). For more information, see Getting Started - Control Center.
- Define a public IP address as Point of Entry for the Secure Access Controller. The Secure Connectors will connect to this public IP address.
- Define the networks used for the Secure Connectors. Depending on your setup, create a global/range or cluster network object for them.
- Create a service object for the following Secure Connector services:
- NGS-MGMT – TCP/UDP 888 and TCP/UDP 889
- NGS-VPN – TCP/UDP 692. If a custom port is used, replace the port with the custom port.
- Create network objects for the Secure Connector networks. For more information, see Network Objects.
Step 1. Deploy a CloudGen Firewall Image to Be Used as the Access Controller
Deploy a virtual or public cloud CloudGen Firewall. Verify that the number of CPU cores, storage, and RAM are sized according to your Access Controller model. For more information, see Virtual Systems (Vx) or Microsoft Azure Deployment.
If you are deploying in the public cloud, see Secure Access Controller in the Public Cloud for more information on Access Controller cloud deployment options.
The following Virtual Access Controller Cloud (VACC) models are available:
| VF / ACC Model | Number of Licensed Cores | Minimum Storage [GB] | Minimum Memory [GB] |
|---|---|---|---|
| VACC400 | 2 | 80 | 2 |
| VACC610 | 4 | 80 | 2 |
| VACC820 | 8 | 80 | 2 |
Step 2. Import the Secure Access Controller into the Control Center
The Access Controller must be managed by the same Control Center that is managing the Secure Connectors.
For more information, see How to Import an Existing CloudGen Firewall into a Control Center.
Step 3. License the Secure Access Controller
License and activate the Access Controller. For more information, see Access Controller Licensing.
Step 4. Configure the Access Controller VPN Service
Create the Access Controller VPN Service
- Go to your cluster > Assigned Services.
- Right-click Assigned Services and select Create Service.
- Enter a Service Name. The name must be unique and no longer than six characters. The service name cannot be changed later.
- From the Software Module list, select Access Controller VPN Service.

- (optional) Change the Service IPs. For more information, see How to Assign Services.
- Click Finish.
- Click Activate.
Configure the Access Controller VPN Service
Create the Access Controller VPN key used to authenticate the Secure Connectors, and enter the IP address and port the Secure Connectors will use to connect to this Access Controller.
- Go to your cluster > your Access Controller > Assigned Services > VPNAC > VPN Settings.
- Click Lock.
- In the left menu, click Secure Access Controller.
- Click New Key to create a Server Key.
- Click Send Changes and Activate.
Step 5. Add Access Rules for the Secure Connector VIP Network
Create access rules to allow Secure Connector traffic to the Control Center and to the border firewall. TCP/UDP 888 - 889 is used for communication between the Control Center and the Secure Connectors.
- Go to your cluster > your Access Controller > Assigned Services > Firewall > Forwarding Rules.
- Click Lock.
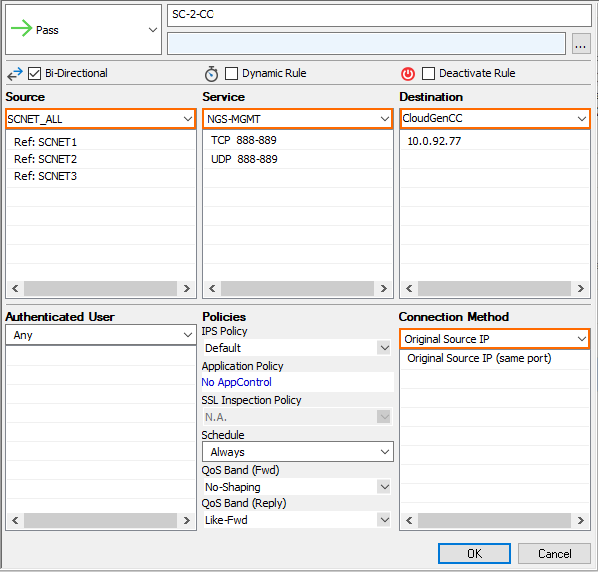
- Create a PASS access rule to allow management traffic from the Secure Connector VIP network to the Control Center:
- Action – Select PASS.
- Bi-Directional – Select the check box to apply the rule in both directions.
- Source – Select the Secure Connector VIP network(s) associated with this Access Controller.
- Service – Select the NGS-MGMT service object for Secure Connector management traffic: TCP/UDP 888 and TCP/UDP 889.
- Destination – Select the network object for the Control Center IP address.
- Connection – Select Original Source IP.

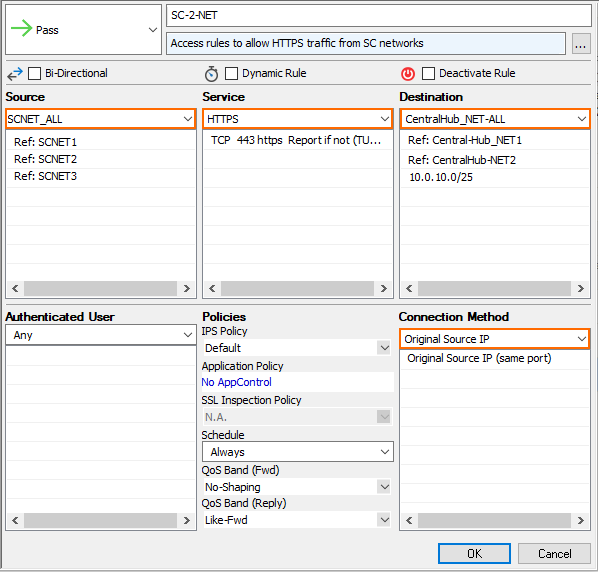
- Create a PASS access rule to allow all other traffic from the Secure Connector VIP network(s):
- Action – Select PASS.
- Source – Select the Secure Connector VIP network(s) associated with this Access Controller.
- Service – Select the service you want to allow.
- Destination – Select the destination network
- Connection – Select Original Source IP.

(optional) Create a PASS access rule to allow Internet access from the Secure Connector VIP network(s):
Configure the Firewall Control Center (CC)
The Control Center manages the configuration for all Secure Connector devices and the associated Access Controller. The Control Center communicates with the Secure Connectors on TCP 889.
Step 1. Enable CC Database Support
Enable CC database support on the box level of the Firewall Control Center.
- Log into the box layer of your Firewall Control Center.
- Go to CONFIGURATION > Configuration Tree > Box > Infrastructure Services > CC Database.
- Click Lock.
- Set Use CC Database to yes.

- Click Send Changes and Activate.
Step 2. Add a Gateway Route if Access Controller and Control Center are in the Same Subnet
If the Control Center and the Access Controller are in the same subnet, add a gateway route to direct all Secure Connector traffic to the Access Controller. If the Access Controller is reachable via the default gateway of the Firewall Control Center, skip this step.
- Go to CONFIGURATION > Configuration Tree > Box > Network.
- Click Lock.
- Add a gateway route for every Secure Connector management network:
- Target Network Address – Enter the Secure Connector VIP network.
- Route Type – Select gateway.
- Gateway – Enter the gateway IP address of the Access Controller.

- Click Send Changes and Activate.
- Activate the network configuration. For more information, see How to Activate Network Changes.
You can now reach the gateway IP address of every Access Controller from the Control Center.
Step 3. Add Secure Connector VIP Networks
The individual Secure Connectors automatically receive a subnet from the Secure Connector VIP network defined on the Control Center. Choose a VIP network large enough to support the number of Secure Connector appliances you are deploying. Secure Connector networks cannot be resized later.
- Log into the Control Center.
- Go to Multi-Range > Global Settings > Secure Connector Management Networks.
- Click Lock.
- Click Add Net.

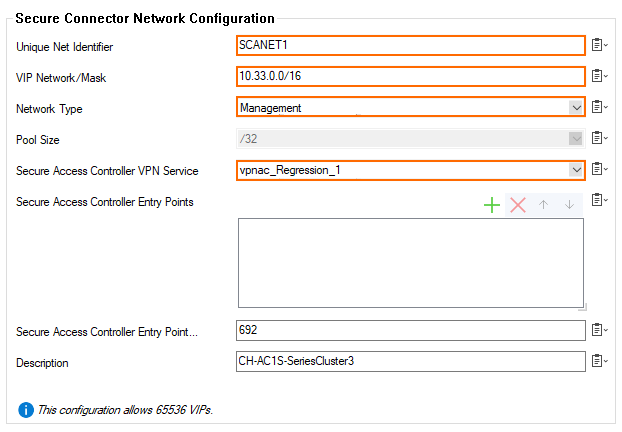
The Create Net windows opens. - Enter the Unique Net Identifier.
- Enter the VIP Network/Mask.
- Select Management as the Network Type.
- Select the Secure Access Controller VPN Service this Secure Connector VIP network will be assigned to.

- Click OK.
- (optional) Create additional Secure Connector VIP networks.
- Click Send Changes and Activate.
Step 4. Enable Secure Connector Support for the Cluster
- Go to your cluster > Cluster Properties.
- Click Lock.
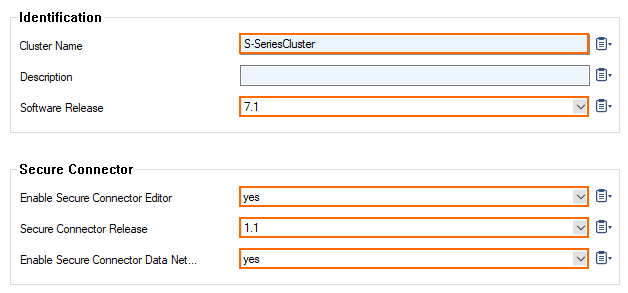
- From the Secure Connector Release drop-down list, select the Secure Connector firmware version. E.g.: 1.1 for SC1.
- Set Enable Secure Connector Data Networks to yes.

- Click Send Changes and Activate.
