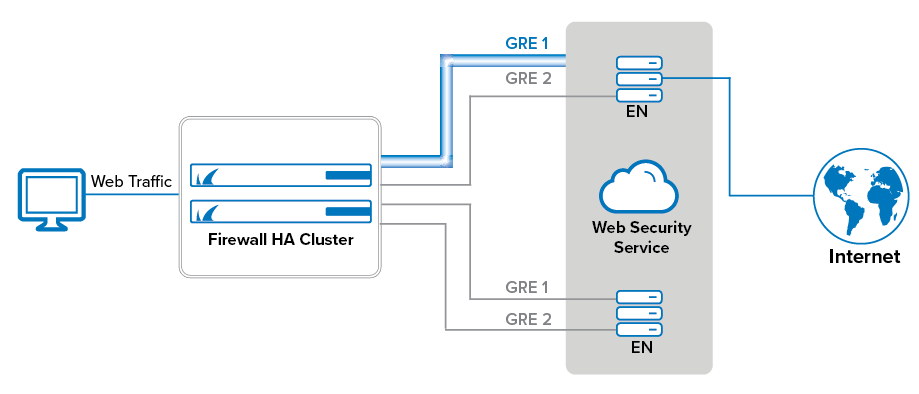
Barracuda Web Security Service offers a cloud-based web security solution. To forward web traffic from your internal networks to the Web Security Cloud Enforcement Nodes (EN), all traffic must be sent through two redundant GRE tunnels connecting the CloudGen Firewall to the Web Security cloud. During normal operations, all web traffic uses the primary GRE tunnel. In case the primary tunnel goes down, all traffic is routed through the second GRE tunnel, which terminates in a different node. Traffic is redirected through the GRE tunnels using transparent redirect. This allows you to forward web traffic without using source NAT while allowing the Web Security Service to work with and log the original IP address of the client. Forwarding web traffic to the Web Security Service works for both high availability clusters and stand-alone firewalls.
Limitations
- The firewall must use a WAN connection with a static public IP address.
- The forwarding firewall Feature Level must be set to Release 6.2 or higher.
Before You Begin
Contact Barracuda Networks Technical support to receive the GRE tunnel configuration.
Go to CONFIGURATION > Configuration Tree > Box > Network > IP Configuration and verify that the public IP address used for the GRE tunnel is a Shared IP. For more information, see Assigned Services.
Step 1. Configure the Primary GRE Tunnel on the Primary Firewall
Create the GRE tunnel on the primary firewall.
Go to CONFIGURATION > Configuration Tree > Box > Network.
In the left menu, expand Configuration Mode and click Switch to Advanced View.
In the left menu, click IP Tunneling.
Click Lock.
In the Tunnel Configuration table, click + to add an IP tunnel.
Enter a Name.
Click OK. The Tunnel Configuration window opens.
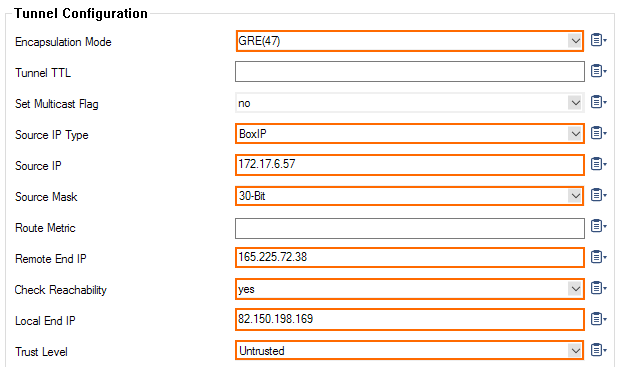
Enter the following for GRE tunnel settings:
- Encapsulation Mode – Select GRE(47).
- Source IP Type – Select BoxIP.
- Source IP – Enter the Primary Internal Router IP assigned by the Web Security Service.
- Source Mask – Select 30-Bit.
- Remote End IP – Enter the Primary Tunnel Destination IP address assigned by the Web Security Service.
- Check Reachability – Select yes.
- Local End IP – Enter the public IP address of the firewall.
- Trust Level – Select Untrusted.
- Click OK.
Click Send Changes and Activate.
Step 2. Configure the Secondary GRE Tunnel on the Primary Firewall
Create the secondary GRE tunnel. Use a higher metric for the secondary GRE tunnel, so that traffic is sent via the primary tunnel by default.
Go to CONFIGURATION > Configuration Tree > Box > Network.
In the left menu, expand Configuration Mode and click Switch to Advanced View .
In the left menu, click IP Tunneling.
Click Lock.
In the Tunnel Configuration table, click + to add an IP tunnel.
Enter a Name.
Click OK. The Tunnel Configuration window opens.
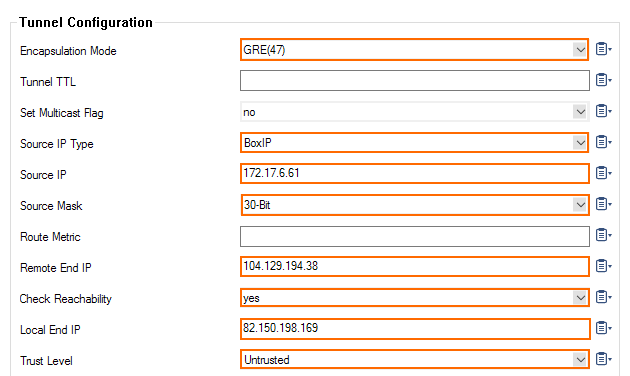
Enter the following for GRE tunnel settings:
- Encapsulation Mode – Select GRE(47).
- Source IP Type – Select BoxIP.
- Source IP – Enter the Secondary Internal Router IP assigned by the Web Security Service.
Source Mask – Select 30-Bit. - Remote End IP – Enter the Secondary Tunnel Destination IP address assigned by the Web Security Service.
- Check Reachability – Select yes.
- Local End IP – Enter the public IP address of the firewall.
- Trust Level – Select Untrusted.
- Click OK.
Click Send Changes and Activate.
Step 3. (High Availability Clusters Only) Configure Identical GRE Tunnels on the Secondary Firewall
Repeat steps 1 and 2 to configure same GRE tunnels on the secondary firewall as well. Since the Local End IP is a box IP address, only the active firewall can send traffic through the GRE tunnels. Traffic can only be sent through the GRE tunnels on the active firewall.
Step 4. Activate the Network Configuration
Go to CONTROL > Box.
In the left menu, expand the Network section and click Activate new network configuration.
Click Failsafe.
The tun1 and tun2 interfaces are now listed with a green status icon on the CONTROL > Network page of the primary and secondary firewalls.

Step 5. Create Transparent Redirect Access Rule for Web Traffic
Create an access rule to send web traffic through the active GRE tunnel.
Go to CONFIGURATION > Configuration Tree > Box > Assigned Services > Firewall > Forwarding Rules.
Click Lock.
Create an access rule to forward selected traffic coming from your clients:
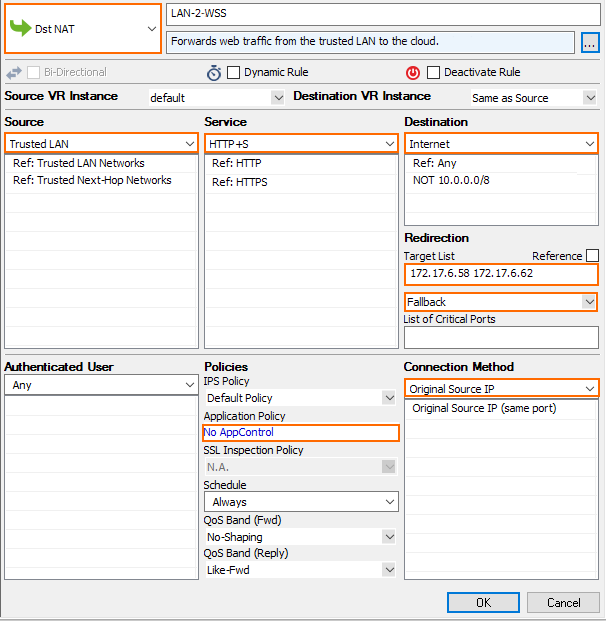
- Action – Select Dst NAT.
- Source – Select Trusted Networks, or select the network object containing the client networks.
Destination – Select Internet.
Service – Select HTTP+S.
Target List – Enter the Primary Internal EN IP and Secondary Internal EN IP separated by a space. E.g.,
172.17.6.58 172.17.6.62- Fallback/Cycle – Select Fallback.
Connection Method – Select Original Source IP.
- Application Policy – Disable Application Control.
In the Miscellaneous section, set Transparent Redirect to Enable.
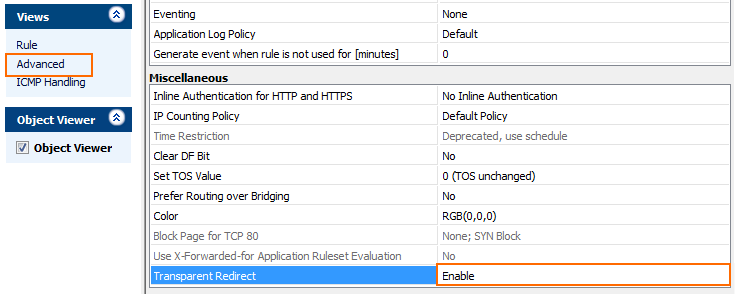
Click OK.
In the ruleset, drag and drop the access rule before all other access rules matching HTTP/HTTPS traffic from the client networks.
Click Send Changes and Activate.
Step 6. Configure the Web Security Service Web URL Filtering Policies
Configure the Web Security Service URL filtering policies in the Web Security cloud.
Sign into the Web Security Service portal.
Go to Policy – URL & Cloud App Control
Under URL Filtering Policy, click on Add URL Filtering Rule
Configure the policy:
- Rule Order – Specify the order of precedence.
- Rule Status – Enabled/Disabled
- URL Categories – Specify the URL categories for filtering.
- HTTP Requests – All or POST
- Users – If this is a user-specific policy, choose the username. Otherwise, select Any to apply the policy to all users.
- Groups – If this is a specific group-based rule, select the group name. Otherwise, select Any to apply the rule to all users and groups.
- Departments – Select any specific department or choose Any.
- Locations – Select any specific location or choose Any.
- Time – Select any specific time or choose Any.
- Action – Select Allow, Caution, or Block based on the policy.
- Daily Bandwidth Quota (MB), Time Quota (min) (optional) – If the Action is set to Allow or Caution, you can specify the bandwidth and time quota.
- Allow Override – Enable to allow specific users or groups access to the blocked site.
- Description – Describe the policy name.
- Click Save.
All HTTP and HTTPS traffic is now sent through the active GRE tunnel to the Web Security Service enforcement point to be processed according to the web filtering rules.

