

Configure dynamic DNS updates for the Barracuda CloudGen Firewall DHCP service. The DDNS update style is evaluated once after reading the dhcpd.conf file, not each time a client is assigned an IP address. As a result, the same DNS update style is used for all clients.
This article provides an overview of configuring the setup described in its title.
At the end of this article, a link to an article shows how to perform a setup based on a specific practical use case.
Before You Begin
Before configuring dynamic DNS, enable advanced pool configuration in the DHCP service setup. For more information, see How to Configure Advanced DHCP Settings.
Make sure that a DNS service is created and configured on your firewall. For more information, see DNS.
Step 1. Configure the DNS Zones
Configure DNS zones for your clients. If a forward and a reverse lookup must be done, a valid zone must be configured where updates are allowed. A reverse zone is not required if only a forward lookup should be done.
For more information, see How to Configure a Zone.
Step 2. Create a DHCP Subnet
Create a DHCP subnet for the clients that should receive DDNS updates. For more information, see How to Configure DHCP Subnets and Address Pools.
Step 3. Create a Parameter Template
Create a DHCP parameter template for the subnet the clients reside in:
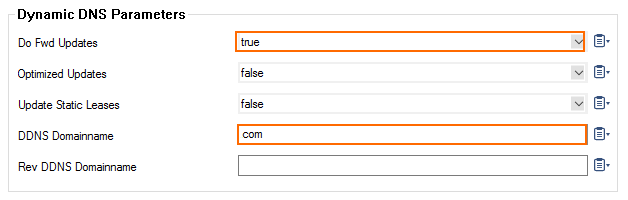
In the Dynamic DNS Parameters settings, set Do Fwd Updates to true.
For dynamic DNS to work, you must also enter the DDNS Domainname.
For more information, see How to Configure DHCP Parameter Templates .
Step 4. Configure Dynamic DNS
Go to CONFIGURATION > Configuration Tree >Box > Assigned Services > DHCP > DHCP Enterprise Configuration .
In the left menu, expand the Configuration Mode section and click Advanced View.
In the left menu, select Dynamic DNS.
Click Lock.
Select whether to use a DNS Update Scheme.
When selecting interim, choose an option from the Client Updates list.
(optional) In the Zone Keys table, click + and add the HMAC-MD5 keys for the DNS zones.
In the DNS Zones table, click + and add the DNS zones.
Specify the Zone Type. You can select:
Forward – (default) The hostname is looked up.
Enter the network of the forward lookup in the Forward Zone Name field.
Reverse – The IP address is looked up.
Enter the network of the reverse lookup in the Reverse Lookup Net/Netmask fields.
Both – IP address and hostname are looked up.
Enter the network of the forward and reverse lookup in the Forward Zone Name and Reverse Lookup Net/Netmask fields.
Enter the DNS Server IP address.
Select the Authentication Key for the zone that was entered in the Zone Keys table.
(optional) Click + and add additional DNS zones.
Click OK.
Click Send Changes and Activate.
To configure DHCP with dynamic DNS based on a specific use case, see Example - How to Configure DHCP with Dynamic DNS.