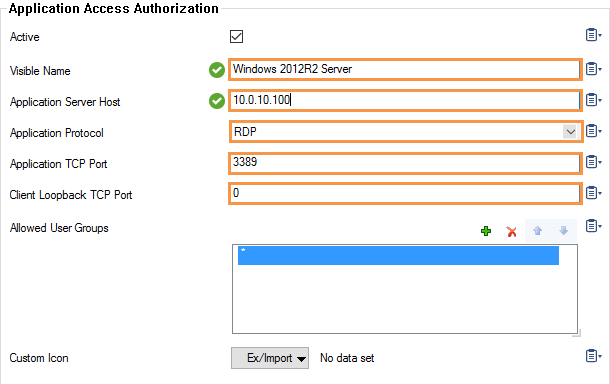
The RDP native app creates an SSL tunnel from a random port on 127.0.0.1 to the port 3389 on the destination Windows server or PC behind the firewall. The native RDP client is automatically launched and supplied with the connection information.
Create a Native App for RDP
- Go to CONFIGURATION > Configuration Tree > Box > Assigned Services > VPN > SSL VPN.
- Click Lock.
- In the left menu, click Native Apps.
- Click + to add a native app.

- Enter the Name.
- Click OK. The Native Apps window opens.
- Enter the Visible Name. This is the name used for this resource in the web portal and CudaLaunch.
- Enter an IP address or hostname of the Application Server Host.
- From the Application Protocol list, select RDP.
- From the Application TCP Port list, select 3389 or click Other to enter a non-standard port.
- (optional) Enter the Client Loopback TCP Port to use a static local port. Enter
0for the SSL VPN service to dynamically assign a port.

- (optional) To restrict access to this native app based on user groups, remove the * and click + to add Allowed User Groups.
- (optional) Click the Ex/Import button to import a Custom Icon.
- (optional) Configure advanced settings for the behavior of Native Apps connections. For more information, see the following Advanced Settings section.
- Click OK.
- Click Send Changes and Activate.
Advanced Settings
With Advanced Configuration Mode enabled, you can configure additional settings for the behavior of native apps connections.
- From the Configuration Mode menu on the left, select Switch to Advanced.
- Configure General connection settings:
- Negotiate Security Layer – Select whether the security level should be negotiated.
- Use Network Level Authentication – Use Credential Security Service Provider (CredSSP) for network-level authentication.
- Automatic Reconnection – If selected, the local computer will automatically try to reconnect if the connection is dropped.
- Configure Display settings:
Screen Size – Customize the screen size according to your requirements. Smart Sizing enables content scaling to fit the local window size.
Display Connection Bar – Enable to display the connection bar in full-screen mode. If Pin Connection Bar is active, the connection bar is pinned to the top of the screen.
Administrative Session – Enable to connect to the administrative session of the remote computer.
Span Monitors – Allows spanning the remote content across multiple monitors.
Multiple Monitors – Configures the remote session monitor layout to be identical to the client configuration.
- In the Local Resources section, determine which resources will be part of a remote session:
- Remote Audio – Configure remote audio settings. Send Local Captured Audio determines how sounds captured on the local computer are handled when you are connected to the remote computer.
- Apply Windows Key Combinations – Apply Windows key combinations (e.g., ALT+TAB).
- Drives to Redirect – Select the local drives/labels to be redirected to the remote connection. Separate entries with a comma.
Redirect component – Redirect local components, Microsoft Point of Service (PoS) for .NET devices, and Plug and Play (PnP) devices to the remote connection.
- In the Experience section, configure aspects that influence bandwidth and user experience:
- Connection Type – Select the connection type.
- Detect Bandwidth/Network – Enable automatic detection of bandwidth and network type.
- Use Compression – Select whether to use compression.
- Use Efficient Multimedia Streaming – Use RDP efficient multimedia streaming for video playback.
- Configure settings for starting Programs and Remote Applications remotely:
Start the Following Program – Define a program to get started on connection.
Start in the Following Folder – Enter the path of the directory the program should be started from.
Launch Remote Application – Select whether a remote application should be launched.
Remote Application Name/Program/Arguments – Enter name, alias/executable name, and o ptional command line parameters for the remote application to launch.
Configure settings for Dynamic Access – To make this resource available only when enabled by super user groups, select the Dynamic App check box.
Allow Enabling/ Enabling with Time/Disabling – Allow super user groups to enable, disable, or time-enable the resource.
Allow Maximum/Minimum Time – Select the check boxes and restrict the maximum and minimum amount of time this resource can be time-enabled for.
Launching an RDP Native App
- Start CudaLaunch on the desktop.
- In the Apps tab, click on the RDP app.

The native RDP client starts automatically and connects to the remote Windows server.
