

Add multiple VPN transports to your TINA site-to-site VPN tunnel to use SD-WAN. The SD-WAN settings in the access rules matching the traffic determine which transport is used.
Before You Begin
Create a TINA site-to-site VPN tunnel between two CloudGen Firewalls. For more information, see How to Create a TINA VPN Tunnel between CloudGen Firewalls.
Step 1. Add a Transport to the VPN Tunnel
Go to CONFIGURATION > Configuration Tree > Box > Assigned Services > VPN Service > Site to Site.
Click Lock.
Right-click an existing TINA VPN tunnel and select Add.
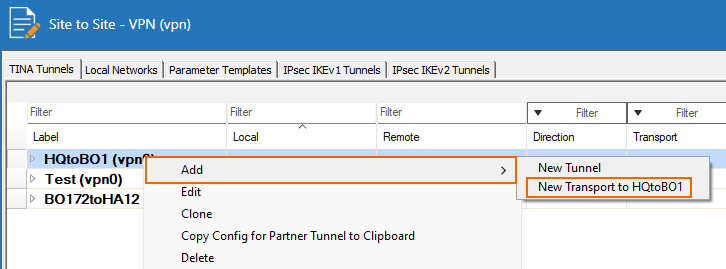
Select Add New Transport. The TINA tunnel transport window opens.
Configure the transport settings for the local firewall. For more information, see TINA Tunnel Settings.
Click OK.
Click Send Changes and Activate.
Step 2. Add the VPN Transport on the Remote Firewall
Duplicate the VPN transport configuration on the remote firewall. For more information, see How to Create a TINA VPN Tunnel between CloudGen Firewalls.
Step 3. Create a Custom Connection Object for the SD-WAN Primary
Create a custom connection object to route traffic into the new VPN transport and configure the firewall as a SD-WAN primary.
Go to CONFIGURATION > Configuration Tree > Box > Assigned Services > Firewall > Forwarding Rules.
In the left menu, click Connections.
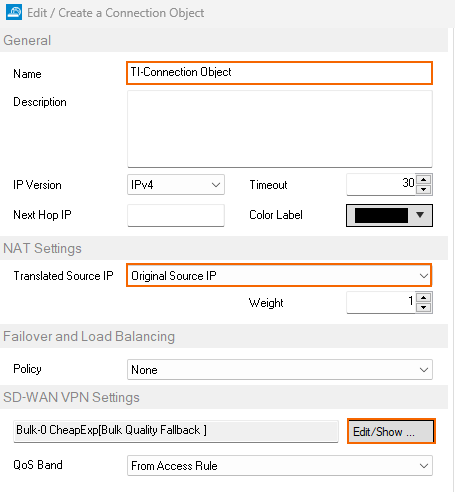
Right-click the table and select New Connection. The Edit/Create a Connection Object window opens.
Enter a Name.
From the Translated Source IP list, select Original Source IP.
Click Edit/Show.
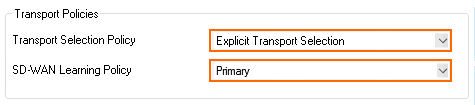
The SD-WAN Settings window opens. From the Transport Selection Policy drop-down list, select Explicit Transport Selection.
From the SD-WAN Learning Policy drop-down list, select Primary.
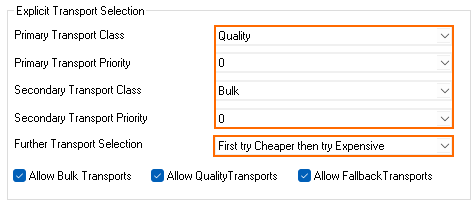
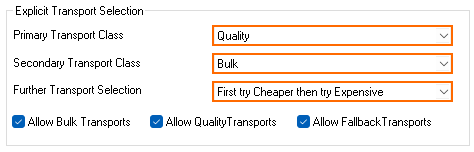
Configure the Explicit SD-WAN Transport Selection policy:
Primary Transport Class – Select the default transport class for the traffic matching this rule.
Primary Transport ID / Priority – Select the default transport ID/priority for the traffic matching this rule.
Secondary Transport Class – Select the backup transport class.
Secondary Transport ID / Priority – Select the backup transport ID/priority.
Further Transport Selection – Select the transports that are used if the primary and secondary VPN transports fail. Depending on the additional available VPN transports, you can define more than one backup path. Select from the following predefined policies:
First try Cheaper then try Expensive
Only try Cheaper
First try Expensive then try Cheaper
Only try Expensive
Stay on Transport (no further tries)
Random Transport Selection - If you use a Policy Profile VPN SD-WAN configuration, and you want to use the automated random selection for already configured transports, you have to activate this feature.
Allow Bulk Transports | Allow Quality Transports | Allow Fallback Transports – Enable all transport classes that can be used as a backup path in combination with the Further Transport Selection setting.
Feature Level 8.x, >=9.0.4 | Feature Level 9.0 through 9.0.3 |
|---|---|
 |  |
(TCP transports only) Configure TCP Transport Traffic Prioritization settings:
When using BULK Transports – The priority level for the bulk transport class.
When using QUALITY Transports – The priority level for the quality transport class.
(Dynamic Mesh only) Configure the Dynamic Mesh settings. For more information, see Dynamic Mesh VPN Networks.
Click OK.
Click OK.
Click Send Changes and Activate.
Step 4. Create a Custom Connection Object for the SD-WAN Secondary
Create a custom connection object to route traffic into the new VPN transport and configure the firewall as a SD-WAN secondary.
Go to CONFIGURATION > Configuration Tree > Box > Assigned Services > Firewall > Forwarding Rules .
In the left menu, click Connections.
Right-click the table and select New Connection. The Edit/Create a Connection Object window opens.
Enter a Name.
From the Translated Source IP list, select Original Source IP.
Click Edit/Show. The SD-WAN Settings window opens.
From the SD-WAN Learning Policy drop-down list, select Secondary. All other SD-WAN settings are learned from the SD-WAN primary.

Click OK.
Click OK.
Click Send Changes and Activate.
Step 3. Edit Access Rules Matching the VPN Traffic
Edit the access rules matching the VPN traffic on both firewalls to use the custom connection objects. If multiple firewalls are connected in a hub and spoke VPN network, the firewall acting as the VPN hub must be the SD-WAN primary. Create multiple access rules and connection objects to statically route VPN traffic through different VPN transports.
For more information, see How to Create Access Rules for Site-to-Site VPN Access.
Next Steps
Configure advanced SD-WAN features such as: