When performing layer 2 bridging, the Barracuda CloudGen Firewall will be completely transparent to the user. The interface is not assigned an IP address and cannot be directly contacted by the user in the bridged networks. Traffic passing through the layer 2 bridge will retain its original MAC address with the bridge acting as a proxy ARP in the middle. Since the bridged network interface does not have an IP address, you will need to use a separate interface to locally administer the Barracuda CloudGen Firewall. You can define multiple bridging groups on one interface. Traffic between the interface groups is forwarded on layer 3. Define a pass and a broad-multicast access rule for each bridge interface group.

Step 1. Configure Transparent Layer 2 Bridging
Go to CONFIGURATION > Configuration Tree > Box > Network.
In the left menu, select Layer 2 Bridging.
Click Lock.
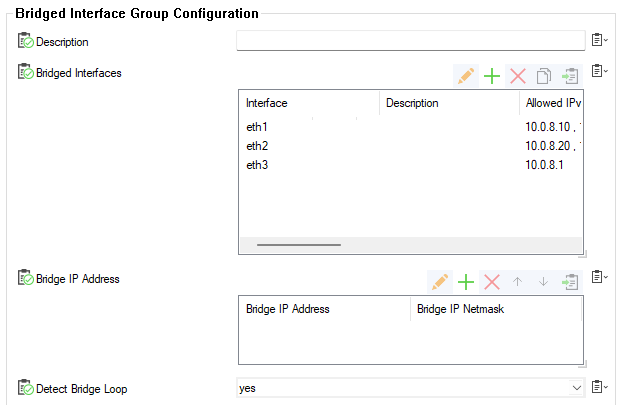
In the Bridged Interface Group table, click + to add an entry. For each interface group, you can edit the following settings:
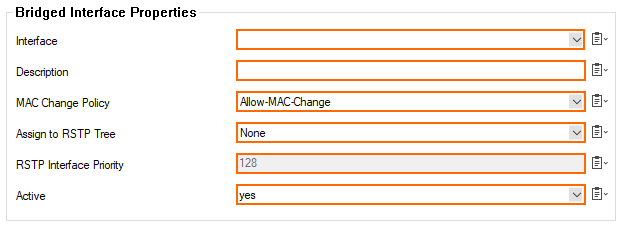
Bridged Interfaces – Add all interfaces to be bridged together in this group. For each interface enter the following settings:
Interface – Select the interface from the list.
Description – Enter an optional description of the interface.
MAC Change Policy – This option controls whether a MAC address that is bound to an IP address may change during an active session. If the policy allows a MAC to change, a previously assigned IP address is subsequently available at a different MAC address.
Allow-MAC-Change – MAC addresses may change during an active session.
Deny-MAC-Change – MAC addresses must not change during an active session.
Assign to RSTP Tree – Assign the interface to an existing RSTP tree by choosing it from the list.
RSTP Interface Priority – Assign a priority to the RSTP interface. This might affect the role the port will play in the calculated topology.
Active – Default is yes. Set to no to disable the setting to leave the interface within the configuration but prevent it from being used.

Detect Bridge Loop – Detect layer 2 loops and disable ARP and broadcast propagation if required. Note that a bridge IP address must be preset for loop detection to work. Default is yes.

RSTP Tree – Add RSTP trees to the bridged interface group so that a subset of its interfaces can be assigned to them.
Click OK.
Click Send Changes and Activate.
Step 2. Create Access Rules for Layer 2 Bridging
To allow network traffic to pass between the bridged interfaces, create a Pass (How to Create a Pass Access Rule) and Broad-Multicast (How to Create a Broad-Multicast Access Rule) access rule for every bridged interface group.
Go to CONFIGURATION > Configuration Tree > Box > Assigned Services > Firewall > Forwarding Rules.
Click Lock.
Create a pass access rule with the following settings:
Action – Select PASS.
Bi–Directional – Yes.
Source – Select Any (0.0.0.0/0)
Service – Select Any
Destination – Select a network object containing all networks or IP addresses for the bridged interfaces. E.g.,
10.0.8.0/24and172.31.1.25Connection Method – Select Original Source IP
Create a Broad–Multicast access rule with the following settings:
Action – Select Broad-Multicast.
Source – Select a network object containing all networks or IP addresses for the bridged interfaces. E.g.,
10.0.8.0/24and172.31.1.25Service – Select Any
Connection Method – Select Original Source IP
Destination – Enter the destination networks/IP addresses. E.g.,
10.0.8.255Propagation List – Enter the propagation interface or IP address(es). For more information, see How to Create a Broad-Multicast Access Rule.
Rearrange the order of the access rules so the new rules can match incoming traffic.
Click Send Changes and Activate.
