The Barracuda CloudGen Firewall offers a default configuration for SD-WAN policies that uses a predefined application database to cover the most common use cases. You can customize default profiles to change the default behavior, or you can create additional explicit policies specifically matching your requirements. In addition, you can add applications to the database using custom applications, which allows you to extend the predefined application database used by both the SD-WAN policies and the application policies. SD-WAN policies are applied to all sites simultaneously and define the behavior of the VPN and non-VPN traffic, such as routing, failover, load balancing, and application prioritization. Fallback links are used only in case of failovers and only for the traffic that is allowed to use fallback links. When used with applications, the matching algorithm works as follows:
- An application is detected. Custom application definitions take precedence over predefined applications. For more information, see Application Policies.
- If there is an SD-WAN Explicit policy for that application, the explicit policy is used.
- Otherwise, the algorithm looks up the SD-WAN category and applies the Quality of Service / intelligent routing defined in the policy.

For information on how to customize default policy profiles, see How to Configure Policy Profiles.
Create an SD-WAN Policy Profile
Create an explicit SD-WAN policy profile to match individual requirements.
- (On the Control Center) Go to CONFIGURATION > Configuration Tree > Multi-Range > Global Settings > Global Firewall Objects/Policies.
- Click Lock.
- In the left menu, expand Policy Profiles.
Select SD-WAN.
- To add a new policy profile, click the plus icon (
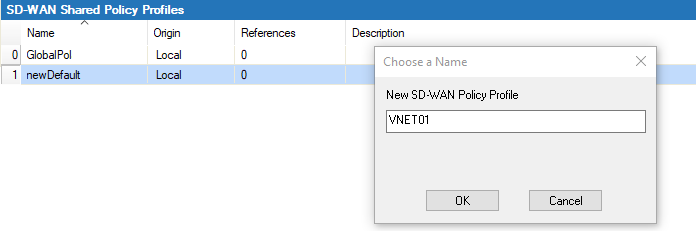
 ) at the top right of the window, enter a profile name, and click OK.
- Click Send Changes and Activate.
The policy profile now appears in the SD-WAN Shared Policy Profiles list, and you can create policies for it.
Create an Explicit SD-WAN Policy
The Barracuda CloudGen Firewall comes with a set of default policies to cover the most common use cases. With explicit policies, since they are used before the default policies, you can change the default behavior or create additional policies specifically matching your requirements.
- (On the Control Center) Go to CONFIGURATION > Configuration Tree > Multi-Range > Global Settings > Global Firewall Objects/Policies.
- (On a CloudGen Firewall) Go to CONFIGURATION > Configuration Tree > Box > Assigned Services > Firewall > Forwarding Rules.
- Click Lock.
- In the left menu, expand Policy Profiles.
Select SD-WAN. The SD-WAN policies window opens.
- (Control Center only) Select the profile you wish to create the policy for. The explicit policy list appears in the lower window.
- (Control Center only) To add a new policy, click the plus icon (
 ) at the top right of the lower window. You can also right-click the list and select Add Policy.
(CloudGen Firewall only) To add a new policy, click the SD-WAN Explicit Policy Profile tab and click the plus icon ( ) at the top right. You can also right-click the list and select Add Policy.
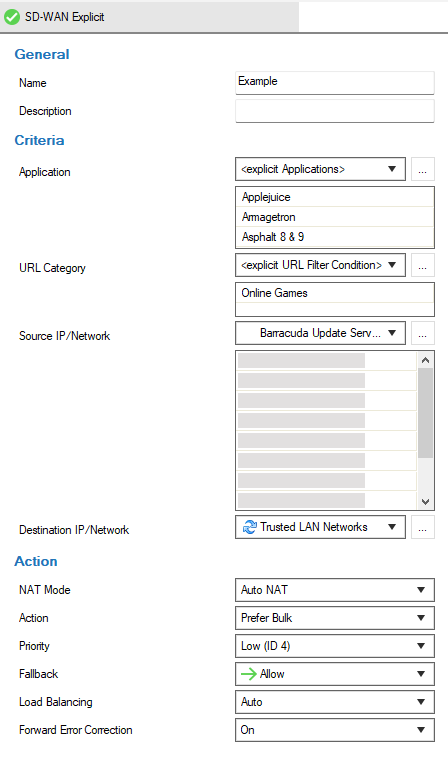
 - Specify values for the following:
- Name – Enter a descriptive name for the explicit policy.
- Description – Enter a description for the policy.
- Application – Select the source application the policy should apply to from the drop-down menu, or define an explicit application by double-clicking the field. Selecting applications in the application editor works similarly to the process in the object configuration for the application rule set. For more information, see How to Create an Application Object and How to Create a Custom Application Object.
- URL Category – Select the URL category the policy should apply to, or define an explicit category by double-clicking the field.
Source / Destination IP / Network – Select the source- and destination IP address and network, or select <Explicit Network> and enter an address or specify a domain that gets resolved to an IP address for the matching.
- NAT Mode – Select the connection method that should be used for the policy.
- Explicit NAT – Define an explicit mode using a connection object.
- Auto NAT – NAT is performed automatically. In order to maintain internal network transparency, destinations from private networks are not translated. Outgoing traffic is translated according to the provider.
- No Source NAT – The original source IP address is used. No NAT is performed.
- Dynamic Source NAT – NAT is enforced, and the bind IP address gets dynamically assigned to the source IP.
- Action – Select an option from the drop-down menu to specify the action to take for the traffic:
- Optimize – Based on the probing data, traffic will use the ISP connection with the best bandwidth/latency depending on what the application needs. When applications with different requirements are in the same category, it falls back to the SLA of the individual application.
- Best Bandwidth – Traffic uses ISP connections with the best bandwidth.
- Best Latency – Traffic uses ISP connections with the best latency.
- Pin to Bulk – Traffic will only use ISP connections assigned to this group and, if configured, the fallback link. There must be at least one WAN connection that is not a WWAN in the provider pinning of Bulk.
- Pin to Quality – Traffic will only use ISP connections assigned to this group and, if configured, the fallback link.
Prefer Bulk/Quality – Traffic uses ISP connections assigned to this group. If no link in the group is available, it will use the other group and then, if configured, the fallback link.
Priority – Select a traffic priority. Use the highest option (real-time) with caution as it can lead to excessive package drops if the traffic oversubscribes your ISP connection. Other options will not oversubscribe your ISP connection.
- Fallback – Select from the drop-down menu if the traffic is allowed to use fallback links. Fallback links are only used in case the assigned uplinks are down.
- Allow – The traffic of this policy is allowed to use the fallback link.
- Block – Traffic of this policy is not allowed to use the fallback link.
- Load Balancing – Select how load balancing should be enabled for this type of traffic:
- Off – No load balancing will be performed.
Auto – Load balancing will be performed between all transports (providers) of the same class (group).
- Forward Error Correction – Select if Forward Error Correction (FEC) should be enabled for this type of traffic. FEC is a method of correcting certain data transmission errors that occur over noisy communication lines, thereby improving data reliability without requiring retransmission.

- Click OK.
- Click Send Changes and Activate.
The policy is now listed as SD-WAN Explicit Policy and can be selected as a Policy in your forwarding rules. For more information, see the last step in How to Configure Policy Profiles.
