

The CloudGen Firewall provides a predefined list of URL categories that are available for block listing and allow listing. The default action of a URL filtering policy can be either to block all URLs and define exceptions that are allowed, to allow all and define exceptions that are blocked, or to let the filter generate logs according to actions performed by users. You can change the default action for all URL policies individually.
For information on how to customize default policy profiles, see How to Configure Policy Profiles.
Create a URL Filtering Policy Profile
Create an explicit URL filtering policy profile to match individual requirements.
- (On the Control Center) Go to CONFIGURATION > Configuration Tree > Multi-Range > Global Settings > Global Firewall Objects/Policies.
- Click Lock.
- In the left menu, expand Policy Profiles.
Select URL Filtering.
- To add a new policy profile, click the plus icon (
 ) at the top right of the window, enter a profile name, and click OK.
- Click Send Changes and Activate.
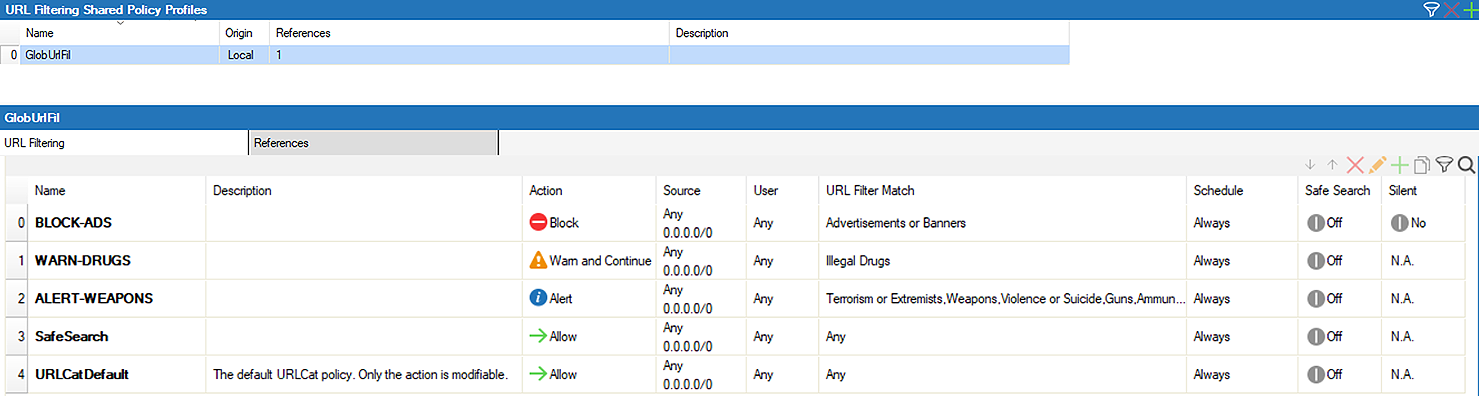
The policy profile now appears in the URL Filtering Shared Policy Profiles list, and you can create policies for it.
Create an Explicit URL Filtering Policy
- (On the Control Center) Go to CONFIGURATION > Configuration Tree > Multi-Range > Global Settings > Global Firewall Objects/Policies.
- (On a CloudGen Firewall) Go to CONFIGURATION > Configuration Tree > Box > Assigned Services > Firewall > Forwarding Rules.
- Click Lock.
- In the left menu, expand Policy Profiles.
Select URL Filtering. The URL filtering policies window opens.
- (Control Center only) Select the profile you wish to create the policy for. The explicit policy list appears in the lower window.
- (Control Center only) To add a new policy, click the plus icon () at the top right of the lower window. You can also right-click the list and select Add Policy.
(CloudGen Firewall only) To add a new policy, click the plus icon () at the top right. You can also right-click the list and select Add Policy. - Specify values for the following:
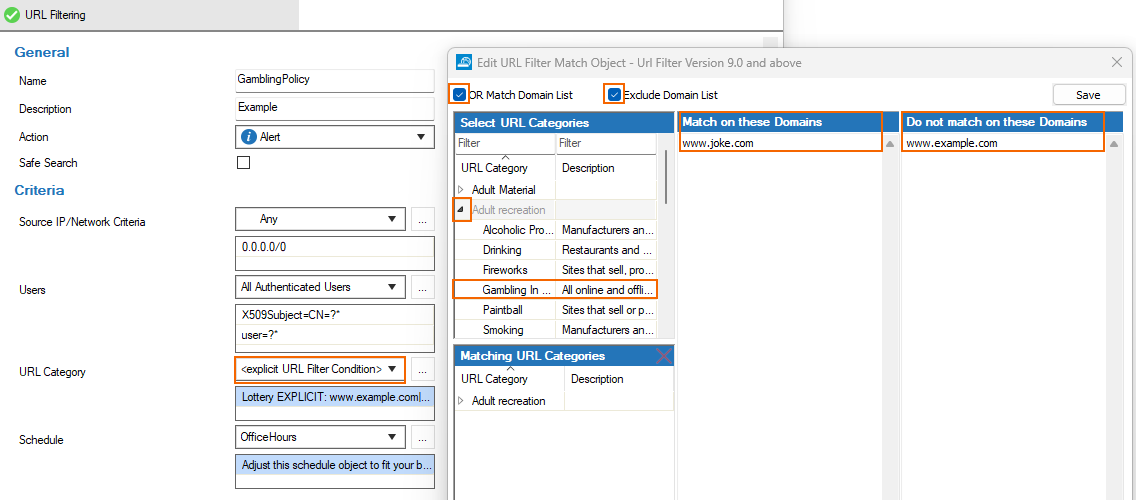
- Name – Enter a descriptive name for the URL filtering policy.
- Description – Enter a description.
- Action – Select one of the following actions:
- Allow – The CloudGen Firewall allows all URLs by default. Only URLs defined as exceptions will get blocked.
- Block – The user is blocked from viewing the website and is redirected to the customizable URL filter block page. For more information, see How to Configure Custom Block Pages and Texts.
Warn and Continue – Allows access to the URL. However, a warning page is shown. When a user clicks Continue in the browser, an entry is generated in the Box/Firewall/Acknowledged and Box/Firewall/Alerted log. The warning page is customizable. For more information, see How to Configure Custom Block Pages and Texts.
- Alert – Visiting a website in this category is silently logged. Go to FIREWALL > Monitor, Filter Settings and activate the filter for 'Warned' to see the logged alerts.
- Override – Allows the user to request temporary access from an admin. Upon receiving the request, the override admin must log into the override admin interface to grant access for a specific amount of time to this otherwise blocked URL category. The admin can only grant overrides for the URL category, not for specific websites. For information on how to grant URL filter overrides, see URL Filtering in the Firewall.
Safe Search – Enable this check box to enforce Safe Search in browsers for the search engines Google, Yahoo, Bing, YouTube, and DuckDuckGo.
Silent – When selecting Block as the action, push notifications are generated whenever the policy applies. To avoid recurring pop-up windows, select the check box.
- Source IP/Network Criteria – Select the source and destination network, or select <Explicit Network> and enter an IP address/network or a domain that gets resolved to an IP address for the matching.
- URL Category – Choose the categories you want to allow or block:
- For common malware, select Default.
- For individual categories:
- Select explicit URL Filter Condition.
- Either search or filter for the URL categories that you want to include in the object.
- Add the URL categories or subcategories (expand a category for a list) you wish to include in the object by clicking + next to an entry. The selected item appears in the lower section of the Edit URL Filter Match Object window.
- To add an explicit URL, select OR Match Domain List.
To exclude an explicit URL, select Exclude Domain List.
- Schedule – Set a time schedule for the policy to apply. For more information, see Schedule Objects.
- Click OK.
- Click Send Changes and Activate.
The policy is now listed in the lower window and can be selected as Policy in your forwarding rules. For more information, see the last step in How to Configure Policy Profiles.