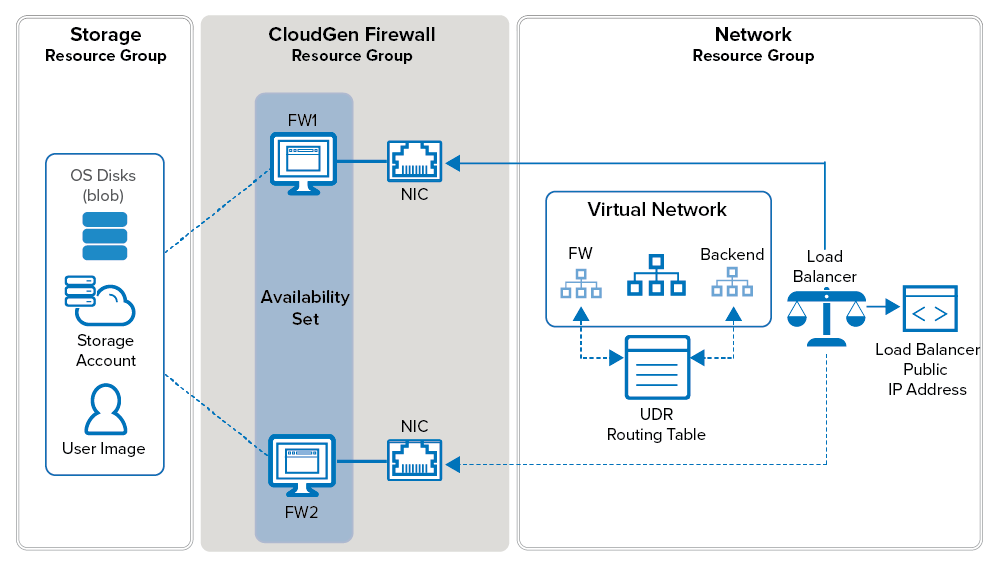
Configure a high availability cluster to ensure that the services running on the Barracuda CloudGen Firewall VMs are always available even if one unit is unavailable due to maintenance or a hardware issue. To be able to configure an HA cluster, both firewalls VMs must be deployed to the same subnet and be placed in an Availability Set. This ensures that the VMs are placed in different fault and update domains inside the Azure datacenter. Incoming connections are forwarded to the active firewall by the Azure Load balancer. The load balancer actively monitors the services on the firewall and, when an HA failover takes place, redirects the traffic to the other, now-active firewall. You must create load balancer rules and health probes for each service for the load balancer to know which ports to forward and how to monitor them. The load balancer does not failover immediately after the firewall service has failed over, since it requires at least two probes to fail before reacting. Combined with the minimum poll time of 5 seconds, this means that failover will take at least 10 seconds during which no traffic can be forwarded.
The existing session will time out after a failover since Azure does not support floating IP addresses; the connection to the backend server VMs will thus use a different source IP address. The backend VMs are configured to use the firewall as the default gateway and, if needed, access control between the backend subnets using Azure User Defined Routing. Because only one IP address can be configured as the destination, the CloudGen Firewall connects to the Azure fabric and rewrites the route table to use the now-active firewall instead of the failed firewall VM. Now, the backend VMs can connect via the active firewall to the Internet.
Before You Begin
- Install Azure PowerShell 3.5.0 or higher.
Step 1. Deploy Two CloudGen Firewall VMs
To configure an HA cluster, deploy two CloudGen VMs. The Public IPs attached to the NICs are removed after configuring client-to-site VPN access via the load balancer. To be able to use them in an HA cluster, the deployment must meet the following requirements:
- Single Network Interfaces must be used.
- Both VMs must be in the same subnet of the virtual network.
- Both VMs must be in the same subnet.
- Static private (internal) IP addresses must be used.
- The same instance size for both VMs must be used.
- Both firewalls require the same Barracuda CloudGen Firewall for Azure model.
- Both VMs must be deployed in one Availability Set.
For more information, see How to Deploy a CloudGen Firewall from the Microsoft Azure Marketplace or How to Deploy a CloudGen Firewall in Microsoft Azure Using PowerShell and ARM.
Step 2. Change the Firewall Network Configuration to Use the Static Private IP Addresses
On both firewall VMs, change the network configuration to use a static network interface. Use the static private IP address you assigned to the NIC during deployment.
Step 2.1 Reconfigure the Network Interface
Change the network interface type from dynamic to static.
- Go to CONFIGURATION > Configuration Tree > Box > Network.
- In the left menu, click on xDSL/DHCP.
- Click Lock.
- Delete the DHCP01 entry in the DHCP Links list.
- Expand the DHCP Enabled drop-down list and select No.
- Click Send Changes.
- In the left menu, click IP Configuration.
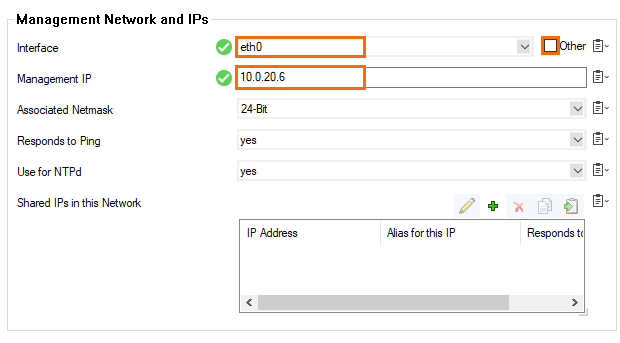
- Go to the Management Network and IPs section and clear the Other check box in the Interface line.
- Select eth0 from the Interface list.
- Enter the static internal IP address from Step 1 as the Management IP (MIP). E.g.,
10.0.20.6
Step 2.2 Create the Default Route
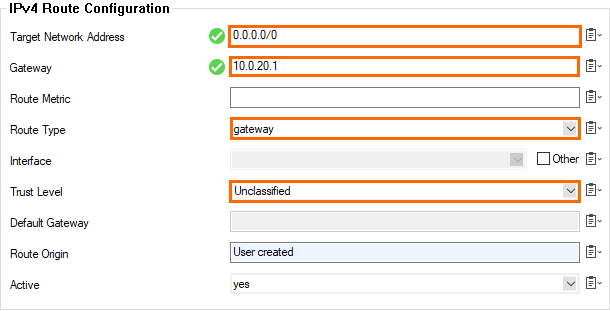
Add the default route. The default gateway in Azure subnets is always the first IP in the subnet. E.g., 10.0.20.1 if the subnet is 10.0.20.0/24.
- In the left menu, click Advanced Routing.
- Click + in the IPv4 Routing Table and configure the following settings:
- Target Network Address – Enter
0.0.0.0/0 - Gateway – Enter the first IP address of the subnet the firewalls reside in. E.g.,
10.0.20.1if the IP addresses of the firewalls are 10.0.20.6 and 10.0.20.7. - Route Type – Select gateway.
- Trust Level – Select Unclassified.
- Target Network Address – Enter
- Click OK.
- Click Send Changes and Activate.
Step 2.3 Disable ICMP Monitoring of the Gateway
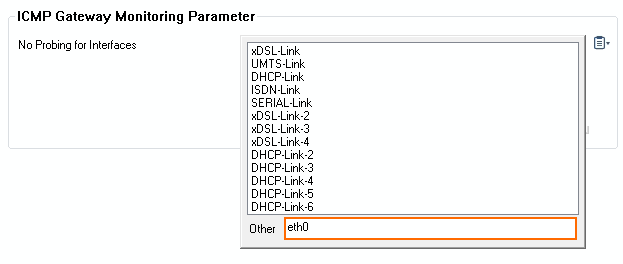
ICMP probing must be disabled for the interface.
- Go to CONFIGURATION > Configuration Tree > Infrastructure Services > Control.
- Click Lock.
- In the ICMP Gateway Monitoring Parameter section click + to add an entry to the No Probing for Interface table.

- In the Other field, enter
eth0.
- Click Send Changes and Activate.
Step 2.4 Activate the Network Changes
Activate the changes to the network configuration.
- Go to CONTROL > Box.
- In the Network section of the left menu, click Activate new network configuration.
- Click Activate Now.
Open the CONTROL > Network page. Your interface and IP address are now static.
Step 3. (PAYG only) Import PAYG Licenses from the Secondary Firewall
Step 3.1 Export the PAYG license from the secondary firewall
- Log into the secondary firewall.
- Go to CONFIGURATION > Configuration Tree > Box > Licenses.
- Click Lock.
- Select the license file, click the export icon, and select Export to File.
- Click Unlock.
Step 3.2 Import the PAYG License on the Primary Firewall
- Log into the primary firewall.
- Go to CONFIGURATION > Configuration Tree > Box > Licenses.
- Click Lock.
- Click + and select Import from File.
- Select the license file exported from the secondary firewall.
The primary firewall now has both PAYG licenses listed in the Licenses list.
Step 4. Configure a HA Cluster on the CloudGen Firewall VMs
Configure the two firewalls to synchronize session and configuration information. Because Azure does not support floating IP addresses, you must configure all assigned services to listen on a loopback address (127.0.0.X). Use Application Redirect access rules to redirect incoming traffic from the eth0 interface to the services. Use the the internal IP address of the primary and secondary firewall as the destination of the rule to ensure that it matches without regard to which firewall VM the service is currently running on.
For more information, see How to Set Up a High Availability Cluster.
Step 5. (BYOL only) Activate and License the two Firewall VMs
Activate the license on the secondary firewall then on the primary firewall. If the primary unit is activated prior to the secondary unit the licenses for the secondary can not be downloaded. In this case reboot the primary firewall and perform a complete manual HA sync and update to download and install the licenses correctly.
For more information, see How to Activate and License a Standalone High Availability Cluster.
Step 6. Configure the Azure Load Balancer
Install an Azure Load Balancer to monitor and forward incoming traffic to the active firewall. You must add a load balancer rule for each service with at least one health probe. This determines how the health of the service is checked. Load balancer rules are required for the following services:
- TINA VPN on TCP or UDP 691 – If both TCP and UDP are required you must map one protocol to a different internal port such as 693 and then use an Application redirect rule to forward the traffic to the VPN service on port 691. Probe for TCP on port 691.
- SSH on TCP 22 – This load balancer rule will allow to connect to the active firewall with ssh. The secondary firewall can be accessed via the active firewall.
For more information, see How to Configure Azure Load Balancer for HA Clusters using PowerShell and ARM.
Step 7. Configure User Defined Routing in Azure
Configure UDR for the backend VMs to use the firewall as their default gateways for all connections to the Internet and/or between backend subnets.
For more information, see How to Configure Azure Cloud Integration Using ARM.
Step 8. Configure HA UDR on the CloudGen Firewall VMs
Configure both the primary and secondary firewalls to update the UDR routing table. In case of a failover, an update to the Azure Route table is triggered so that all backend VMs using the HA cluster as a gateway use the active firewall.
For more information, see How to Configure Azure Cloud Integration Using ARM.
Step 9. Configure a Client-to-Site VPN for Management Access
Configure a TINA client-to-site VPN that will be used for management access. Connect via the load balancer public IP address.
For more information, see How to Configure a Client-to-Site VPN Group Policy or How to Configure a Client-to-Site TINA VPN with Personal Licenses.
Step 10. Disassociate the Public IP Addresses
When both a load balancer and a public IP are available for the firewall VM the public IP is used as the default source IP address for the VM. This would mean that outgoing connections would use different source IP addresses depending on which firewall is active.
Using the Azure Web Portal
For each firewall VM remove the Public IP address from the network interface.
- Go to https://portal.azure.com.
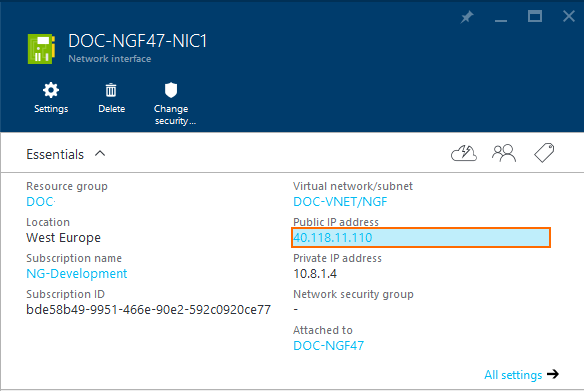
- Locate the Network Interface attached to your primary firewall VM.
- Click on the Public IP Address. The Public IP address column opens.
- Click Disassociate.
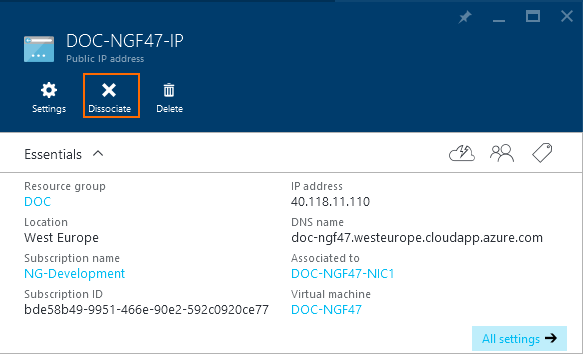
- Repeat for the secondary firewall VM.
Use a client-to-site VPN connection to manage both Barracuda CloudGen Firewall VMs via the internal IP addresses. For more information, see Client-to-Site VPN.
Go to CONTROL > Network > Azure UDR and verify that all routes using the firewall VM are green.

