The Sessions page lets you view a list of active sessions on the Barracuda CloudGen Firewall. To access the Sessions page, open the CONTROL tab and click the Sessions icon in the ribbon bar.


Information Display
The information display shows session details on processes that have been initiated by users.

Information for each session is divided into the following columns:
- PID – The process ID (PID).
- Type – The service type. (The type of service is also indicated by an icon next to the PID.)
- Service – The service name.
- Peer – The IP address where the session started from.
- Start – The time period that has passed since the session started.
- Idle – The length of time that the session has been idle.
- Admin – The name of the administrative account that has logged into the session.
To terminate a session in this list, right-click it and select Kill Session.
Order of Sessions
By default, sessions are displayed in ascending order according to the time they were initiated. This is indicated by the blue highlighted category label. The small triangle indicates the sort order of the displayed table entries, which can be either ascending or descending.
To change the sort order, click on the corresponding label of a table category.
Reordering Columns in the Session Table
To reorder the columns in the process table, drag and drop the column header to your desired position.
Customizing Categories in the Session Table
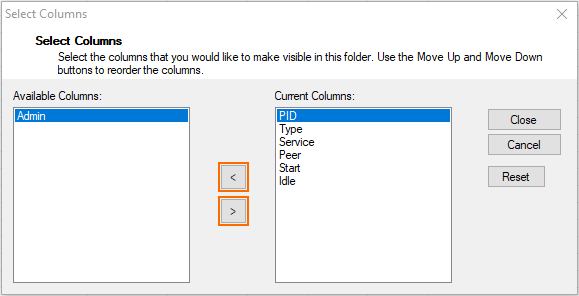
You can customize the categories of the columns shown in the Session table.
To specify the information category of your choice:
- Right-click inside the display area of the Session table.
- In the pop-up menu, click on Select Columns....
- From the Available Columns table, select the category that you want to be displayed in the table.
- Click on the > button to move the information field from the column Available Columns to the Current Columns. Entries in the table Current Columns will be displayed in the list order. Click on < to remove the category from the values to be displayed.
- To apply the changes, click Close.

