

RSA-ACE is a commonly used two-factor authentication method for the authentication of network and VPN users. When authenticating with an RSA-ACE server, users can sign in with the username and password, consisting of PIN and RSA SecurID provided by a token.
Before You Begin
- RSA-ACE does not provide group information. To create groups, follow the instructions given in How to Configure Explicit Groups.
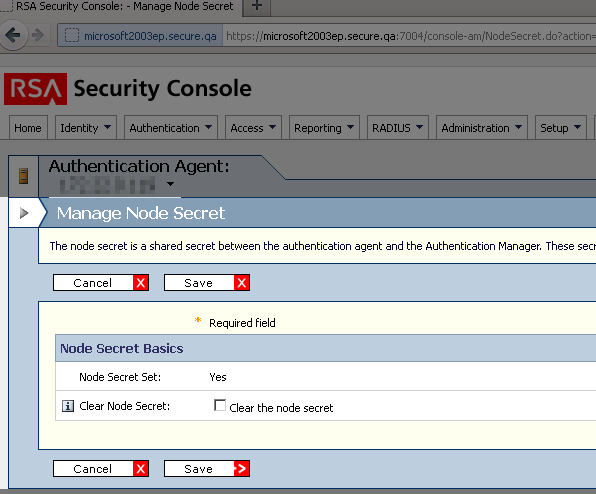
- For authentication against the Barracuda CloudGen Firewall using an RSA-ACE authentication server, verify that the Clear Node Secret is properly set:
Step 1. Configure the RSA-ACE Server
Before configuring RSA-ACE authentication, you must prepare the RSA-ACE server.
Create an Agent Host and add the users who want to authenticate over the Barracuda CloudGen Firewall.
- Encryption – Select DES.
- Type – Select Unix Agent.
Click Assign Acting Server.
- Export the configuration to insert it in the RSA-ACE Authentication configuration as explained in Step 2.
Step 2. Configure RSA-ACE Authentication
- Go to CONFIGURATION > Configuration Tree > Box > Infrastructure Services > Authentication Service.
- In the left navigation pane, select RSA-ACE Authentication.
- Click Lock.
- For Activate Scheme, select Yes from the menu list.
- In the Basic section, click +.
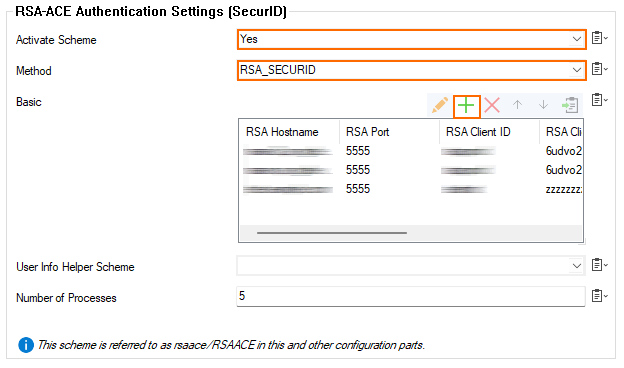
- The Basic - AUTO-KEY26662 window opens.
For RSA Hostname, enter the hostname of the RSA server.
For RSA Authentication Agent, enter the authentication agent hostname as configured with the RSA authentication manager.
- For RSA Client Key, enter the client key of the RSA authentication manager.
- The checkboxes for Verify RSA certificate's name, Verify RSA SSL peer, and Verify RSA SSL certificate status are preset by default. You can modify the status depending on your individual requirements.
- Click OK.
- If group information is queried from a different authentication scheme, select the scheme from the User Info Helper Scheme list.
- Click Send Changes and Activate.
RSA-ACE SecurID Authentication Through the Remote Management Tunnel
To allow remote CloudGen Firewalls to connect to the authentication server through the remote management tunnel, you must activate the outbound BOX-AUTH-MGMT-NAT Host Firewall rule. By default, this rule is disabled.