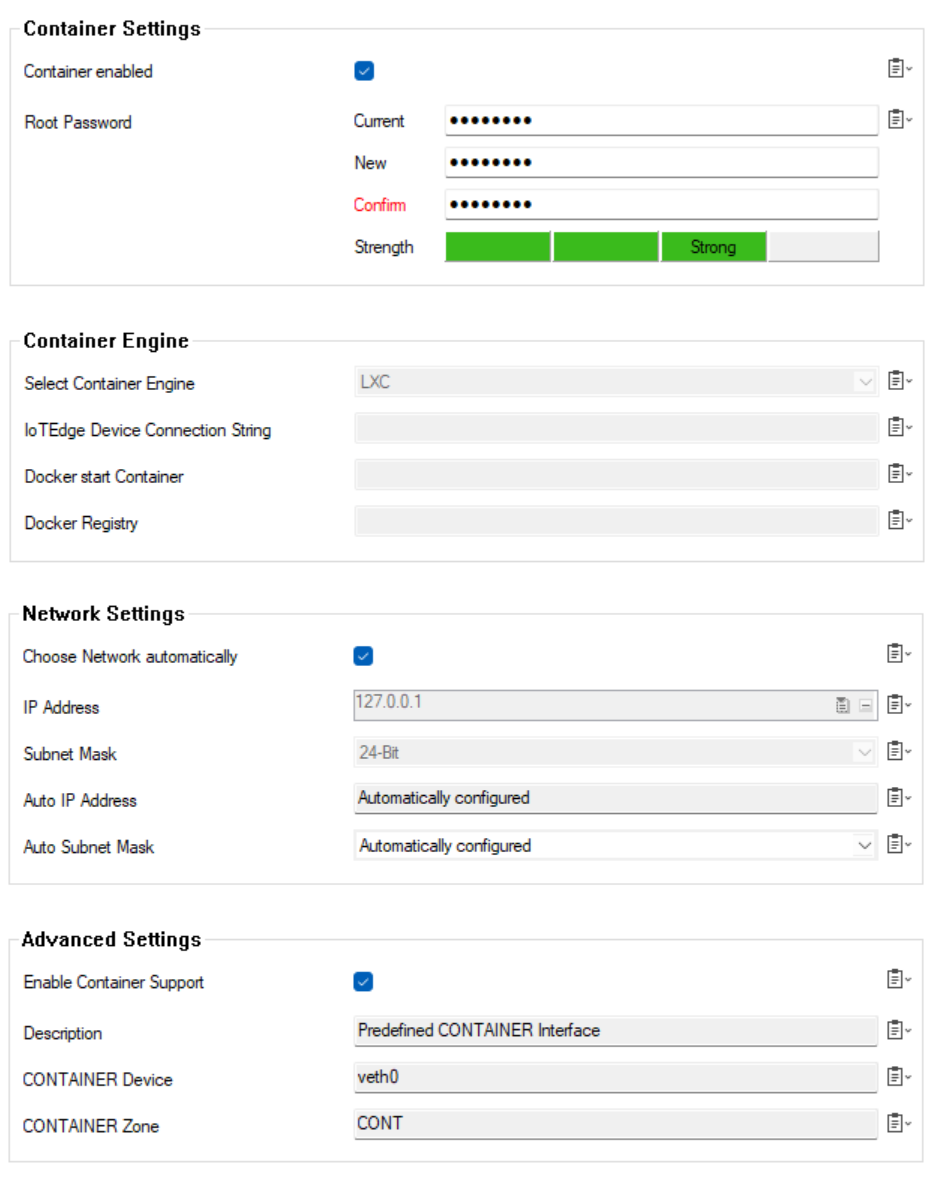
The Secure Connector running firmware 1.1.0 or higher can now run a single LXC container. Linux containers must be enabled in the Secure Connector configuration. The container is assigned an IP address from the data network defined on the Firewall Control Center.
The container is distributed and installed via the firmware update page on the Control Center. The container is transferred and then unpacked on the Secure Connector. All deb packages are installed, and the doit script is executed during deployment. The /root/start.sh script is executed every time the Secure Connector is started. To allow SSH access, a Secure Connector firewall management rule must be added to allow traffic into the container zone.
Resource Limits for Containers
- 1 CPU core
- 512 MB RAM
- 2 GB Storage
Container Requirements
Each container must be in a .tgz archive. The file name must include the string container. E.g, my_container.tgz or my_container_v01.tgz
- deb packages – The deb packages must be compiled for ARM-HF.
- doit – This script is executed during the installation.
- /root/start.sh – This script is executed every time the Secure Connector boots and after the installation of the container.
Enable Container Support
- Go to your cluster > Cluster Settings > Secure Connector Editor.
- Click Lock.
- Double-click to edit the device or Secure Connector template.
- In the left menu, click Container Settings.
Select the Container enabled check box.
- Enter the Root Password for container support on the Secure Connector.

Click OK.
Click Activate.
Create a Firewall Rule
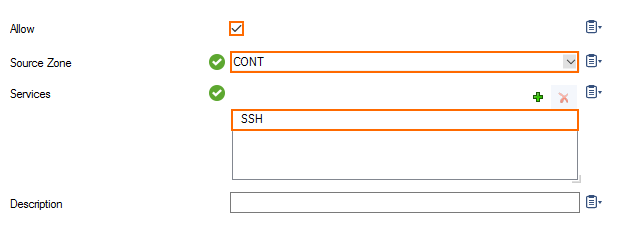
Add a Secure Connector firewall management rule to allow SSH access into the container zone. Configure the rule with the following settings:
- Allow – Select the check box.
- Source Zone – Select CONT. This is the zone associated with the container.
- Services – Select SSH.

For more information, see How to Create Secure Connector Firewall Management Rules.
Example for LXC Container
This is a simple example for a container installation script. The image itself is already provisioned on the Secure Connector. The script will install the application. Additional required binaries can be added to the *.tgz package.
wget_container.tgz
doit script:
#!/bin/bash
echo $(date) "doit script executed" >> /home/InstallContainer.log
echo $(date) "Running u Update and upgrade" >> /home/InstallContainer.log
apt-get update -y && apt-get upgrade -y>> /home/InstallContainer.log
echo $(date) "Installing packeges....." >> /home/InstallContainer.log
apt-get install wget -y >> /home/InstallContainer.log
if [ "$?" -eq "0" ]
then
        echo $(date) "wget installed!" >> /home/InstallContainer.log
else
        echo $(date) "wget installation failed!" >> /home/InstallContainer.log
        exit 1
fi
echo $(date) "Copy start script and make it executable" >> /home/InstallContainer.log
cp start.sh /root/start.sh && chmod +x /root/start.sh >> /home/InstallContainer.log
if [ "$?" -eq "0" ]
then
        echo $(date) "Installation completed successfully !" >> /home/InstallContainer.log
        echo  "=======doit script finished======" >> /home/InstallContainer.log
        exit 0
else
        echo $(date) "Adding start.sh failed – please configure manually" >> /home/InstallContainer.log
        echo  "=======doit script finished======" >> /home/InstallContainer.log
        exit 1
fi
start.sh script:
#!/bin/bash
while :
do
        wget barracuda.com -O
        sleep 60
done
Create a *.tgz archive including doit, start.sh as well as other binaries if applicable for the installation. The archive must include “container” in the archive name. For example: <Name>_container.tgz
tar -cvzf wget_container.tgz doit start.sh Install a Container via Firmware Update in Barracuda Firewall Admin
Containers are installed just like Secure Connector firmware updates. Copy the container .tgz file to the Control Center and distribute it just like a firmware update. When the archive is on the Secure Connector, the deb packages are installed and the installation scripts executed.
For more information, see Secure Connector Firmware Updates.
