

You may encounter situations where devices are not appearing WMI enabled in the Service Center. The following Knowledge Base is written with the intent of following through each process until WMI comes back enabled or, in the worst-case scenario, WMI repository is possibly corrupted and needs to be repaired.
Configuring your Environment / Devices for Onsite Manager managed devices
- For Domain-tied devices, ensure you are using the Domain Configuration Guide in the latest version of the Barracuda RMM documentation.
- For devices that are not Domain tied:
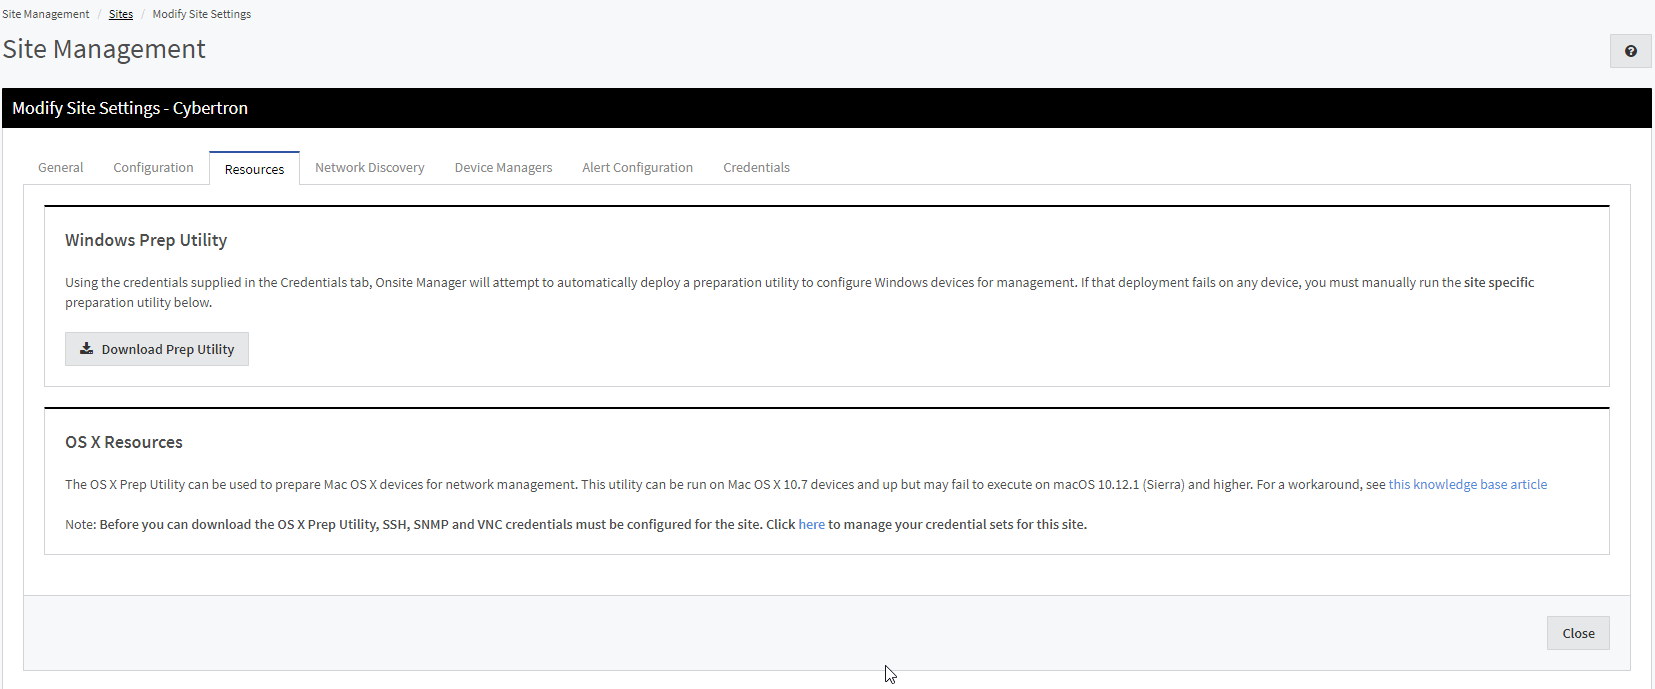
- In your Service Center click Site Management.
- Select Sites.
- Select the Site in question.
- Select the Resources tab.
- Download the Windows Prep Utility as below.
- Run the Prep Utility on the Device(s).
- An Onsite Manager attempts to run this automatically and silently, but sometimes you may have to do this manually.
Credentials Causing the Issue
Another strong possibility for WMI not showing enabled broad spectrum on a site is that the Credential (be that MWService account or a Credential Override) has an incorrect password for a variety of reasons. To remedy this, do the following:
- Determine if you are using the MWService Account or a Credential Override:
- In your Service Center click Site Management.
- Select Sites.
- Select the Site in question.
- Select the Credentials tab.
- For devices that are not Domain tied, skip to step 3. For Domain-tied devices:
- Login to your Active Directory.
- Change the password for the Service Account as listed above.
- For devices that are not Domain-tied:
- Log in to each device.
- Setup or change the Service Account as listed above and the password.
- Run Configure Onsite Manager utility.
- On the Onsite Manager, select Start.
- Type
Configure Onsite Manageror locate the Level Platforms folder and select the utility. - Run the configuration with the corrected Service Account name/password.
Possible WMI Repository Corruption
After following the above steps, a Windows device still will not appear as WMI enabled in Service Center, even when monitored by a Device Manager instead of an Onsite Manager. In these cases, there is likely some corruption of the WMI repository on the device which must be repaired. When this is true, no monitoring tools can query WMI information, including those that are included with the operating system itself.
WMI is a core component of all modern Windows operating systems, and issues with the component will eventually surface as problems with other features or applications. Using Microsoft tools you can demonstrate to end clients that the issue is with the operating system and take corrective action.
In these cases, Barracuda RMM has actually discovered an issue on the network from the very first scan.
Using wbemtest.exe
This tool is included with all modern versions of Windows that contain a full implementation of Windows Management Instrumentation. When monitoring using an Onsite Manager, you will start by running the test from the Onsite Manager server to the managed device. If the results are unsuccessful, or when you are using a Device Manager for monitoring, you will have to run the test locally on the managed device.
To run the test from the Onsite Manager
- Log in to the Service Center.
- Navigate to Site Management.
- Click Sites.
- Click the Site Name.
- Click Credentials.
- Make note of the Windows account. You will use the same account for your testing to duplicate exactly what Onsite Manager is doing. If there are multiple, use the default or the overridden entry for the device.
- From the Onsite Manager application server:
- Click Start.
- Select Run.
- Type
WBEMTEST. - Click OK.
The Windows Management Instrumentation Tester opens.
Click Connect and configure with the following settings:
Namespace: \\[MACHINE NAME or IP ADDRESS]\root\cimv2
User: Type the username collected in step 1e above.
Password: Type the password for the username collected in step 1e above.
Impersonation Level: Impersonate
Authentication Level: Packet
How to interpret empty password: Null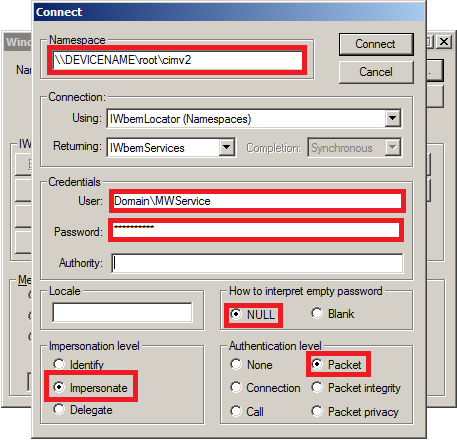
- Click Connect. You are returned to the main page with your configuration in place.
- Click Query, enter the following, then click Apply:
SELECT * FROM Win32_ComputerSystem
The query must be successful in both asynchronous and semi-synchronous methods. Devices will show up as WMI?enabled when the query is successful in semi-synchronous mode, but asset collection will not occur unless the query also succeeds in asynchronous mode.
If you get any other kind of result or are unable to run the query at all, this means that there is an issue with the operating system on the managed device. Very likely, the WMI repository is corrupted.
When you are unable to successfully query WMI devices from the Onsite Manager, and you have confirmed the account being used has the required privilege (Domain Admin, Enterprise Admin), you can try the same process locally to determine if the cause is a corruption of WMI.
To run the test locally
- From the Onsite Manager application server, click Start > Run and enter
wbemtest. Click OK.
The Windows Management Instrumentation Tester opens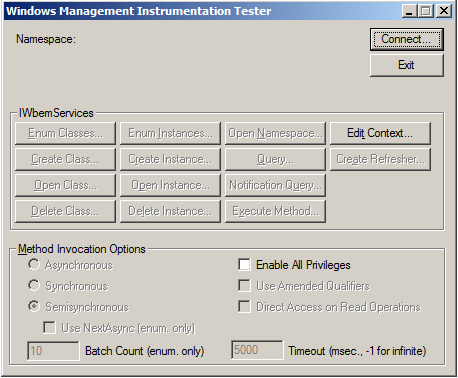
- Click Connect and configure with the following settings:
Namespace: \root\cimv2
Impersonation Level: Impersonate
Authentication Level: Packet
How to interpret empty password: Null - Click Connect.
You are returned to the main page with your configuration in place. - Click Query, type the following, and click Apply:
SELECT * FROM Win32_ComputerSystem
The query must be successful in both asynchronous and semi-synchronous methods. Devices will show up as WMI enabled when the query is successful in semi-synchronous mode, but asset collection will not occur unless the query also succeeds in asynchronous mode.
If you get any other kind of result or are unable to run the query at all, this means that there is an issue with the operating system on the managed device. Very likely, the WMI repository is corrupted.
Using WMI Diagnostics
This tool runs various tests against the WMI repository on the local device and creates three log files with the results in the Windows temporary directory (%Temp%). The names of the files contain the machine name and date/time when the script was executed, so will vary from what you see below:
- WMIDIAG?V2.0_2003_.SRV.RTM.32_TRODNEY?DT_2011.07.09_17.38.21.LOG
- WMIDIAG?V2.0_2003_.SRV.RTM.32_TRODNEY?DT_2011.07.09_17.38.21?REPORT.TXT
- WMIDIAG?V2.0_2003_.SRV.RTM.32_TRODNEY?DT_2011.07.09_17.38.21?STATISTICS.CSV
The log file is fairly easy to interpret as it is presented in plain language. You may see indicators of corrupt WMI as messages such as:
- ..218 17:38:24 (2) !! WARNING: WMI System file 'C:\WINDOWS\SYSTEM32\WBEM\IISWMI.DLL' is MISSING or is access DENIED but it is an OPTIONAL component.
- ..331 17:38:27 (1) !! ERROR: Unable to access or find file 'C:\WINDOWS\MICROSOFT.NET\FRAMEWORK\V3.5\MOF\SERVICEMODEL35.MOF' listed in 'Autorecover MOFs'.
Generally, you want to examine all WARNING and ERRORS. For more detailed information on interpreting the results, please refer to the official Microsoft documentation on the WMI Diagnosis Utility or refer to the WMIDiag.doc included with the download.